說到移動設備,裡面的多媒體資源想必是很多人的興趣所在,多媒體資源一般包括視頻、音頻和圖片等。本節主要講Android開發中訪問和操作音頻與視頻的方法。
Android為音頻和視頻操作分別提供了MediaPlayer類和MediaRecorder類這兩個工具類,本文就為大家演示如何使用這兩個類操作音頻和視頻。
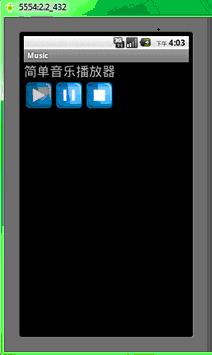
一、簡單音樂播放器
1、新建一個項目Lesson28_Music,主Activity的名字是MainMusic.java。
2、拷貝以下這幾張圖片到res/drawable目錄下,並建立3個xml文件,拷貝love.mp3到res/raw文件中。


play.xml:
XML/HTML代碼
- <?xml version="1.0" encoding="utf-8"?>
- <SELECTOR xmlns:android="http://schemas.android.com/apk/res/android">
- <ITEM android:state_enabled="false" android:drawable="@drawable/play_disable" /> <!-- state_enabled=false -->
- <ITEM android:drawable="@drawable/play_50" /> <!-- default -->
- </SELECTOR>
pause.xml:
XML/HTML代碼
- <?xml version="1.0" encoding="utf-8"?>
- <SELECTOR xmlns:android="http://schemas.android.com/apk/res/android">
- <ITEM android:state_enabled="false" android:drawable="@drawable/pause_disable" /> <!-- state_enabled=false -->
- <ITEM android:drawable="@drawable/pause_50" /> <!-- default -->
- </SELECTOR>
stop.xml:
XML/HTML代碼
- <?xml version="1.0" encoding="utf-8"?>
- <SELECTOR xmlns:android="http://schemas.android.com/apk/res/android">
- <ITEM android:state_enabled="false" android:drawable="@drawable/stop_disable" /> <!-- state_enabled=false -->
- <ITEM android:drawable="@drawable/stop_50" /> <!-- default -->
- </SELECTOR>
3、res/layout/main.xml 的內容如下:
XML/HTML代碼
- <?xml version="1.0" encoding="utf-8"?>
- <LINEARLAYOUT xmlns:android="http://schemas.android.com/apk/res/android" android:layout_height="fill_parent" android:layout_width="fill_parent" android:orientation="vertical">
- <TEXTVIEW android:layout_height="wrap_content" android:layout_width="fill_parent" android:text="簡單音樂播放器" android:textsize="25sp" />
- </LINEARLAYOUT>
- <LINEARLAYOUT xmlns:android="http://schemas.android.com/apk/res/android" android:layout_height="fill_parent" android:layout_width="fill_parent" android:orientation="horizontal">
-
- <IMAGEBUTTON android:layout_height="wrap_content" android:layout_width="wrap_content" android:background="@drawable/play" android:id="@+id/play" android:adjustviewbounds="true" android:layout_margin="4dp">
- </IMAGEBUTTON>
-
- <IMAGEBUTTON android:layout_height="wrap_content" android:layout_width="wrap_content" android:background="@drawable/pause" android:id="@+id/pause" android:adjustviewbounds="true" android:layout_margin="4dp">
- </IMAGEBUTTON>
-
- <IMAGEBUTTON android:layout_height="wrap_content" android:layout_width="wrap_content" android:background="@drawable/stop" android:id="@+id/stop" android:adjustviewbounds="true" android:layout_margin="4dp">
- </IMAGEBUTTON>
- </LINEARLAYOUT>
4、MainMusic.java的內容如下:
Java代碼
- package android.basic.lesson28;
-
- import java.io.IOException;
-
- import android.app.Activity;
- import android.media.MediaPlayer;
- import android.media.MediaPlayer.OnCompletionListener;
- import android.media.MediaPlayer.OnPreparedListener;
- import android.os.Bundle;
- import android.view.View;
- import android.view.View.OnClickListener;
- import android.widget.ImageButton;
- import android.widget.Toast;
-
- public class MainMusic extends Activity {
-
- // 聲明變量
- private ImageButton play, pause, stop;
- private MediaPlayer mPlayer;
-
- /** Called when the activity is first created. */
- @Override
- public void onCreate(Bundle savedInstanceState) {
- super.onCreate(savedInstanceState);
- setContentView(R.layout.main);
-
- // 定義UI組件
- play = (ImageButton) findViewById(R.id.play);
- pause = (ImageButton) findViewById(R.id.pause);
- stop = (ImageButton) findViewById(R.id.stop);
-
- // 按鈕先全部失效
- play.setEnabled(false);
- pause.setEnabled(false);
- stop.setEnabled(false);
-
- // 定義單擊監聽器
- OnClickListener ocl = new View.OnClickListener() {
-
- @Override
- public void onClick(View v) {
- switch (v.getId()) {
- case R.id.play:
- // 播放
- Toast.makeText(MainMusic.this, "點擊播放", Toast.LENGTH_SHORT).show();
- play();
- break;
- case R.id.pause:
- // 暫停
- Toast.makeText(MainMusic.this, "暫停播放", Toast.LENGTH_SHORT).show();
- pause();
- break;
- case R.id.stop:
- // 停止
- Toast.makeText(MainMusic.this, "停止播放", Toast.LENGTH_SHORT).show();
- stop();
- break;
- }
- }
- };
-
- // 綁定單擊監聽
- play.setOnClickListener(ocl);
- pause.setOnClickListener(ocl);
- stop.setOnClickListener(ocl);
-
- // 初始化
- initMediaPlayer();
- }
-
- // 初始化播放器
- private void initMediaPlayer() {
-
- // 定義播放器
- mPlayer = MediaPlayer.create(getApplicationContext(), R.raw.love);
-
- // 定義資源准備好的監聽器
- mPlayer.setOnPreparedListener(new OnPreparedListener() {
- @Override
- public void onPrepared(MediaPlayer mp) {
- // 資源准備好了再讓播放器按鈕有效
- Toast.makeText(MainMusic.this, "onPrepared", Toast.LENGTH_SHORT)
- .show();
- play.setEnabled(true);
- }
- });
-
- // 定義播放完成監聽器
- mPlayer.setOnCompletionListener(new OnCompletionListener() {
-
- @Override
- public void onCompletion(MediaPlayer mp) {
- Toast.makeText(MainMusic.this, "onCompletion",
- Toast.LENGTH_SHORT).show();
- stop();
- }
- });
- }
-
- // 停止播放
- private void stop() {
- mPlayer.stop();
- pause.setEnabled(false);
- stop.setEnabled(false);
- try {
- mPlayer.prepare();
- mPlayer.seekTo(0);
- play.setEnabled(true);
- } catch (IllegalStateException e) {
- e.printStackTrace();
- } catch (IOException e) {
- e.printStackTrace();
- }
-
- }
-
- // 播放
- private void play() {
-
- mPlayer.start();
- play.setEnabled(false);
- pause.setEnabled(true);
- stop.setEnabled(true);
- }
-
- // 暫停
- private void pause() {
- mPlayer.pause();
- play.setEnabled(true);
- pause.setEnabled(false);
- stop.setEnabled(true);
- }
-
- // Activity銷毀前停止播放
- @Override
- protected void onDestroy() {
- super.onDestroy();
- if (stop.isEnabled()) {
- stop();
- }
-
- }
-
- }
5、運行程序,查看效果。

二、簡單視頻播放器
Android為視頻播放提供了VideoView和MediaController兩個現成的組件,讓我們可以方便的實現MP4、3GP等視頻的播放。下面我們通過一個例子來看一下:
1、新建一個項目Lesson28_Video。
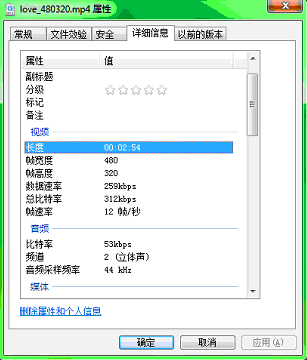
2、使用Format Factory這個軟件壓縮一個視頻備用,我這裡壓縮的參數如下:
注意,如果播放時完全無法播放或者只有聲音沒有圖像,你就需要換壓縮軟件和調整壓縮參數重新壓縮視頻了,暫時只能這樣,我也是折騰了2-3小時都是黑屏,郁悶中(似乎得出一個答案,是否黑屏和機器設備的性能有關,我降低壓縮分辨率和每秒幀數,出圖像音畫同步,如果提高每秒幀數,聲音出來後十幾秒圖像才會出來,但是出來後音畫還是同步的,有興趣的朋友可以多測試測試給出一個結論)。
用命令行的方式拷貝此視頻到存儲卡(sdcard)中,為什麼不用eclipse中的可視化工具拷貝呢?因為那個方式靠大文件的時候經常失敗,而命令行方式我沒拷貝失敗一次過。命令就是 adb push ,具體截個圖給你看:

3、res\layout\main.xml的內容如下:
XML/HTML代碼
- <?xml version="1.0" encoding="utf-8"?>
- <LINEARLAYOUT xmlns:android="http://schemas.android.com/apk/res/android" android:layout_height="match_parent" android:layout_width="match_parent" android:orientation="vertical" android:layout_gravity="top">
- <VIDEOVIEW android:layout_height="fill_parent" android:layout_width="fill_parent" android:id="@+id/VideoView01">
- </VIDEOVIEW>
- </LINEARLAYOUT>
4、MainVideo.java的內容如下:
Java代碼
- package android.basic.lesson28;
-
- import android.app.Activity;
- import android.net.Uri;
- import android.os.Bundle;
- import android.view.Window;
- import android.view.WindowManager;
- import android.widget.MediaController;
- import android.widget.VideoView;
-
- public class MainVideo extends Activity {
- /** Called when the activity is first created. */
- @Override
- public void onCreate(Bundle savedInstanceState) {
- super.onCreate(savedInstanceState);
- //全屏
- this.getWindow().setFlags(WindowManager.LayoutParams.FLAG_FULLSCREEN, WindowManager.LayoutParams.FLAG_FULLSCREEN);
- //標題去掉
- this.requestWindowFeature(Window.FEATURE_NO_TITLE);
- //要在全屏等設置完畢後再加載布局
- setContentView(R.layout.main);
-
- //定義UI組件
- VideoView videoView = (VideoView) findViewById(R.id.VideoView01);
- //定義MediaController對象
- MediaController mediaController = new MediaController(this);
- //把MediaController對象綁定到VideoView上
- mediaController.setAnchorView(videoView);
- //設置VideoView的控制器是mediaController
- videoView.setMediaController(mediaController);
-
- //這兩種方法都可以 videoView.setVideoPath("file:///sdcard/love_480320.mp4");
- videoView.setVideoURI(Uri.parse("/sdcard/love_480320.mp4"));
- //啟動後就播放
- videoView.start();
- }
- }
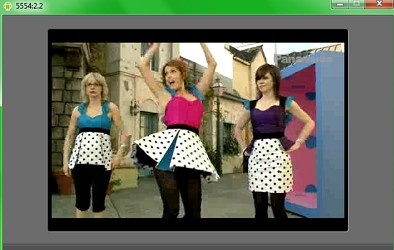
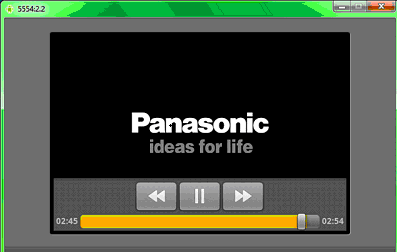
5、運行效果如下:
三、簡單錄音程序
1、新建一個一個項目Tip_Recorder,主activity名字是MainActivity。
2、其布局文件main.xml的代碼是:
XML/HTML代碼
- <?xml version="1.0" encoding="utf-8"?>
- <LINEARLAYOUT xmlns:android="http://schemas.android.com/apk/res/android" android:layout_height="fill_parent" android:layout_width="fill_parent" android:orientation="vertical" android:gravity="center">
-
- <BUTTON type=submit android:layout_height="wrap_content" android:layout_width="wrap_content" android:text="錄音" android:textsize="30sp" android:id="@+id/Button01"></BUTTON>
- <BUTTON type=submit android:layout_height="wrap_content" android:layout_width="wrap_content" android:text="停止" android:textsize="30sp" android:id="@+id/Button02" android:layout_margintop="20dp"></BUTTON>
- </LINEARLAYOUT>
3、主程序文件 MainActivity.java的代碼如下:
Java代碼
- package android.tip.yaoyao;
-
- import java.io.File;
- import java.io.IOException;
- import java.util.Calendar;
- import java.util.Locale;
-
- import android.app.Activity;
- import android.media.MediaRecorder;
- import android.os.Bundle;
- import android.text.format.DateFormat;
- import android.view.View;
- import android.widget.Button;
- import android.widget.Toast;
-
- public class MainActivity extends Activity {
-
- private Button recordButton;
- private Button stopButton;
-
- private MediaRecorder mr;
-
- @Override
- public void onCreate(Bundle savedInstanceState) {
- super.onCreate(savedInstanceState);
- setContentView(R.layout.main);
-
- recordButton = (Button) this.findViewById(R.id.Button01);
- stopButton = (Button) this.findViewById(R.id.Button02);
-
- // 錄音按鈕點擊事件
- recordButton.setOnClickListener(new View.OnClickListener() {
-
- @Override
- public void onClick(View v) {
-
- File file = new File("/sdcard/"
- + "YY"
- + new DateFormat().format("yyyyMMdd_hhmmss",
- Calendar.getInstance(Locale.CHINA)) + ".amr");
-
- Toast.makeText(getApplicationContext(), "正在錄音,錄音文件在"+file.getAbsolutePath(), Toast.LENGTH_LONG)
- .show();
-
- // 創建錄音對象
- mr = new MediaRecorder();
-
- // 從麥克風源進行錄音
- mr.setAudioSource(MediaRecorder.AudioSource.DEFAULT);
-
- // 設置輸出格式
- mr.setOutputFormat(MediaRecorder.OutputFormat.DEFAULT);
-
- // 設置編碼格式
- mr.setAudioEncoder(MediaRecorder.AudioEncoder.DEFAULT);
-
- // 設置輸出文件
- mr.setOutputFile(file.getAbsolutePath());
-
- try {
- // 創建文件
- file.createNewFile();
- // 准備錄制
- mr.prepare();
- } catch (IllegalStateException e) {
- e.printStackTrace();
- } catch (IOException e) {
- e.printStackTrace();
- }
- // 開始錄制
- mr.start();
- recordButton.setText("錄音中……");
- }
- });
-
- // 停止按鈕點擊事件
- stopButton.setOnClickListener(new View.OnClickListener() {
-
- @Override
- public void onClick(View v) {
-
- if (mr != null) {
- mr.stop();
- mr.release();
- mr = null;
- recordButton.setText("錄音");
- Toast.makeText(getApplicationContext(), "錄音完畢", Toast.LENGTH_LONG).show();
- }
- }
- });
-
- }
-
- }
4、因為錄音和寫存儲卡都需要權限聲明,所以這裡也把AndroidManifest.xml代碼提供出來:
XML/HTML代碼
- <?xml version="1.0" encoding="utf-8"?>
- <MANIFEST android:versionname="1.0" android:versioncode="1" xmlns:android="http://schemas.android.com/apk/res/android" package="android.tip.yaoyao">
- <APPLICATION android:icon="@drawable/icon" android:label="@string/app_name" android:debuggable="true">
- <ACTIVITY android:name=".MainActivity" android:label="@string/app_name" android:screenorientation="portrait" android:configchanges="orientation|keyboardHidden|keyboard">
- <INTENT -filter>
- <ACTION android:name="android.intent.action.MAIN" />
- <CATEGORY android:name="android.intent.category.LAUNCHER" />
- </INTENT>
- </ACTIVITY>
-
- </APPLICATION>
- <USES android:minsdkversion="4" -sdk />
-
- <USES android:name="android.permission.RECORD_AUDIO" -permission></USES>
- <USES android:name="android.permission.WRITE_EXTERNAL_STORAGE" -permission></USES>
- </MANIFEST>
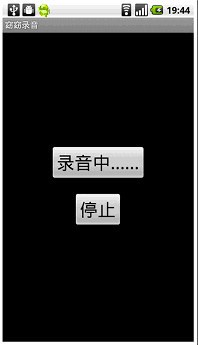
5、編譯並運行程序,查看結果。
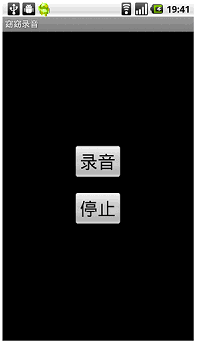
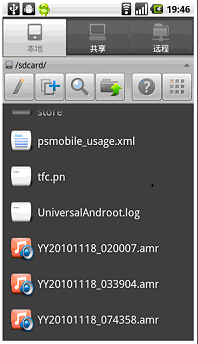
點擊錄音:
錄音文件在存儲卡的根目錄幾個以YY開頭的amr文件:
6、這個例子要用到錄音設備,而模擬器並不能把電腦聲卡模擬出來使用,因此這個例子必須在真機上進行測試。
真機上測試方法也很簡單:
1)在真機上把USB調試模式打開。
2)把真機用USB線與電腦連接。
3)設置電腦和手機的連接方式為 ”僅充電“(此時手機可以操作存儲卡)。
4)打開Eclipse,在不選擇模擬器的情況下運行程序,此時,Eclipse會自動找到真機,並使用它運行程序,最完美的是他可以把真機運行程序的輸出信息,照樣輸出在Eclipse中的Logcat日志中。
上面的真機截圖也是通過Eclipse的DDMS窗口直接抓取的,下圖中右上角顏色最深的圖標就是抓取真機截圖的按鈕:

本節就講到這裡,內容不少,希望大家自己多加練習,熟練掌握。
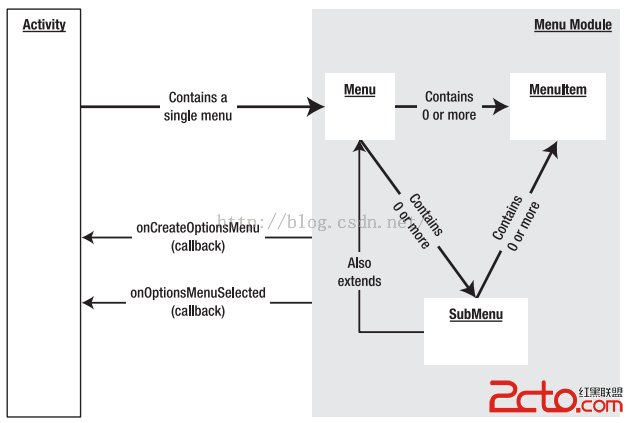 Android開發之Menu:OptionMenu(選項菜單)、ContextMenu(上下文菜單)、SubMenu(子菜單)
 Android平台Camera實時濾鏡實現方法探討(十)--代碼地址以及簡介
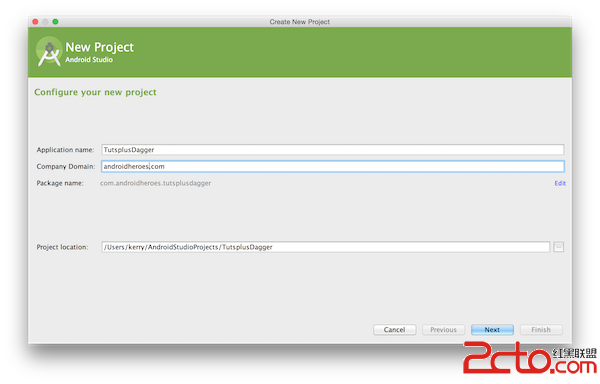 Android項目使用Dagger2進行依賴注入
 類似桌面背景壁紙隨手指滑動--第三方開源--BackgroundViewPager,viewpager滑動開源