Android軟件開發中為什麼要制作第三方數據庫?在程序中獲取數據的方式無非就是兩種:本地獲取,服務器獲取。如果項目中的數據非常龐大,並且又不能使用聯網獲取數據的方式,那麼就需要采取制作第三方數據庫的方式。我用一個比較實際的例子向大家說明這一點,最近我制作了一個來電歸屬地查詢的小DEMO,產品的需求是對方打過來電話後能再屏幕中現實對方手機號碼的歸屬地。Android提供了聯網獲取歸屬地的方式,但是我沒有采取這樣的方式獲取號碼歸屬地。因為聯網獲取號碼歸屬地時間實在無法控制,有可能用戶已經接通電話數據才獲取到,那麼來電歸屬地的意義就不存在了。並且聯網獲取數據還必需是在有網絡的情況下,所以限制太多了,所以我放棄的聯網獲取手機號碼歸屬地的方法。
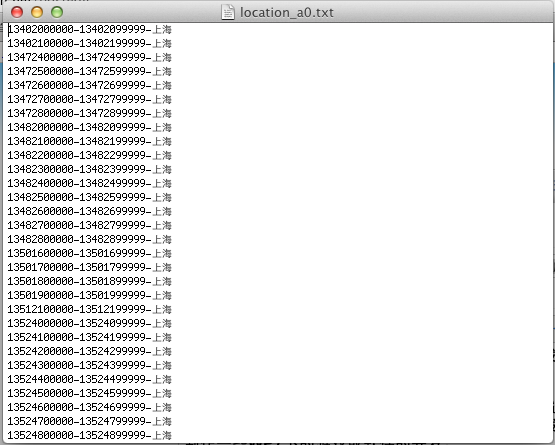
接著我在網絡中找了一份07年手機號碼歸屬地的數據庫原始資源。它是以TXT形式包含中國所有省份與城市的號碼歸屬地規則,如下圖所示,打開上海所在的歸屬地文件後。發現歸屬的規則是截取手機號碼前6位判斷手機號碼所在的歸屬地。歸屬地數據庫的原始資源包括移動號碼與聯通號碼,加起來一共有61個文本文件。我們需要編寫程序這些數據需要全部寫入數據庫中,然後將生成的數據庫文件放入需要查詢的新工程中。這麼做的原因是歸屬地數據庫的數據量比較大,如果在查詢的工程中寫入數據庫的話至少也要20分鐘。這樣會造成用戶安裝完軟件後,第一個電話打進來時有可能你的數據庫還沒寫完,用戶體驗大打折扣。所以我們需要在第三方程序中將這個龐大的數據庫先制作出來,然後在放入軟件中,最後直接操作這個數據庫即可。
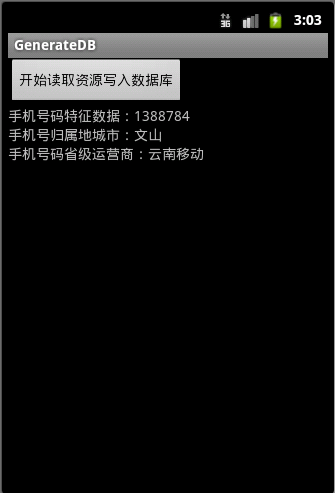
07年的數據確實有點老,但是本篇博文的重點不是探討手機號碼歸屬地。我最終的涉及思路是將.db文件放置在服務器中,服務器端來維護這個db文件,用戶首次安裝時從服務器下載這個數據庫文件,說的有點遠了 呵呵。下面學習如何將歸屬地數據庫中龐大的原始數據寫入數據庫當中,首先需要制作生成數據庫的程序。如下圖所示,本程序的是方法為點擊“開始讀取資源寫入數據庫”按鈕後,程序將循環開始在本地讀取所有原始資源,截取出需要的數值後在寫入歸屬地數據庫當中。
上圖對應的Activity是GenerateDBActivity,代碼如下所示:
Java代碼
- import java.io.BufferedReader;
- import java.io.IOException;
- import java.io.InputStream;
- import java.io.InputStreamReader;
- import java.io.UnsupportedEncodingException;
-
- import android.app.Activity;
- import android.content.res.Resources;
- import android.content.res.Resources.NotFoundException;
-
- import android.os.Bundle;
- import android.os.Handler;
- import android.os.Message;
- import android.util.Log;
- import android.view.View;
- import android.view.View.OnClickListener;
- import android.widget.Button;
- import android.widget.TextView;
- import android.widget.Toast;
-
- public class GenerateDBActivity extends Activity
- {
-
- //DB對象
- public DBHelper m_db = null;
- //按鈕對象
- public Button button = null;
- //文本對象
- public TextView textNumber = null;
- public TextView textCity = null;
- public TextView textLocation = null;
-
- //接收線程中傳遞的數值,用於刷新UI
- Handler handler = new Handler() {
- //注解3
- @Override
- public void handleMessage(Message msg) {
-
- Bundle bundle = msg.getData();
- //獲取號碼、城市、省級
- String number = bundle.getString("number");
- String city = bundle.getString("city");
- String location = bundle.getString("location");
- //更新UI
- textNumber.setText(number);
- textCity.setText(city);
- textLocation.setText(location);
-
- super.handleMessage(msg);
- }
- };
-
- @Override
- public void onCreate(Bundle savedInstanceState)
- {
- super.onCreate(savedInstanceState);
- setContentView(R.layout.main);
-
- // 獲取DBHelper對象
- m_db = DBHelper.getInstance(this);
-
- //獲取按鈕對象
- button = (Button)this.findViewById(R.id.button);
- button.setText("開始讀取資源寫入數據庫");
- //獲取文本對象
- textNumber = (TextView)this.findViewById(R.id.number);
- textCity = (TextView)this.findViewById(R.id.city);
- textLocation = (TextView)this.findViewById(R.id.location);
-
- //開始讀取資源
- button.setOnClickListener(new OnClickListener()
- {
-
- @Override
- public void onClick(View v)
- {
- //注解1
- //啟動線程開始讀取資源並寫入數據庫當中
- new Thread()
- {
- @Override
- public void run()
- {
- int count = DBHelper.LOCATIONS.length;
-
- for(int i =0; i < count; i++)
- {
- loadLocationFile(i);
- }
-
- }
- }.start();
-
- }
- });
- }
-
- private void loadLocationFile(int resourceID)
- {
- //注解2
- Resources res = this.getResources();
- InputStream in = null;
- BufferedReader br = null;
-
- try
- {
- in = res.openRawResource(R.raw.location_a0 + resourceID);
- String str;
- br = new BufferedReader(new InputStreamReader(in, "GBK"));
- while ((str = br.readLine()) != null)
- {
- //手機號碼特征值為前7位
- String number = str.substring(0, 6);
- //手機號碼歸屬地從第24位開始到最後
- String city = str.substring(24, str.length());
-
- //將數據寫入數據庫當中
- m_db.insert(DBHelper.TABLE_NAME,
- new String[] { DBHelper.NUMBER, DBHelper.CITY, DBHelper.LOCATION },
- new String[]{ number, city, DBHelper.LOCATIONS[resourceID] });
-
- Message msg = new Message();
- Bundle bundle = new Bundle();
- bundle.putString("number", "手機號碼特征數據:" + number);
- bundle.putString("city", "手機號歸屬地城市:" + city);
- bundle.putString("location", "手機號碼省級運營商:" + DBHelper.LOCATIONS[resourceID]);
- msg.setData(bundle);
- handler.sendMessage(msg);
-
- Log.v("xuanyusong", "手機號碼特征數據:" + number + " 手機號歸屬地城市:" + city + " 手機號碼省級運營商:" + DBHelper.LOCATIONS[resourceID]);
- }
- } catch (NotFoundException e)
- {
- Toast.makeText(this, "文本文件不存在", 100).show();
- e.printStackTrace();
- } catch (UnsupportedEncodingException e)
- {
- Toast.makeText(this, "文本編碼出現異常", 100).show();
- e.printStackTrace();
- } catch (IOException e)
- {
- Toast.makeText(this, "文件讀取錯誤", 100).show();
- e.printStackTrace();
- } finally
- {
- try
- {
- if (in != null)
- {
- in.close();
- }
- if (br != null)
- {
- br.close();
- }
- } catch (IOException e)
- {
- e.printStackTrace();
- }
-
- }
- }
-
- }
注解1:在窗口中用戶點擊“讀取寫入數據庫”按鈕後,程序將開啟一個線程來讀取資源,而且代碼必需寫在線程中讀取,因為數據量比較大,主線程中讀取會出現ANR的情況。DBHelper.LOCATIONS.Length表示原始數據資源文件的數量,這裡使用循環將讀取所有原始資源文件。
注解2:loadLocationFile()方法開始讀取本地原始資源,原始資源全部放置在res/raw下,使用openRawResource()方法取得每一個原始文件的流對象。然後在while循環中調用br.readLine()方法逐行讀取文本對象中的數據,數據讀取完畢後將它們寫入數據庫當中。因為這裡是線程,所以需要刷新UI時就得使用Handler了。
注解3:數據庫中每插入一條數據庫使用handler發來一條消息,在這裡獲取該消息附帶的參數,然後刷新UI將數據現實在屏幕中。
數據庫的創建與插入數據的方法寫在 DBHelper類當中,代碼如下所示:
Java代碼
- package com.m15.cn;
-
- import android.content.ContentValues;
- import android.content.Context;
- import android.database.sqlite.SQLiteDatabase;
- import android.database.sqlite.SQLiteOpenHelper;
-
- public class DBHelper extends SQLiteOpenHelper
- {
-
- public static DBHelper mInstance = null;
-
- /** 數據庫名稱 **/
- public static final String DATABASE_NAME = "location.db";
-
- /** 數據庫版本號 **/
- private static final int DATABASE_VERSION = 1;
-
- /** DB對象 **/
- SQLiteDatabase mDb = null;
-
- Context mContext = null;
-
- // 歸屬地
- public final static String TABLE_NAME = "location_date";
- public final static String ID = "_id";
- public final static String NUMBER = "number";
- public final static String LOCATION = "location";
- public final static String CITY = "city";
-
- // 索引ID
- public final static int ID_INDEX = 0;
- public final static int NUMBER_INDEX = 1;
- public final static int LOCATION_INDEX = 2;
- public final static int CITY_INDEX = 3;
-
- /** 數據庫SQL語句 創建歸屬地表 **/
- public static final String NAME_TABLE_CREATE = "create table location_date(" + "_id INTEGER PRIMARY KEY AUTOINCREMENT," + "number TEXT NOT NULL," + "city TEXT NOT NULL,"
- + "location TEXT NOT NULL);";
-
- public final static String[] LOCATIONS =
- { "上海移動", "上海聯通", "雲南移動", "雲南聯通", "內蒙古移動", "內蒙古聯通", "北京移動", "北京聯通", "吉林移動", "吉林聯通", "四川移動", "四川聯通", "天津移動", "天津聯通", "寧夏移動", "寧夏聯通", "安徽移動", "安徽聯通", "山東移動", "山東聯通", "山西移動", "山西聯通", "廣東移動", "廣東聯通",
- "廣西移動", "廣西聯通", "新疆移動", "新疆聯通", "江蘇移動", "江蘇聯通", "江西移動", "江西聯通", "河北移動", "河北聯通", "河南移動", "河南聯通", "浙江移動", "浙江聯通", "海南移動", "海南聯通", "湖北移動", "湖北聯通", "湖南移動", "湖南聯通", "甘肅移動", "甘肅聯通", "福建移動",
- "福建聯通", "西藏移動", "西藏聯通", "貴州移動", "貴州聯通", "遼寧移動", "遼寧聯通", "重慶移動", "重慶聯通", "陝西移動", "陝西聯通", "青海移動", "青海聯通", "黑龍江移動", "黑龍江聯通" };
-
- /** 單例模式 **/
- public static synchronized DBHelper getInstance(Context context)
- {
- if (mInstance == null)
- {
- mInstance = new DBHelper(context);
- }
- return mInstance;
- }
-
- public DBHelper(Context context)
- {
- super(context, DATABASE_NAME, null, DATABASE_VERSION);
- // 得到數據庫對象
- mDb = getReadableDatabase();
- mContext = context;
- }
-
- @Override
- public void onCreate(SQLiteDatabase db)
- {
- //創建數據庫
- db.execSQL(NAME_TABLE_CREATE);
- }
-
- @Override
- public void onUpgrade(SQLiteDatabase db, int oldVersion, int newVersion)
- {
-
- }
-
- /**
- * 插入一條數據
- *
- * @param key
- * @param date
- */
- public void insert(String tablename, String key[], String date[])
- {
- ContentValues values = new ContentValues();
- for (int i = 0; i < key.length; i++)
- {
- values.put(key[i], date[i]);
- }
- mDb.insert(tablename, null, values);
- }
-
- }
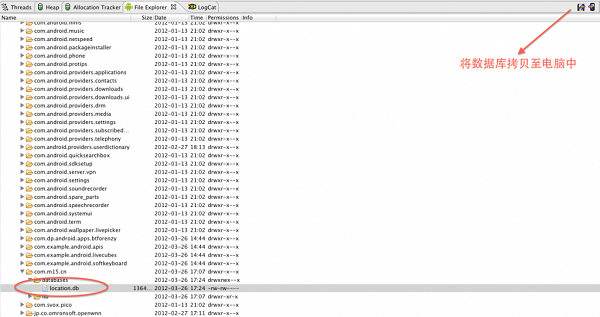
數據庫寫入完畢後,然後將生成的數據庫從程序中拷貝至本地。如下圖所示,將本例程序的location.db文件拷貝至電腦中。
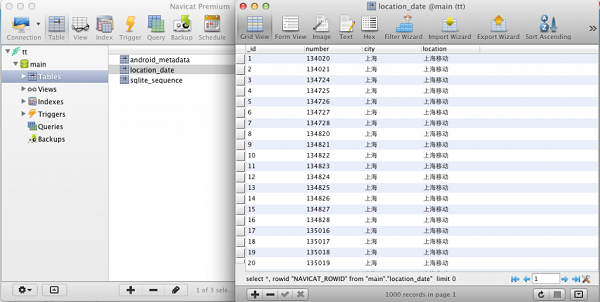
然後使用數據庫查看軟件,來看一看我們生成的數據庫。因為我這裡使用的是mac在做開發,所以和以前寫用的數據庫查看軟件有點不一樣。如下圖所示,本地數據已經寫入到數據庫當中 , 下面說一下字段的含義:_id為升序具有唯一性 , number 表示號碼的前6位字段,city表示號碼歸屬地的城市,location:表示省級的運營商歸屬地。那麼到這一步我們的第三方數據庫文件就已經制作完畢。如果有朋友問能不能使用非Android程序生成的數據庫,那麼我建議最好不要用。或者你將系統生成的表android_metadata與sqlite_sequence表添加進你的數據庫試一試,因為這個數據庫一定要與Android生成出來的數據庫結構一樣。否則在部分Android手機上無法打開它db文件的對象。
接著創建一個新android工程,用於我們查詢數據庫。首先將上面工程中生成的歸屬地數據庫文件location.db拷貝至新工程的raw文件夾中。在如下代碼中開始載入數據庫中的內容。
Java代碼
- import java.io.File;
- import java.io.FileOutputStream;
- import java.io.InputStream;
-
- import android.app.Activity;
- import android.content.Context;
- import android.database.Cursor;
- import android.database.sqlite.SQLiteDatabase;
- import android.os.Bundle;
- import android.view.View;
- import android.view.View.OnClickListener;
- import android.widget.Button;
- import android.widget.EditText;
- import android.widget.TextView;
- import android.widget.Toast;
-
- public class GetInfoActivity extends Activity
- {
-
- //文件的路徑
- public final static String URL = "/data/data/cn.location.xys/files";
- //數據庫文件
- public final static String DB_FILE_NAME = "location.db";
- // 歸屬地
- public final static String TABLE_NAME = "location_date";
- // 索引ID
- public final static int ID_INDEX = 0;
- public final static int NUMBER_INDEX = 1;
- public final static int LOCATION_INDEX = 2;
- public final static int CITY_INDEX = 3;
-
- EditText editText = null;
- Button button = null;
- TextView textView = null;
- SQLiteDatabase db = null;
-
- @Override
- protected void onCreate(Bundle savedInstanceState)
- {
-
- super.onCreate(savedInstanceState);
-
- setContentView(R.layout.getinfo);
- //首先將DB文件拷貝至程序內存當中
- //注解1
- if (copyDB())
- {
- //得到數據庫文件
- File file = new File(URL, DB_FILE_NAME);
- db = SQLiteDatabase.openOrCreateDatabase(file, null);
-
- editText = (EditText) this.findViewById(R.id.edit);
- textView = (TextView) this.findViewById(R.id.location);
-
- button = (Button) this.findViewById(R.id.button);
- button.setOnClickListener(new OnClickListener()
- {
-
- public void onClick(View v)
- {
- String editStr = editText.getText().toString();
- if (editStr.length() == 11)
- {
- //輸入手機號碼
- Cursor cursor = db.query("location_date", null, "number=?", new String[]{ editStr.substring(0, 6) }, null, null, null);
-
- if (cursor != null && cursor.moveToFirst())
- {
- //獲取號碼省級與市級歸屬地
- String text = cursor.getString(LOCATION_INDEX) + cursor.getString(CITY_INDEX);
- textView.setText(text);
- }
- else
- {
- Toast.makeText(getApplicationContext(), "未能在數據庫中查詢到您的手機號碼", Toast.LENGTH_SHORT).show();
- }
- } else
- {
- Toast.makeText(getApplicationContext(), "手機號碼為11位,重新輸入", Toast.LENGTH_SHORT).show();
- }
-
- }
- });
- }
- }
-
- // 將raw文件中的數據庫文件拷貝至手機中的程序內存當中
- public boolean copyDB()
- {
-
- try
- {
- // 判斷程序內存中是否有拷貝後的文件
- if (!(new File(URL)).exists())
- {
- InputStream is = getResources().openRawResource(R.raw.location);
- FileOutputStream fos = this.openFileOutput(DB_FILE_NAME, Context.MODE_WORLD_READABLE);
- // 一次拷貝的緩沖大小1M
- byte[] buffer = new byte[1024 * 1024];
- int count = 0;
- // 循環拷貝數據庫文件
- while ((count = is.read(buffer)) > 0)
- {
- fos.write(buffer, 0, count);
- }
-
- fos.close();
- is.close();
- }
- return true;
- } catch (Exception e)
- {
- e.printStackTrace();
- return false;
- }
- }
-
- }
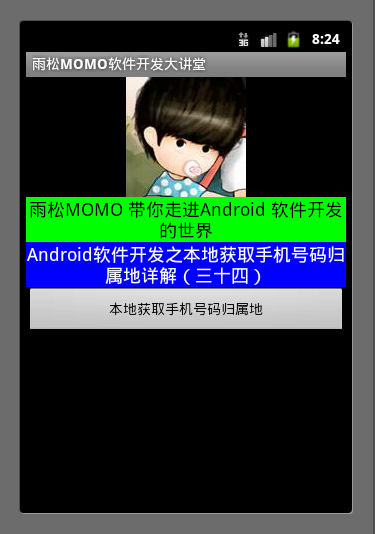
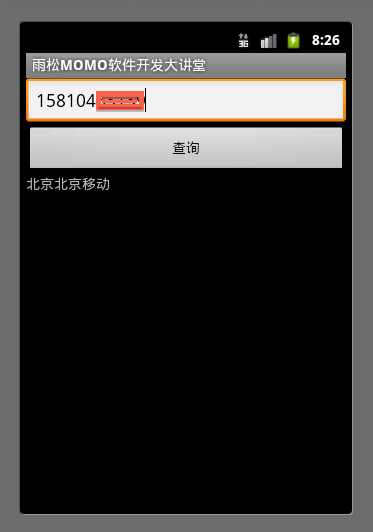
注解1:首先將raw文件夾中的數據庫文件拷貝至程序內存當中,接著通過拷貝後的路徑獲取數據庫文件的對象。有了數據庫對象那麼增、刪、改、查的操作都可以執行啦。最後的效果圖如下所示,輸入手機號碼後點擊查詢,下方將現實手機號碼的歸屬地信息。
源碼下載地址:http://vdisk.weibo.com/s/aa7gG
 自定義控件之創建可以復用的組合控件(三)
 android 自定義狀態欄和導航欄分析與實現
 單機搭建Android開發環境(二),單機搭建android開發
 Android7.0 Phone應用源碼分析(三) phone拒接流程分析,android7.0拒接