編輯:關於android開發
AppWidget是創建的桌面窗口小控件,在這個小控件上允許我們進行一些操作(這個視自己的需要而定)。作為菜鳥,我在這裡將介紹一下AppWeight的簡單使用。
1.在介紹AppWidget之前,我們先來了解一下PendingIntent和RemoteViews;
PendingIntent:A description of an Intent and target action to perform with it. Instances of this class are created with getActivity, getActivities, getBroadcast, and getService; the returned object can be handed to other applications so that they can perform the action you described on your behalf at a later time.
翻譯:通過PendingIntent來描述一個Intent和target action,這個類的實例和getActivity,getActivites,getBroadCast,getService一起創建:返回的對象能夠傳給其他程序,以便它們能在後來執行你想讓他們執行的動作。
結合Mars老師的講解可以這樣來理解:PendingIntent能夠包含一個Intent對象,能夠將這個Intent傳遞給其他的應用,當滿足一定條件時,就會執行這個Intent中包含的動作。getActivity和getActivities是為了啟動活動,getBroadcast是為了發送廣播,getService是為了開啟一個服務。(這個在下面有講解)
RemoteViews:A class that describes a view hierarchy that can be displayed in another process. The hierarchy is inflated from a layout resource file, and this class provides some basic operations for modifying the content of the inflated hierarchy.
翻譯:remoteviews:一個類描述了一個視圖的層次結構,可以顯示在另一個進程。該層次結構從布局資源文件中增長,該類提供一些基本操作來修改虛化層次結構的內容。
簡言之就是RemoteView代表的是顯示在桌面上的appwidget這整個布局,包括設置的按鈕,圖片什麼的。。。
2.了解了上面的概念,就可以更好的理解AppWeight了。
實現AppWeige的步驟:
文件的結構:
1).在res下新建一個文件夾,裡面新建一個類型為appwidget_provider的xml文件。這個是代表顯示在桌面上的整個布局(只是布局的框架,不包含細節,至於顯示的內容需要引用另一個布局文件),示例中我的xml文件名為example_appwidget_provider.xml:
<?xml version="1.0" encoding="utf-8"?>
<appwidget-provider xmlns:android="http://schemas.android.com/apk/res/android"

    android:minWidth = "280dp"
    android:minHeight = "100dp"
    android:updatePeriodMillis = "864000000"
    android:initialLayout="@layout/example_appwidget">

</appwidget-provider>
<!-- 上面設置了布局的寬、高、更新時間周期(毫秒)、包含的布局 -->
2).在layout中新建一個xml文件來作為在appwidget中的布局顯示,就是上面的@layout/example_appwidget中的example_appwidget。
<?xml version="1.0" encoding="utf-8"?>
<LinearLayout xmlns:android="http://schemas.android.com/apk/res/android"
android:layout_width="match_parent"
android:layout_height="match_parent"
android:orientation="vertical" >
<!-- 這裡是顯示在桌面的appWidget的布局 -->
<ImageView
android:id="@+id/imageId"
android:layout_width="fill_parent"
android:layout_height="60dp"
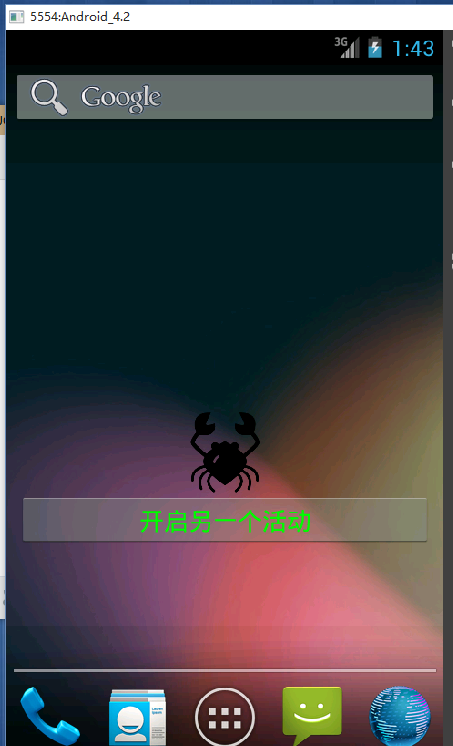
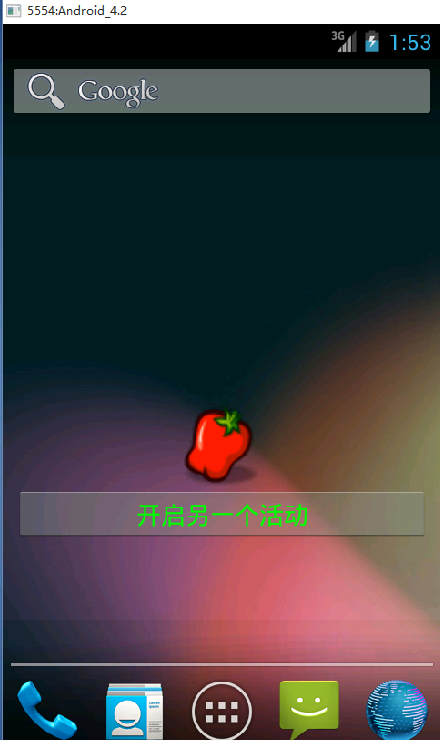
android:src="@drawable/cancer"/>
<Button
android:id="@+id/changeButton"
android:layout_width="match_parent"
android:layout_height="40dp"
android:textColor="#00ff00"
android:text="開啟另一個活動"/>
</LinearLayout>
3).新建一個Activity,這個Activity繼承AppWidgetProvider,復寫其中的方法。在這裡注釋的代碼實現了點擊AppWidget中的按鈕就啟動另一個Activity,未注釋的代碼實現了ImagView中的Image的替換:值得注意的是,AppWiget所進行的活動並不與當前Main_Activity所在的線程在同一個線程中,因此這裡並不能像在主線程中那樣操作布局內容,AppWiget的操作方法可以看下面代碼。
package com.example.appwight;

import android.app.PendingIntent;
import android.appwidget.AppWidgetManager;
import android.appwidget.AppWidgetProvider;
import android.content.ComponentName;
import android.content.Context;
import android.content.Intent;
import android.widget.RemoteViews;

public class ExampleAppWidgetProvider extends AppWidgetProvider{

    //廣播名稱,需要在AppWidget Manifest.xml文件中聲明
    private static final String UPDATE_INTENT = "com.example.appwidget";

    @Override
    public void onReceive(Context context, Intent intent) {
        //接受廣播的時候調用
        String action = intent.getAction();
        if (UPDATE_INTENT.equals(action)) {
            System.out.println("action=======>"+UPDATE_INTENT);

            RemoteViews remoteViews = new RemoteViews(context.getPackageName(), R.layout.example_appwidget);
       //第一個參數:ImagView的Id,第二個參數:用來替換的圖片
            remoteViews.setImageViewResource(R.id.imageId, R.drawable.chilli);
            AppWidgetManager appWidgetManager = AppWidgetManager.getInstance(context);
            //ComponentName也代表AppWidget控件,與RemoteViews不同的是。前者只是代表著“整個”控件,後者包含Button,ImageView,,,等內容
            ComponentName componentName = new ComponentName(context, ExampleAppWidgetProvider.class);
            appWidgetManager.updateAppWidget(componentName, remoteViews);
        }else {
            //調用父類的onReceive方法
            super.onReceive(context, intent);
        }
    }

    @Override
    public void onUpdate(Context context, AppWidgetManager appWidgetManager,
            int[] appWidgetIds) {
        super.onUpdate(context, appWidgetManager, appWidgetIds);
        System.out.println("onUpdate");
        for (int i = 0; i < appWidgetIds.length; i++) {

            //Intent intent = new Intent(context, SecondActivity.class);
            Intent intent = new Intent();
            intent.setAction(UPDATE_INTENT);
            /*
             * pendingIntent可以包含一個intent
             * 第一個參數是當前上下文,第二個參數是包含的intent
             * getAcitivity表明這個PendingIntent的目的是為了啟動一個activity,此外還有getService(),和getBroadcast()
             *PendingIntent pendingIntent = PendingIntent.getActivity(context, 0, intent, 0);
             */
            PendingIntent pendingIntent = PendingIntent.getBroadcast(context, 0, intent, 0);
            //remoteView代表的是AppWidget的整個布局,第一個參數是包名,第二個參數是AppWidget的布局
            RemoteViews remoteViews =  new RemoteViews(context.getPackageName(), R.layout.example_appwidget);
            //為remoteVIew中的按鈕設置點擊事件,第一個為按鈕的id,第二個參數為要啟動的PendingIntent。
            remoteViews.setOnClickPendingIntent(R.id.changeButton, pendingIntent);
            //更新AppWidget,第一個參數為表明是當前哪個AppWidget(因為可以在桌面上創建多個AppWidget)
            //第二個參數為要更新的RemoteViews的對象
            appWidgetManager.updateAppWidget(appWidgetIds[i], remoteViews);
        }
    }

    @Override
    public void onDeleted(Context context, int[] appWidgetIds) {
        //刪除AppWidget的時候調用
        super.onDeleted(context, appWidgetIds);
        System.out.println("onDeleted");
    }

    @Override
    public void onEnabled(Context context) {
        //當AppWidget被創建的時候調用
        super.onEnabled(context);
        System.out.println("onEnabled");
    }

    @Override
    public void onDisabled(Context context) {
        //當最後一個AppWidget被刪除的時候調用
        super.onDisabled(context);
        System.out.println("onDisable");
    }


}
4).在AndroidManifest.xml文件中的<application 中聲明。
<receiver
            android:name="com.example.appwight.ExampleAppWidgetProvider">
        //過濾廣播
            <intent-filter >
                <action android:name="android.appwidget.action.APPWIDGET_UPDATE"/>
                <action android:name="com.example.appwidget"/>
            </intent-filter>
        //元數據,將布局與類綁定
            <meta-data android:name="android.appwidget.provider"
                android:resource="@xml/example_appwidget_provider"/>
        </receiver>
效果圖:
 Intent(二)隱式調用intent,調用intent
Intent(二)隱式調用intent,調用intent 在上一節我們一起學習了顯示調用Intent,這一節我
 android: ListView歷次優化,androidlistview
android: ListView歷次優化,androidlistview第一版: ListView一屏顯示多少對象其內部就創建多少View對象。滑動時退出的緩存對象
 高仿餓了麼應用項目源碼,高仿餓項目源碼
高仿餓了麼應用項目源碼,高仿餓項目源碼 高仿餓了麼界面效果,動畫效果還是不錯滴,分享給大家一下。 源碼下載:http://code.662p.com/list/11
 單機搭建Android開發環境(二),單機搭建android開發
單機搭建Android開發環境(二),單機搭建android開發 前文介紹了如何優化SSD和內存,以發揮開發主機的最佳性能,