編輯:關於android開發
TabWidget可以通過不同的標簽進行切換並且顯示不同的內容,相當於Button按鈕實現不同的功能。
TabHost的布局:
(1):我們先在Layouts拖一個Vertical(縱向視圖)的LinearLayout,再在Composite下拖動TabHost組件時會有三個LinearLayout,把它都刪去。
(2):在LinearLayout視圖中會有xmlns:android="http://schemas.android.com/apk/res/android"(xmls:命名空間),它是Android的模板。
(3):當你執行(1)時你會發現,刪去了有錯誤提示的三個LinearLayout之後就只剩一個標簽了,這時我們就把Vertical(縱向視圖)的LinearLayout模板改換成我們的TabHost模板即可。接下來復制xmlns:android="http://schemas.android.com/apk/res/android"這段代碼,把首尾的<LinearLayout>和</LinearLayout>刪了,然後在TabHost中粘貼剛剛復制的xmlns:android="http://schemas.android.com/apk/res/android"的代碼就轉換成功了。
(4):此時便相當於FrameLayout布局了,接下來直接把TextView放在FrameLayout作為標簽使用即可。
activity_main.xml中的布局是這樣的:
   <TabHost
        xmlns:android="http://schemas.android.com/apk/res/android"
        android:id="@android:id/tabhost"
        android:layout_width="match_parent"
        android:layout_height="wrap_content" >

        <LinearLayout
            android:layout_width="match_parent"
            android:layout_height="match_parent"
            android:orientation="vertical" >

            <TabWidget
                android:id="@android:id/tabs"
                android:layout_width="match_parent"
                android:layout_height="wrap_content" >
            </TabWidget>

            <FrameLayout
                android:id="@android:id/tabcontent"
                android:layout_width="match_parent"
                android:layout_height="414dp" >

                <TextView
                    android:id="@+id/textView1"
                    android:layout_width="wrap_content"
                    android:layout_height="wrap_content"
                    android:textColor="#00FF00"
                    android:text="TextView" />

                <TextView
                    android:id="@+id/textView2"
                    android:layout_width="wrap_content"
                    android:layout_height="wrap_content"
                    android:textColor="#FF0000"
                    android:text="TextView" />

                <TextView
                    android:id="@+id/textView3"
                    android:layout_width="wrap_content"
                    android:layout_height="wrap_content"
                    android:textColor="#0099CC"
                    android:text="TextView" />

            </FrameLayout>
        </LinearLayout>
    </TabHost>
如圖: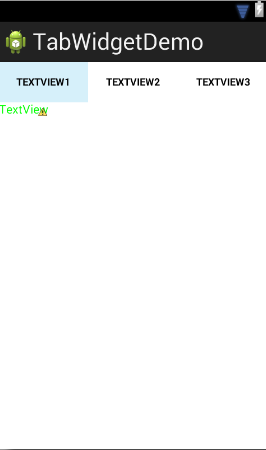
而MainActivity則改為繼承TabActivity方法(本來是繼承Activity方法)
package com.example.tabwidgetdemo;

import android.os.Bundle;
import android.app.Activity;
import android.app.AlertDialog;
import android.app.Dialog;
import android.app.TabActivity;
import android.content.DialogInterface;
import android.content.DialogInterface.OnClickListener;
import android.graphics.Color;
import android.view.Menu;
import android.widget.TabHost;
import android.widget.TabHost.OnTabChangeListener;

public class MainActivity extends TabActivity {
    private TabHost tabHost;
    @Override
    protected void onCreate(Bundle savedInstanceState) {
        super.onCreate(savedInstanceState);
        setContentView(R.layout.activity_main);

        tabHost=getTabHost();
        //添加Tab標簽
        addTab();
        //設置TabHost背景顏色
        tabHost.setBackgroundColor(Color.argb(150, 20, 50, 150));
        //設置背景圖片資源
        tabHost.setBackgroundResource(R.drawable.a);
        //啟動位置
        tabHost.setCurrentTab(0);
        tabHost.setOnTabChangedListener(new OnTabChangeListener() {

            @Override
            public void onTabChanged(String tabID) {
                // TODO Auto-generated method stub
                AlertDialog.Builder builder=new AlertDialog.Builder(MainActivity.this);
                Dialog dialog;
                builder.setTitle("提示");
                builder.setMessage("當前選中了"+tabID+"標簽");
                builder.setPositiveButton("確定", new OnClickListener() {

                    @Override
                    public void onClick(DialogInterface dialog, int which) {
                        // TODO Auto-generated method stub
                        dialog.cancel();
                    }
                });
                dialog=builder.create();
                dialog.show();
            }
        });
    }

    //添加Tab標簽
    private void addTab() {
        // TODO Auto-generated method stub
        //設置標簽圖表
        tabHost.addTab(tabHost.newTabSpec("tab1")
                .setIndicator("TAB1", getResources()
                .getDrawable(R.drawable.a))
                .setContent(R.id.textView1));
        tabHost.addTab(tabHost.newTabSpec("tab2")
                .setIndicator("TAB2", getResources()
                .getDrawable(R.drawable.a))
                .setContent(R.id.textView2));
        tabHost.addTab(tabHost.newTabSpec("tab3")
                .setIndicator("TAB3", getResources()
                .getDrawable(R.drawable.a))
                .setContent(R.id.textView3));
    }

    @Override
    public boolean onCreateOptionsMenu(Menu menu) {
        // Inflate the menu; this adds items to the action bar if it is present.
        getMenuInflater().inflate(R.menu.main, menu);
        return true;
    }

}
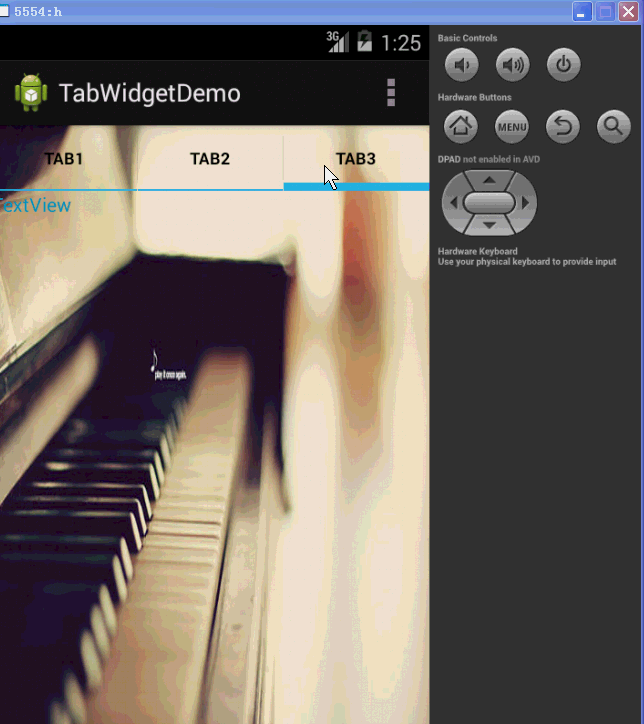
執行效果如圖:
If reference to indicate the source:蔡都平
 第3章 用C#編寫百度地圖Android手機應用程序(第5講),
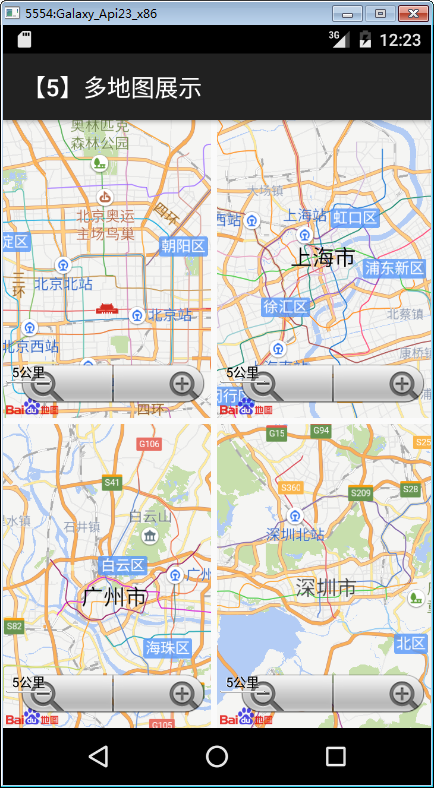
第3章 用C#編寫百度地圖Android手機應用程序(第5講),分類:C#、Android; 日期:2016-02-04 3.5 示例5--多地圖展示 一、簡介 地圖控件
 Android筆記——Android自定義控件,android自定義控件
Android筆記——Android自定義控件,android自定義控件目錄: 1.自定義控件概述 01_什麼是自定義控件 Android系統中,繼
 減少移動端用戶的輸入,移動端用戶
減少移動端用戶的輸入,移動端用戶最近因為一個登錄注冊的問題和公司的項目經理爭論開來,項目經理覺得需要在注冊的時候需要進行密碼的二次確認,我的觀點則是在移動端不需要二次確認
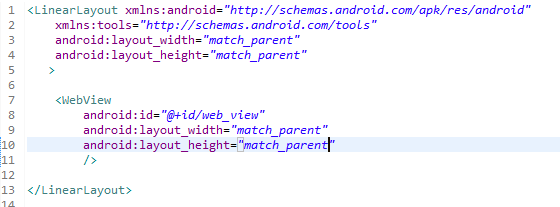 WebView的使用,WebView使用
WebView的使用,WebView使用1.首先修改activity.xml中的代碼: 2.然後MainActivity中的代碼: 3.最後設置權限: <use