編輯:高級開發
而下面我們要講的Intent 對象就是為解決這問題而生的,Intent 就如同其英文字義,是"想要"或"意圖",之意,在主Activity 當中,告訴程序自己是什麼,並想要前往哪裡,這就是Intent 對象所處理的事了,本例子和前一個例子我們將實現同一個效果.
首先是布局main.xml 及mylayout.XML
main.XML:
< ?XML version="1.0" encoding="utf-8"?>
< LinearLayout XMLns:android="http://schemas.android.com/apk/res/android"
android:orIEntation="vertical"
android:layout_width="fill_parent"
android:layout_height="fill_parent"
>
< TextVIEw
android:layout_width="fill_parent"
android:layout_height="wrap_content"
android:text="歡迎來到魏祝林的博客"
/>
< Button
android:id="@+id/bt1"
android:layout_width="wrap_content"
android:layout_height="wrap_content"
android:text="點擊進入Layout2"
/>
< /LinearLayout>
mylayout.XML
< ?XML version="1.0" encoding="utf-8"?>
< LinearLayout XMLns:android="http://schemas.android.com/apk/res/android"
android:orIEntation="vertical"
android:layout_width="fill_parent"
android:layout_height="fill_parent"
android:background="#ffffffff"
>
< TextVIEw
android:layout_width="fill_parent"
android:layout_height="wrap_content"
android:text="Welcome to Mr Wei's blog"
/>
< Button
android:id="@+id/bt2"
android:layout_width="wrap_content"
android:layout_height="wrap_content"
接上頁
android:text="點擊進入Layout1"
/>
< /LinearLayout>
然後是控制程序IntentDemo.java 及IntentDemo1.Java 代碼:
IntentDemo.Java:
package com.android.test;
import android.app.Activity;
import android.content.Intent;
import android.os.Bundle;
import android.view.VIEw;
import android.widget.Button;
public class IntentDemo extends Activity {
private Button bt1;
public void onCreate(Bundle savedInstanceState) {
super.onCreate(savedInstanceState);
setContentVIEw(R.layout.main);
bt1 = (Button)findVIEwById(R.id.bt1);
bt1.setOnClickListener(new Button.OnClickListener(){
public void onClick(VIEw v){
//new 一個Intent對象,並指定要啟動的Class
Intent intent = new Intent();
intent.setClass(IntentDemo.this, IntentDemo1.class);
//調用一個新的Activity
startActivity(intent);
//關閉原本的Activity
IntentDemo.this.finish();
}
});
}
}
在IntentDemo.java 同一目錄內新建一個IntentDemo1.Java 類
IntentDemo1.Java:
package com.android.test;
import android.app.Activity;
import android.content.Intent;
import android.os.Bundle;
import android.view.VIEw;
import android.widget.Button;
public class IntentDemo1 extends Activity {
private Button bt2;
public void onCreate(Bundle savedInstanceState) {
super.onCreate(savedInstanceState);
// 載入mylayout.XML
setContentVIEw(R.layout.mylayout);
bt2 = (Button) findVIEwById(R.id.bt2);
bt2.setOnClickListener(new Button.OnClickListener() {
public void onClick(VIEw v) {
// new 一個Intent對象,並指定要啟動的Class
接上頁
Intent intent = new Intent();
intent.setClass(IntentDemo1.this, IntentDemo.class);
// 調用一個新的Activity
startActivity(intent);
// 關閉原本的Activity
IntentDemo1.this.finish();
}
});
}
}
最後是本例子的重點,添加另外一個Activity 所以必須在androidManifest.XML 中定義一個新的activty ,並給予名稱name ,或則程序無法編譯運行.新手很容易遇到這個問題.
< ?XML version="1.0" encoding="utf-8"?>
< manifest XMLns:android="http://schemas.android.com/apk/res/android"
package="com.android.test"
android:versionCode="1"
android:versionName="1.0">
< application android:icon="@drawable/icon" android:label="@string/app_name">
< activity android:name=".IntentDemo"
android:label="@string/app_name">
< intent-filter>
< action android:name="android.intent.action.MAIN" />
< category android:name="android.intent.category.LAUNCHER" />
< /intent-filter>
< /activity>
< activity android:name="IntentDemo1">< /activity>
< /application>
< uses-sdk android:minSdkVersion="3" />
< /manifest>
本例子所涉及的的全部代碼已經全部貼出,最後執行之,將達到上述效果!本節到此結束~
 Dashboard Android用戶自定義UI設計模板
Dashboard,一種專門針對入口界面設計的應用程序,Dashboard (為儀表板之意)原來是蘋果公司 Mac OS X v10.4 Tiger 作業系統中的應用程
 總結谷歌Android SDK系統最新細節
在android SDK系統中已經沒有了JDK,自然也無法運行JUnit,但是這並不能阻止我們利用JUnit來編寫單元測試,下面的文章進行詳細說明下android SD
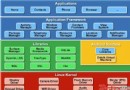 Android 架構
Android操作系統是一個堆棧的軟件組件,它大致分為五個部分和四個主要層的體系結構,如下圖所示。Linux內核在層次的底部是 Linux - Linux 2.6。它提供
 谷歌的Android 2.0系統使用心得
Google正式推出了android 2.0系統的SDK(軟件開發套件,開發人員調試系統所用),這將使現在日漸風靡的GPhone變得越來越好用,這也大大的方便了用戶的使