編輯:高級開發
Java代碼
/**
* 電信APN列表
* @author wudongdong
*
*/
public class APNNET {
public static String CTWAP="ctwap";
public static String CTNET="ctnet";
}
/**
* 電信APN列表
* @author wudongdong
*
*/
public class APNNET {
public static String CTWAP="ctwap";
public static String CTNET="ctnet";
}獲得APN的類型
Java代碼
/**
* 獲得APN類型
* @author wudongdong
*
*/
public class ApnUtil {
private static Uri PREFERRED_APN_URI = Uri
.parse("content://telephony/carrIErs/preferapn");
/**
* get apntype
* @param context
* @return
*/
public static String getApnType(Context context){
String apntype="nomatch";
Cursor c = context.getContentResolver().query(PREFERRED_APN_URI,
null, null, null, null);
c.moveToFirst();
String user=c.getString(c.getColumnIndex("user"));
if(user.startsWith(APNNET.CTNET)){
apntype=APNNET.CTNET;
}else if(user.startsWith(APNNET.CTWAP)){
apntype=APNNET.CTWAP;
}
return apntype;
}
}
/**
* 獲得APN類型
* @author wudongdong
*
*/
public class ApnUtil {
private static Uri PREFERRED_APN_URI = Uri
.parse("content://telephony/carrIErs/preferapn");
/**
* get apntype
* @param context
* @return
*/
public static String getApnType(Context context){
String apntype="nomatch";
Cursor c = context.getContentResolver().query(PREFERRED_APN_URI,
接上頁
null, null, null, null);
c.moveToFirst();
String user=c.getString(c.getColumnIndex("user"));
if(user.startsWith(APNNET.CTNET)){
apntype=APNNET.CTNET;
}else if(user.startsWith(APNNET.CTWAP)){
apntype=APNNET.CTWAP;
}
return apntype;
}
}
獲得手機號碼的話可以傳IMSI碼到指定接口,接口地址不方便說。
但可以透露一點,必須走CTWAP,這也是判斷APN類型的原因
發現很多應用如果APN是走代理的話就不能聯網,那麼再介紹一下用APN設置網絡的代理信息。
Java代碼
Cursor c = context.getContentResolver().query(PREFERRED_APN_URI,
null, null, null, null);
c.moveToFirst();
String proxy=c.getString(c.getColumnIndex("proxy"));
if (!"".equals(proxy) && proxy!=null) {
Properties prop = System.getPropertIEs();
System.getPropertIEs().put("proxySet", "true");
prop.setProperty("http.proxyHost", c.getString(c
.getColumnIndex("proxy")));
prop.setProperty("http.proxyPort", c.getString(c
.getColumnIndex("port")));
String authentication = c.getString(c.getColumnIndex("user"))
+ ":" + c.getString(c.getColumnIndex("passWord"));
String encodedLogin = Base64.encode(authentication);
uc.setRequestProperty("Proxy-Authorization", " Basic "
+ encodedLogin);
}
c.close();
 Android開發工具大全 Android工具Top 7
過去的2010年是android全面爆發的一年,出眾的擴展性使其成為了眾多玩家的購機首選,市場占有率節節攀高。本文與大家分享七個非常有用的android開發工具和工具包
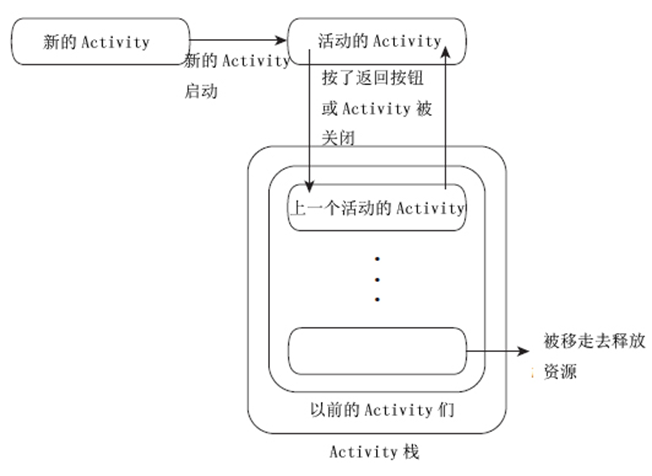 Android四種Activity的加載模式(3)
/ul> Activity棧 上面提到開發者是無法控制Activity的狀態的,那Activity的狀態又是按照何種邏輯來運作的呢?這就要知道 Activit
 Android遠遜於iPhone 缺乏獨特應用產品
盡管蘋果聯合創始人承認:android將取得最終勝利,不過很多人認為過於開放的環境依然不利於android,無差異的應用體驗正在制約Android超過iPhone。日前
 Sidekick的故事:從Danger到Android(6)
2011 年 2 月,Danger 時代結束。T Mobile 的新 CEO Philipp Humm 實施新計劃,確認了向現有的 Sidekick 用戶關閉 Dang