編輯:初級開發
系出名門android(4) - 活動(Activity),服務(Service),廣播(Broadcast),廣播接收器(BroadcastReceiver)
介紹
在 android 中使用 Activity, Service, Broadcast, BroadcastReceiver
活動(Activity) - 用於表現功能
服務(Service) - 相當於後台運行的 Activity
廣播(Broadcast) - 用於發送廣播
廣播接收器(BroadcastReceiver) - 用於接收廣播
Intent - 用於連接以上各個組件,並在其間傳遞消息
1、演示 Activity 的基本用法,一個 Activity 啟動另一個 Activity,啟動另一個 Activity 時為其傳遞參數,被啟動的 Activity 返回參數給啟動者的 Activity
Main.Java
package com.webabcd.activity;
import android.app.Activity;
import android.content.Intent;
import android.os.Bundle;
import android.util.Log;
import android.view.VIEw;
import android.widget.Button;
import android.widget.TextVIEw;
public class Main extends Activity {
TextVIEw txt;
@Override
public void onCreate(Bundle savedInstanceState) {
super.onCreate(savedInstanceState);
this.setContentVIEw(R.layout.main);
txt = (TextView) this.findVIEwById(R.id.txt);
txt.setText("Activity 1");
Button btn = (Button) this.findVIEwById(R.id.btn);
btn.setText("啟動另一個Activity");
btn.setOnClickListener(new Button.OnClickListener() {
@Override
public void onClick(VIEw v) {
// 實例化 Intent,指定需要啟動的 Activity
Intent intent = new Intent();
intent.setClass(Main.this, MyActivity.class);
// 實例化 Bundle,設置需要傳遞的參數
Bundle bundle = new Bundle();
bundle.putString("name", "webabcd");
bundle.putDouble("salary", 100.13);
// 將需要傳遞的參數賦值給 Intent 對象
intent.putExtras(bundle);
// startActivity(intent); // 啟動指定的 Intent(不等待返回結果)
// Main.this.finish();
// 啟動指定的 Intent,並等待返回結果
// 其中第二個參數如果大於等於零,則返回結果時會回調 onActivityResult() 方法
startActivityForResult(intent, 0); });
Log.d("MyDebug", "onCreate");
}
// 被啟動的 Activity 返回結果時的回調函數
@Override
protected void onActivityResult(int requestCode, int resultCode, Intent data) {
if (resultCode == Activity.RESULT_OK){
Bundle bundle = data.getExtras();
String name = bundle.getString("name");
double salary = bundle.getDouble("salary");
txt.setText("Activity 1" + "\n名字:" + name + "\n薪水:" + String.valueOf(salary)); }
@Override
protected void onStart() {
// TODO Auto-generated method stub
super.onStart();
Log.d("MyDebug", "onStart");
}
@Override
protected void onStop() {
// TODO Auto-generated method stub
super.onStop();
Log.d("MyDebug", "onStop");
}
@Override
protected void onRestart() {
// TODO Auto-generated method stub
super.onRestart();
Log.d("MyDebug", "onRestart");
}
@Override
protected void onPause() {
// TODO Auto-generated method stub
super.onPause();
Log.d("MyDebug", "onPause");
}
@Override
protected void onResume() {
// TODO Auto-generated method stub
super.onResume();
Log.d("MyDebug", "onResume");
}
@Override
protected void onDestroy() {
// TODO Auto-generated method stub
super.onDestroy();
Log.d("MyDebug", "onDestroy"); }
MyActivity.Java
package com.webabcd.activity;
import android.app.Activity;
import android.content.Intent;
import android.os.Bundle;
import android.view.VIEw;
import android.widget.Button;
import android.widget.TextVIEw;
// 被另一個 Activity 所啟動的 Activity
public class MyActivity extends Activity {
Intent intent;
@Override
public void onCreate(Bundle savedInstanceState) {
super.onCreate(savedInstanceState);
this.setContentVIEw(R.layout.main2);
// 獲取啟動者傳遞過來的參數
intent = this.getIntent();
Bundle bundle = intent.getExtras();
String name = bundle.getString("name");
double salary = bundle.getDouble("salary");
TextView txt = (TextView) this.findVIEwById(R.id.txt);
txt.setText("Activity 2" + "\n名字:" + name + "\n薪水:" + String.valueOf(salary));
Button btn = (Button) this.findVIEwById(R.id.btn);
btn.setText("返回前一個Activity");
btn.setOnClickListener(new Button.OnClickListener() {
public void onClick(VIEw v) { MyActivity.this.setResult(Activity.RESULT_OK, intent);
MyActivity.this.finish(); }); }
androidManifest.XML
<?XML version="1.0" encoding="utf-8"?>
<manifest XMLns:android="http://schemas.android.com/apk/res/android"
package="com.webabcd.activity" android:versionCode="1"
android:versionName="1.0">
<application android:icon="@drawable/icon" android:label="@string/app_name">
<activity android:name=".Main" android:label="@string/app_name">
<intent-filter>
<action android:name="android.intent.action.MAIN" />
<category android:name="android.intent.category.LAUNCHER" />
</intent-filter>
</activity>
<!--
如果有需要用到的 Activity ,則都要在這裡做相應的配置
-->
<activity android:name=".MyActivity" android:label="Activity 2" />
</application>
<uses-sdk android:minSdkVersion="3" />
</manifest>
2、Service, Broadcast, BroadcastReceiver 的演示
Main.Java
package com.webabcd.service;
import android.app.Activity;
import android.content.BroadcastReceiver;
import android.content.ComponentName;
import android.content.Context;
import android.content.Intent;
import android.content.IntentFilter;
import android.content.ServiceConnection;
import android.os.Bundle;
import android.os.IBinder;
import android.view.VIEw;
import android.view.VIEw.OnClickListener;
import android.widget.TextVIEw;
public class Main extends Activity implements OnClickListener {
private TextVIEw txtMsg;
@Override
public void onCreate(Bundle savedInstanceState) {
super.onCreate(savedInstanceState);
setContentVIEw(R.layout.main);
setTitle("android 之 service");
this.findVIEwById(R.id.btnStart).setOnClickListener(this);
this.findVIEwById(R.id.btnStop).setOnClickListener(this);
this.findVIEwById(R.id.btnBind).setOnClickListener(this);
this.findVIEwById(R.id.btnUnbind).setOnClickListener(this);
txtMsg = (TextView)this.findVIEwById(R.id.txtMsg);
// 實例化自定義的 BroadcastReceiver
receiver = new UpdateReceiver();
IntentFilter filter = new IntentFilter();
// 為 BroadcastReceiver 指定 action ,使之用於接收同 action 的廣播
filter.addAction("com.webabcd.service.msg");
// 以編程方式注冊 BroadcastReceiver 。配置方式注冊 BroadcastReceiver 的例子見 androidManifest.XML 文件
// 一般在 OnStart 時注冊,在 OnStop 時取消注冊
this.registerReceiver(receiver, filter);
// this.unregisterReceiver(receiver);
}
@Override
public void onClick(VIEw v) {
Intent intent = new Intent(Main.this, MyService.class);
switch (v.getId()) {
case R.id.btnStart:
this.startService(intent);
break;
case R.id.btnStop:
this.stopService(intent);
break;
case R.id.btnBind:
this.bindService(intent, conn, Context.BIND_AUTO_CREATE);
break;
case R.id.btnUnbind:
this.unbindService(conn);
break; }
// bindService() 所需的 ServiceConnection 對象
private ServiceConnection conn = new ServiceConnection() {
@Override
public void onServiceConnected(ComponentName className, IBinder service) {
}
@Override
public void onServiceDisconnected(ComponentName className) {
}
};
private String msg="";
private UpdateReceiver receiver;
// 實現一個 BroadcastReceiver,用於接收指定的 Broadcast
public class UpdateReceiver extends BroadcastReceiver{
@Override
public void onReceive(Context context, Intent intent) {
msg = intent.getStringExtra("msg");
txtMsg.append(msg + "\n");
}
}
}
MyService.Java
package com.webabcd.service;
import android.app.Service;
import android.content.Intent;
import android.os.IBinder;
import android.util.Log;
// 演示 Service 的生命周期。具體信息運行程序後在 LogCat 中查看
public class MyService extends Service {
@Override
public IBinder onBind(Intent intent) {
Log.d("MyDebug", "onBind");
sendMsg("onBind");
// TODO Auto-generated method stub
return null;
}
@Override
public void onCreate() {
// TODO Auto-generated method stub
super.onCreate();
Log.d("MyDebug", "onCreate");
sendMsg("onCreate");
}
@Override
public void onDestroy() {
// TODO Auto-generated method stub
super.onDestroy();
Log.d("MyDebug", "onDestroy");
sendMsg("onDestroy");
}
@Override
public void onRebind(Intent intent) {
// TODO Auto-generated method stub
super.onRebind(intent);
Log.d("MyDebug", "onRebind");
sendMsg("onRebind");
}
@Override
public void onStart(Intent intent, int startId) {
super.onStart(intent, startId);
Log.d("MyDebug", "onStart");
sendMsg("onStart");
}
@Override
public boolean onUnbind(Intent intent) {
Log.d("MyDebug", "onUnbind");
sendMsg("onUnbind");
// TODO Auto-generated method stub
return super.onUnbind(intent);
}
// 發送廣播信息
private void sendMsg(String msg){
// 指定廣播目標的 action (注:指定了此 action 的 receiver 會接收此廣播)
Intent intent = new Intent("com.webabcd.service.msg"); intent.putExtra("msg", msg); this.sendBroadcast(intent); }
MyBootReceiver.Java
package com.webabcd.service;
import android.content.BroadcastReceiver;
import android.content.Context;
import android.content.Intent;
import android.util.Log;
public class MyBootReceiver extends BroadcastReceiver {
// 用於接收滿足條件的 Broadcast(相應的 Broadcast 的注冊信息詳見 androidManifest.XML ,當系統啟動完畢後會調用這個廣播接收器)
@Override
public void onReceive(Context arg0, Intent arg1) {
Log.d("MyDebug", "onReceive");
// 啟動服務
Intent service = new Intent(arg0, MyService.class);
arg0.startService(service);
}
androidManifest.XML
<?XML version="1.0" encoding="utf-8"?>
<manifest XMLns:android="http://schemas.android.com/apk/res/android"
package="com.webabcd.service" android:versionCode="1"
android:versionName="1.0">
<application android:icon="@drawable/icon" android:label="@string/app_name">
<activity android:name=".Main" android:label="@string/app_name">
<intent-filter>
<action android:name="android.intent.action.MAIN" />
<category android:name="android.intent.category.LAUNCHER" />
</intent-filter>
</activity>
<!--
如果有需要用到的 service ,則都要在這裡做相應的配置
-->
<service android:name=".MyService"></service>
<!--
注冊一個 BroadcastReceiver
其 intent-filter 為 android.intent.action.BOOT_COMPLETED(用於接收系統啟動完畢的 Broadcast)
-->
<receiver android:name=".MyBootReceiver">
<intent-filter>
<action android:name="android.intent.action.BOOT_COMPLETED" />
</intent-filter>
</receiver>
</application>
<!--
接受系統啟動完畢的 Broadcast 的權限
-->
<uses-permission android:name="android.permission.RECEIVE_BOOT_COMPLETED" />
<uses-sdk android:minSdkVersion="3" />
</manifest>
本文來自編程入門網():http://www.bianceng.cn/OS/extra/201004/16654_4.htm
 android binder機制(七)
接上,其實BnMediaPlayerService->onTransact函數的結構也很簡單,就是switch...case...接收不同的請求執行不同的代碼調用
 Android 2.3.3 Gingerbread來到Nexus One支援WebM視頻
Google先後開始向自己的兩款旗艦手機Nexus One和Nexus S推送Android的小版本升級2.3.3。這也是官方版本Gingerbread發布近兩個月後,
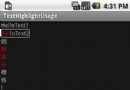 Android 開發TextView 部分字符高亮
TextVIEw 部分字體高[功能]TextVIEw是不支持部分字段高亮的 但是我們可以進行擴展[思路]1. 利用LinearLayout 作為 TextVIEw 的
 Android本地化開發技巧
很多開發者考慮使自己的Android程序兼容多國語言,其實Google在設計Android時已經考慮了本地化問題,通過定義相關的資源可以自適應當前手機的語言來加載響應的