編輯:初級開發
# package ndk.sample.myservice;
# interface IMyService {
# String getGreetings(in String toName);
# }
b)實現MyService; 2. package ndk.sample.myservice;
3. import android.app.Service;
4. import android.content.Intent;
5. import android.os.IBinder;
6. import android.util.Log;
7. public class MyService extends Service {
8. private final IMyService.Stub binder = new IMyService.Stub() {
9. public String getGreetings(String toName) {
10. return get_greetings(toName);
11. }
12. };
13.
14. @Override
15. public void onCreate() {
16. Log.v("MyService", "Lifecycle - onCreate");
17. }
18.
19. @Override
20. public void onDestroy() {
21. Log.v("MyService", "Lifecycle - onDestroy");
22. }
23.
24. @Override
25. public void onStart(Intent intent, int startId) {
26. Log.v("MyService", "Lifecycle - onStart: id = " + Integer.toString(startId));
27. }
28.
29. @Override
30. public IBinder onBind(Intent intent) {
31. Log.v("MyService", "Lifecycle - onBind");
32. return this.binder;
33. }
34. @Override
35. public void onRebind(Intent intent) {
36. Log.v("MyService", "Lifecycle - onRebind");
37. }
38.
39. @Override
40. public boolean onUnbind(Intent intent) {
41. Log.v("MyService", "Lifecycle - onUnbind");
42. return false;
43. }
44.
45. static {
46. System.loadLibrary("mynativecodes");
47. }
48.
49. public native String get_greetings(String toName);
50. }
c)實現TestClIEnt; 2. package ndk.sample.myservice;
3. import android.app.Activity;
4. import android.content.ComponentName;
5. import android.content.Intent;
6. import android.content.ServiceConnection;
7. import android.os.Bundle;
8. import android.os.IBinder;
9. import android.os.RemoteException;
10. import android.util.Log;
11. import android.view.VIEw;
12. import android.widget.Button;
13. import android.widget.EditText;
14. import android.widget.TextView;
15. public class TestClient extends Activity {
16. private TextView tvGreetings;
17. private EditText etName;
18. private IMyService service;
19.
20. private ServiceConnection connection = new ServiceConnection () {
21. @Override
22. public void onServiceConnected(ComponentName className, IBinder iservice) {
23. service = IMyService.Stub.asInterface(iservice);
24. }
25.
26. @Override
27. public void onServiceDisconnected(ComponentName className) {
28. service = null;
29. }
30. };
31.
32. @Override
33. public void onCreate(Bundle savedInstanceState) {
34. super.onCreate(savedInstanceState);
35. setContentView(R.layout.main);
36.
37. tvGreetings = (TextView)findViewById(R.id.tvGreetings);
38. etName = (EditText)findViewById(R.id.etName);
39.
40. Button btnHello = (Button)findViewById(R.id.btnHello);
41. btnHello.setOnClickListener(new View.OnClickListener () {
42. @Override
43. public void onClick(View view) {
44. String toName = etName.getText().toString();
45. try {
46. String greetings = service.getGreetings(toName);
47. tvGreetings.setText(greetings);
48. etName.setText("");
49. }
50. catch (RemoteException e) {
51. Log.e("TestClient", "error", e);
52. }
53. }
54. });
55. }
56.
57. @Override
58. public void onStart() {
59. super.onStart();
60.
61. boolean rc = bindService(
62. new Intent(IMyService.class.getName()),
63. connection, BIND_AUTO_CREATE);
64. if (rc == false)
65. Log.v("TestClIEnt", "Fail to bindService");
66. }
67.
68. @Override
69. public void onStop() {
70. super.onStop();
71.
72. unbindService(connection);
73. }
74. }d)修改androidManifest.XML,添加service# <?xml version="1.0" encoding="utf-8"?> # <manifest XMLns:android="http://schemas.android.com/apk/res/android" # package="ndk.sample.myservice" # android:versionCode="1" # android:versionName="1.0"> # <application android:icon="@drawable/icon" android:label="@string/app_name"> # <activity android:name=".TestClIEnt" # android:label="@string/app_name"> # <intent-filter> # <action android:name="android.intent.action.MAIN" /> # <category android:name="android.intent.category.LAUNCHER" /> # </intent-filter> # </activity> # <service android:name=".MyService"> # <intent-filter> # <action android:name="ndk.sample.myservice.IMyService" /> # </intent-filter>> # </service>> # </application> # <uses-sdk android:minSdkVersion="3" /> # </manifest>e)添加Application.mk文件
  1. APP_PROJECT_PATH := $(call my-dir)
2. APP_MODULES := mynativecodes
3.在MyService下添加目錄jni:
2. #include "ndk_sample_myservice_MyService.h"
3. #include <stdio.h>
4. #include <string.h>
5. JNIEXPORT JString JNICALL Java_ndk_sample_myservice_MyService_get_1greetings
6.   (JNIEnv *env, jobject obj, JString name)
7. {
8. // fixed buffer size for test
9. char buf[128];
10. const jbyte *str;
11. str = (*env)->GetStringUTFChars(env, name, NULL);
12. if (str == NULL) {
13.   return NULL;
14. }
15. if (strlen (str) == 0)
16.   sprintf (buf, "Who are you?");
17. else
18.   sprintf (buf, "Hello, %s!!!", str);
19. (*env)->ReleaseStringUTFChars(env, name, str);
20. return (*env)->NewStringUTF(env, buf);
21. }
c)在MyServer/jni下添加android.mk# LOCAL_PATH := $(call my-dir) # include $(CLEAR_VARS) # LOCAL_MODULE := mynativecodes # LOCAL_SRC_FILES := mynative.c # include $(BUILD_SHARED_LIBRARY)4.在Terminal下,進入NDK目錄,建立指向應用和share library的鏈接(可以不把自己的代碼放在NDK的目錄下,但必須在NDK中加入指向存放Application.mk和android.mk的路徑的鏈接)
 Android IPC框架分析 Binder,Service,Service manager
我首先從宏觀的角度觀察Binder,Service,Service Manager,並闡述各自的概念。從Linux的概念空間中,android的設計Activity托管
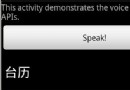 Android 輕松實現語音識別
完整代碼如下:package com.example.android.apis.app;import com.example.android.apis.R;import
 Android 定制android通知(Notification)
Notification通知界面可以用自己定義的界面來顯示。下面是我實現的帶進度條的通知效果下面是主要實現部分代碼,比較簡單直接看代碼可以了。Java代碼nf =new
 Android系統APK軟件漢化教程-2
第一部分:arsc文件漢化目前市面上最流行的漢化方式,就是漢化這部分主文件。我們開始吧:首先,打開androidResEdit1.3然後把resources.arsc文