Android教程網
  1. 首頁
  2. Android 技術
  3. Android 手機
  4. Android 系統教程
  5. Android 游戲
 Android教程網 >> Android技術 >> Android開發環境 >> Android Studio(六):通過Lint提升你的代碼

Android Studio(六):通過Lint提升你的代碼

編輯:Android開發環境

  為了測試你的Android應用符合功能需求。最重要的是確保你的代碼沒有結構性問題。結構差的代碼影響你的Android應用的可靠性,讓你的代碼難以維護。比如,如果你的XML資源文件包含未使用的明明空間,這會花費空間和不必要的進程。其他機構行問題,比如是喲個過時的API調用,如果設備API版本不兼容,可能導致運行失敗。

  概覽

  Android Studio提供了一個稱為Lint的代碼掃描工具,可以非常容易的幫你辨別和糾正代碼的結構性質量問題,而無須你執行app或者編寫測試用例。工具檢測到的每個錯誤都會標明嚴重程度一個描述信息,這樣你就可以迅速的確定優先級。你也可以將在你項目中無關緊要的錯誤進行忽略。這個工具有相應的命令行接口,所以你可以非常容易的整合到你的測試進程中。

  Lint工具通過檢測你的Android項目源代碼來發現潛在的bug並提供代碼優化建議。你可以從命令行或者Android Studio中運行Lint。

Android Studio(六):通過Lint提升你的代碼

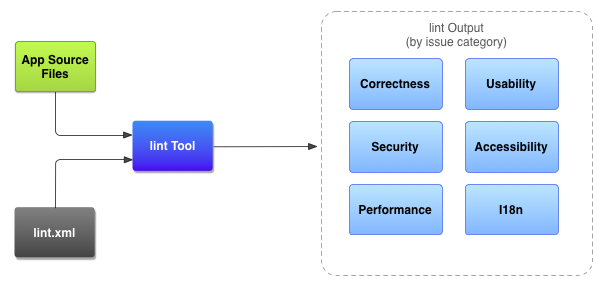
  Application 源文件(Application source files)

  源文件包含組成你的Android項目的文件,包含Java和XML文件、圖標和ProGuard配置文件。

  Lint.xml文件

  配置文件,用於配置你想忽略的問題,或者更高問題的嚴重級別。

  Lint工具

  你可以通過命令行或者Android Studio運行在你的Android項目上的靜態代碼掃描工具。Lint工具檢測影響你的Android應用的質量和性能的代碼結構性問題。強烈建議在發布你的應用之前修復Lint檢測到的任何問題

  Lint檢測結果

  你可以在Android Studio的Event Log中來查看Lint的結果(或者在命令行中)。

  Lint工具作為Android SDK工具的一部分(>=16)。

  在Android Studio中運行Lint

  在Android Studio中,當你構建你的app時,Lint自動運行。

  在Android Studio中你可以在android設置中添加lintOptions屬性。如下:

XML/HTML代碼
  1. android {  
  2.     lintOptions {  
  3.        // 設置為true會關閉lint分析進度  
  4.        quiet true  
  5.        // 如果為true,則在發現錯誤時停止gradle構建  
  6.        abortOnError false  
  7.        // 如果為true,則只報告錯誤  
  8.        ignoreWarnings true  
  9.        }  
  10. }  

  命令行運行Lint

  運行lint檢測項目:

  lint [flags] <project directory>

  檢測項目的某個錯誤,以下這個用於檢測Android命名空間前綴:

  lint --check MissingPrefix myproject

  查看lint幫助,可用:

  Lint輸出示例

  接下來展示lint檢測一個Earthquake的項目輸出的信息:

XML/HTML代碼
  1. $ lint Earthquake  
  2.   
  3. Scanning Earthquake: ...............................................................................................................................  
  4. Scanning Earthquake (Phase 2): .......  
  5. AndroidManifest.xml:23: Warning: <uses-sdk> tag appears after <application> tag [ManifestOrder]  
  6.   <uses-sdk android:minSdkVersion="7" />  
  7.   ^  
  8. AndroidManifest.xml:23: Warning: <uses-sdk> tag should specify a target API level (the highest verified version; when running on later versions, compatibility behaviors may be enabled) with android:targetSdkVersion="?" [UsesMinSdkAttributes]  
  9.   <uses-sdk android:minSdkVersion="7" />  
  10.   ^  
  11. res/layout/preferences.xml: Warning: The resource R.layout.preferences appears to be unused [UnusedResources]  
  12. res: Warning: Missing density variation folders in res: drawable-xhdpi [IconMissingDensityFolder]  
  13. 0 errors, 4 warnings  

  配置lint

  默認情況下,當你運行一個掃描的時候,會檢測Lint支持的所有的issue。你可以禁止Lint檢測某個issue或者設置issue的安全級別。

  你可以在不同級別來配置Lint檢測:

  1、 全局,針對整個項目

  2、 每個項目模塊

  3、 每個測試模塊

  等等。

  在Android Studio中配置Lint

  當你使用Android Studio時,內置的Lint工具可以檢測你的代碼。你可以通過兩種方式來查看警告和錯誤:

  1、 代碼編輯器中,當Lint發現錯誤之後,會黃色高翔顯示問題代碼。

  2、 選擇Analyze > Inspect Code,打開Lint Inspection Results。

  設置默認Lint檢測:

  1、 在Android Studio中,打開你的項目。

  2、 選擇File > Other Settings > Default Settings

  3、 選擇Editor > Inspections,打開Default Preferences對話框。

  4、 在Profile中,選擇Default或者Project Default。

  5、 根據需要更改Lint設置。

  6、 點擊OK。

  將Lint檢測顯示在Inspection Results窗口:

  1、 在Android Studio中,打開項目,選擇你要測試的部分

  2、 選擇Analyze > Inspect Code

  3、 在Specify Inspection Scope對話框中,選擇需要測試的部分

  4、 點擊OK。

  結構將根據分類顯示在Inspection Results窗口。

  配置Lint文件

  你可以在lint.xml文件中聲明Lint檢測參數。如果你手動創建這個文件,將它放在你的Android項目的根目錄。如果你在Android Studio中配置你的Lint參數,lint.xml自動生成並添加到你的項目中。

  Lint.xml 文件包含一個父標簽,包含一個或多個標簽。如下:

XML/HTML代碼
  1. <?xml version="1.0" encoding="UTF-8"?>  
  2.     <lint>  
  3.         <!-- list of issues to configure -->  
  4. </lint>  

  通過設置標簽,你可以禁用Lint檢測某個issue或者更高某個issue的級別。

  注意:查看lint支持的issue列表,可以運行lint –list命令

  Lint.xml文件示例

  下面是一個lint.xml文件示例:

XML/HTML代碼
  1. <?xml version="1.0" encoding="UTF-8"?>  
  2. <lint>  
  3.     <!-- Disable the given check in this project -->  
  4.     <issue id="IconMissingDensityFolder" severity="ignore" />  
  5.   
  6.     <!-- Ignore the ObsoleteLayoutParam issue in the specified files -->  
  7.     <issue id="ObsoleteLayoutParam">  
  8.         <ignore path="res/layout/activation.xml" />  
  9.         <ignore path="res/layout-xlarge/activation.xml" />  
  10.     </issue>  
  11.   
  12.     <!-- Ignore the UselessLeaf issue in the specified file -->  
  13.     <issue id="UselessLeaf">  
  14.         <ignore path="res/layout/main.xml" />  
  15.     </issue>  
  16.   
  17.     <!-- Change the severity of hardcoded strings to "error" -->  
  18.     <issue id="HardcodedText" severity="error" />  
  19. </lint>  

  在Java和XML源文件中配置lint檢測

  你可以在Java和XML文件中禁用Lint檢測

  在Java中配置lint檢測

  為了在你的Android項目中指定的類或方法中金庸Lint檢測,在Java代碼中添加@SupprewwLint注解。

  接下來的示例顯示在OnCreate方法中如何關閉Lint檢測,Lint工具在其他方法中繼續檢測NewApi issue。

Java代碼
  1. @SuppressLint("NewApi")  
  2. @Override  
  3. public void onCreate(Bundle savedInstanceState) {  
  4.     super.onCreate(savedInstanceState);  
  5. setContentView(R.layout.main);  

  下面的示例顯示如何關閉ParserError issue:

Java代碼
  1. @SuppressLint("ParserError")  
  2. public class FeedProvider extends ContentProvider {}  

  在Java文件中禁止所有Lint檢測,如下:

Java代碼
  1. @SuppressLint("all")  

  在XML中配置Lint檢測

  在XML文件中,你可以使用tools:ignore屬性來金庸Lint檢測。為了使相關屬性被Lint工具識別,必須添加如下命名空間到你的XML文namespace xmlns:tools=http://schemas.android.com/tools下:

XML/HTML代碼
  1. <LinearLayout  
  2.     xmlns:android="http://schemas.android.com/apk/res/android"  
  3.     xmlns:tools="http://schemas.android.com/tools"  
  4.     tools:ignore="UnusedResources" >  
  5.   
  6.     <TextView  
  7.         android:text="@string/auto_update_prompt" />  
  8. </LinearLayout>  

  禁用多個issue,如下:

XML/HTML代碼
  1. tools:ignore="NewApi,StringFormatInvalid"  

  禁用所有的issue 檢測,如下:

XML/HTML代碼
  1. tools:ignore="all"
  1. 上一頁:
  2. 下一頁:
熱門文章
閱讀排行版
Copyright © Android教程網 All Rights Reserved