像按鈕、下拉框、列表、標簽、圖片、復選框、編輯框、分割面板、滑動面板、滑動條等都是比較常用的UI類,它們都屬於Actor,可以很方便的納入到舞台的管理中,而且都包含在com.badlogic.gdx.scenes.scene2d.ui包中,
其實仔細看看UI類的實現代碼不難發現其實它們都是大部分繼承自Widget或者Table,如果需要自定義UI可以繼承以上兩個類(它們繼承自Actor),這裡要說明一下libgdx的布局部分使用了TWL,有興趣的朋友可以去看看。
在介紹每個控件之前我們先來看一下NinePatch,這是最近的一個比較重大的更新。
何為NinePatch?其實android原生即有NinePatch類,常在按鈕中使用。

如圖,將圖片分成九份。中間部分可以根據需要擴大,使按鈕的大小內容變動不受圖片的限制。
而在libgdx的NinePatch其實就是九個TextureRegion對象。
常用的實例化方法有兩個:
public NinePatch (Texture texture, int left, int right, int top, int bottom)
public NinePatch (TextureRegion region, int left, int right, int top, int bottom)
關於其中的四個int型參數如何取值我們可以參考一下源碼:
Java代碼
- public NinePatch (TextureRegion region, int left, int right, int top, int bottom) {
- int middleWidth = region.getRegionWidth() - left - right;
- int middleHeight = region.getRegionHeight() - top - bottom;
- this.patches = new TextureRegion[] {new TextureRegion(region, 0, 0, left, top),
- new TextureRegion(region, left, 0, middleWidth, top), new TextureRegion(region, left + middleWidth, 0, right, top),
- new TextureRegion(region, 0, top, left, middleHeight), new TextureRegion(region, left, top, middleWidth, middleHeight),
- new TextureRegion(region, left + middleWidth, top, right, middleHeight),
- new TextureRegion(region, 0, top + middleHeight, left, bottom),
- new TextureRegion(region, left, top + middleHeight, middleWidth, bottom),
- new TextureRegion(region, left + middleWidth, top + middleHeight, right, bottom)};
- }
先計算中間部分的寬度和高度。然後開始切圖,首先取頂部的最左邊的那個,即圖中編號1的那塊,然後去它右邊的,然後再右邊的。
取完最上邊的那行,然後取中間的那行,然後取最後一行的。
由上自下,由左自右。
而在繪制時又是如何處理的呢?看源碼:
Java代碼
- public void draw (SpriteBatch batch, float x, float y, float width, float height) {
- float centerColumnX = x;
- if (patches[BOTTOM_LEFT] != null)
- centerColumnX += patches[BOTTOM_LEFT].getRegionWidth();
- else if (patches[MIDDLE_LEFT] != null)
- centerColumnX += patches[MIDDLE_LEFT].getRegionWidth();
- else if (patches[TOP_LEFT] != null) //
- centerColumnX += patches[TOP_LEFT].getRegionWidth();
- float rightColumnX = x + width;
- if (patches[BOTTOM_RIGHT] != null)
- rightColumnX -= patches[BOTTOM_RIGHT].getRegionWidth();
- else if (patches[MIDDLE_RIGHT] != null)
- rightColumnX += patches[MIDDLE_RIGHT].getRegionWidth();
- else if (patches[TOP_RIGHT] != null) //
- rightColumnX += patches[TOP_RIGHT].getRegionWidth();
- float middleRowY = y;
- if (patches[TOP_LEFT] != null)
- middleRowY += patches[TOP_LEFT].getRegionHeight();
- else if (patches[TOP_CENTER] != null)
- middleRowY += patches[TOP_CENTER].getRegionHeight();
- else if (patches[TOP_RIGHT] != null) //
- middleRowY += patches[TOP_RIGHT].getRegionHeight();
- float topRowY = y + height;
- if (patches[TOP_LEFT] != null)
- topRowY -= patches[TOP_LEFT].getRegionHeight();
- else if (patches[TOP_CENTER] != null)
- topRowY -= patches[TOP_CENTER].getRegionHeight();
- else if (patches[TOP_RIGHT] != null) //
- topRowY -= patches[TOP_RIGHT].getRegionHeight();
- // Bottom row
- if (patches[BOTTOM_LEFT] != null) batch.draw(patches[BOTTOM_LEFT], x, y, centerColumnX - x, middleRowY - y);
- if (patches[BOTTOM_CENTER] != null)
- batch.draw(patches[BOTTOM_CENTER], centerColumnX, y, rightColumnX - centerColumnX, middleRowY - y);
- if (patches[BOTTOM_RIGHT] != null)
- batch.draw(patches[BOTTOM_RIGHT], rightColumnX, y, x + width - rightColumnX, middleRowY - y);
- // Middle row
- if (patches[MIDDLE_LEFT] != null) batch.draw(patches[MIDDLE_LEFT], x, middleRowY, centerColumnX - x, topRowY - middleRowY);
- if (patches[MIDDLE_CENTER] != null)
- batch.draw(patches[MIDDLE_CENTER], centerColumnX, middleRowY, rightColumnX - centerColumnX, topRowY - middleRowY);
- if (patches[MIDDLE_RIGHT] != null)
- batch.draw(patches[MIDDLE_RIGHT], rightColumnX, middleRowY, x + width - rightColumnX, topRowY - middleRowY);
- // Top row
- if (patches[TOP_LEFT] != null) batch.draw(patches[TOP_LEFT], x, topRowY, centerColumnX - x, y + height - topRowY);
- if (patches[TOP_CENTER] != null)
- batch.draw(patches[TOP_CENTER], centerColumnX, topRowY, rightColumnX - centerColumnX, y + height - topRowY);
- if (patches[TOP_RIGHT] != null)
- batch.draw(patches[TOP_RIGHT], rightColumnX, topRowY, x + width - rightColumnX, y + height - topRowY);
- }
先計算左右欄的寬度,在計算中間和頂部的高度。然後從下自上的繪制。說實話我覺得這段代碼看著很好玩的。
現在來說說幾個常用的控件的使用吧。先構建一個舞台。
先來試試Label吧,label是有緩存的,所以替換顯示內容不是用setText方法,而是使用setWrappedText方法。
代碼如下:
Java代碼
- package com.cnblogs.htynkn.listener;
- import com.badlogic.gdx.ApplicationListener;
- import com.badlogic.gdx.Gdx;
- import com.badlogic.gdx.graphics.GL10;
- import com.badlogic.gdx.graphics.g2d.BitmapFont;
- import com.badlogic.gdx.graphics.g2d.BitmapFont.HAlignment;
- import com.badlogic.gdx.scenes.scene2d.Stage;
- import com.badlogic.gdx.scenes.scene2d.actors.Label;
- public class FirstGame implements ApplicationListener {
- private Stage stage;
- Label label;
- @Override
- public void create() {
- stage = new Stage(Gdx.graphics.getWidth(), Gdx.graphics.getHeight(),
- true);
- label = new Label("fpsLabel", new BitmapFont(Gdx.files.internal("cf.fnt"),Gdx.files.internal("cf.png"),false), "label1");
- label.x=5;
- label.y=Gdx.graphics.getHeight()-label.height-5;
- stage.addActor(label);
- Gdx.input.setInputProcessor(stage);
- }
- @Override
- public void dispose() {
- stage.dispose();
- }
- @Override
- public void pause() {
- // TODO Auto-generated method stub
- }
- @Override
- public void render() {
- Gdx.gl.glClear(GL10.GL_COLOR_BUFFER_BIT);
- label.setWrappedText("FPS: "+Gdx.graphics.getFramesPerSecond(),
- HAlignment.CENTER);
- stage.act(Gdx.graphics.getDeltaTime());
- stage.draw();
- }
- @Override
- public void resize(int width, int height) {
- // TODO Auto-generated method stub
- }
- @Override
- public void resume() {
- // TODO Auto-generated method stub
- }
- }
效果:
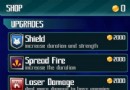
然後再看看Button吧,實例化需要一個ButtonStyle,定義了按鈕三種狀態對應的圖片樣式,按下和松開時的X,Y偏移還有Button中文字繪制所需的BitmapFont和Color。
按鈕的三種狀態的圖片我就省了,只用一張圖片。

修改代碼如下:
Java代碼
- package com.cnblogs.htynkn.listener;
- import com.badlogic.gdx.ApplicationListener;
- import com.badlogic.gdx.Gdx;
- import com.badlogic.gdx.graphics.Color;
- import com.badlogic.gdx.graphics.GL10;
- import com.badlogic.gdx.graphics.Texture;
- import com.badlogic.gdx.graphics.g2d.BitmapFont;
- import com.badlogic.gdx.graphics.g2d.NinePatch;
- import com.badlogic.gdx.graphics.g2d.BitmapFont.HAlignment;
- import com.badlogic.gdx.scenes.scene2d.Stage;
- import com.badlogic.gdx.scenes.scene2d.actors.Label;
- import com.badlogic.gdx.scenes.scene2d.ui.Button;
- import com.badlogic.gdx.scenes.scene2d.ui.Button.ButtonStyle;
- public class FirstGame implements ApplicationListener {
- private Stage stage;
- Label label;
- Texture texture;
- Button button;
- @Override
- public void create() {
- stage = new Stage(Gdx.graphics.getWidth(), Gdx.graphics.getHeight(),
- true);
- texture = new Texture(Gdx.files.internal("06.png"));
- NinePatch n1 = new NinePatch(texture, 7, 7, 9, 9);
- BitmapFont bitmapFont = new BitmapFont(Gdx.files.internal("cf.fnt"),
- Gdx.files.internal("cf.png"), false);
- label = new Label("fpsLabel", bitmapFont, "label1");
- label.x = 5;
- label.y = Gdx.graphics.getHeight() - label.height - 5;
- stage.addActor(label);
- button = new Button("button", new ButtonStyle(n1, n1, n1, 0f, 0f, 0f,
- 0f, bitmapFont, new Color(1, 1, 0, 0.5f)), "button");
- button.x=10;
- button.y=10;
- button.width=100f;
- button.height=32f;
- stage.addActor(button);
- Gdx.input.setInputProcessor(stage);
- }
- @Override
- public void dispose() {
- stage.dispose();
- }
- @Override
- public void pause() {
- // TODO Auto-generated method stub
- }
- @Override
- public void render() {
- Gdx.gl.glClear(GL10.GL_COLOR_BUFFER_BIT);
- label.setWrappedText("FPS: " + Gdx.graphics.getFramesPerSecond(),
- HAlignment.CENTER);
- stage.act(Gdx.graphics.getDeltaTime());
- stage.draw();
- }
- @Override
- public void resize(int width, int height) {
- // TODO Auto-generated method stub
- }
- @Override
- public void resume() {
- // TODO Auto-generated method stub
- }
- }
效果:
按鈕自然應該有點擊事件,通過setClickListener來設置:
Java代碼
- button.setClickListener(new ClickListener() {
- @Override
- public void click(Actor actor) {
- Gdx.app.log("Info", "點擊事件觸發了");
- }
- });
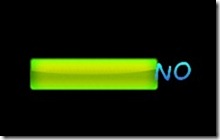
然後再看看CheckBox。CheckBox的樣式定義在CheckBoxStyle中,需要4個參數,兩種狀態的各一張圖片,一個BitmapFont和Color。
這裡我再添加一張圖片:

原理差不多,直接貼代碼了。
Java代碼
- package com.cnblogs.htynkn.listener;
- import android.graphics.Paint.Align;
- import com.badlogic.gdx.ApplicationListener;
- import com.badlogic.gdx.Gdx;
- import com.badlogic.gdx.graphics.Color;
- import com.badlogic.gdx.graphics.GL10;
- import com.badlogic.gdx.graphics.Texture;
- import com.badlogic.gdx.graphics.g2d.BitmapFont;
- import com.badlogic.gdx.graphics.g2d.NinePatch;
- import com.badlogic.gdx.graphics.g2d.TextureRegion;
- import com.badlogic.gdx.graphics.g2d.BitmapFont.HAlignment;
- import com.badlogic.gdx.scenes.scene2d.Actor;
- import com.badlogic.gdx.scenes.scene2d.Stage;
- import com.badlogic.gdx.scenes.scene2d.actors.Label;
- import com.badlogic.gdx.scenes.scene2d.ui.Button;
- import com.badlogic.gdx.scenes.scene2d.ui.CheckBox;
- import com.badlogic.gdx.scenes.scene2d.ui.ClickListener;
- import com.badlogic.gdx.scenes.scene2d.ui.Button.ButtonStyle;
- import com.badlogic.gdx.scenes.scene2d.ui.CheckBox.CheckBoxStyle;
- public class FirstGame implements ApplicationListener {
- private Stage stage;
- Label label;
- Texture texture1;
- Texture texture2;
- CheckBox checkBox;
- @Override
- public void create() {
- stage = new Stage(Gdx.graphics.getWidth(), Gdx.graphics.getHeight(),
- true);
- texture1 = new Texture(Gdx.files.internal("06.png"));
- texture2 = new Texture(Gdx.files.internal("07.png"));
- NinePatch n1 = new NinePatch(texture1, 7, 7, 9, 9);
- BitmapFont bitmapFont = new BitmapFont(Gdx.files.internal("cf.fnt"),
- Gdx.files.internal("cf.png"), false);
- label = new Label("fpsLabel", bitmapFont, "label1");
- label.x = 5;
- label.y = Gdx.graphics.getHeight() - label.height - 5;
- CheckBoxStyle style = new CheckBoxStyle(new TextureRegion(texture1),
- new TextureRegion(texture2), bitmapFont, new Color(1, 1, 1,
- 0.5f));
- checkBox = new CheckBox("checkbox", style, "checkbox");
- checkBox.x = 100;
- checkBox.y = 100;
- checkBox.width = 158f;
- checkBox.height = 32f;
- checkBox.setText("Yes");
- checkBox.setClickListener(new ClickListener() {
- @Override
- public void click(Actor actor) {
- if (checkBox.isChecked) {
- checkBox.setText("Yes");
- } else {
- checkBox.setText("NO");
- }
- }
- });
- stage.addActor(checkBox);
- stage.addActor(label);
- Gdx.input.setInputProcessor(stage);
- }
- @Override
- public void dispose() {
- stage.dispose();
- }
- @Override
- public void pause() {
- // TODO Auto-generated method stub
- }
- @Override
- public void render() {
- Gdx.gl.glClear(GL10.GL_COLOR_BUFFER_BIT);
- label.setWrappedText("FPS: " + Gdx.graphics.getFramesPerSecond(),
- HAlignment.CENTER);
- stage.act(Gdx.graphics.getDeltaTime());
- stage.draw();
- }
- @Override
- public void resize(int width, int height) {
- // TODO Auto-generated method stub
- }
- @Override
- public void resume() {
- // TODO Auto-generated method stub
- }
- }
效果:
其他的UI大致用法差不多,顯示的樣式在對應的Style或者Skin中定義。但是要注意有些UI類需要手動設置width和height,不然有些顯示會很奇怪的。
最後說一下Slider的用法。
SliderStyle需要一個NinePath和Texture,我最初沒有想通為什麼不是兩個NinePath,仔細看一下源碼才了解到,NinePath是作為背景,而Texture那個是中間的那個滑動的方塊。
關於用配置文件設置Style的問題,google code的wiki上似乎沒有寫,但是在libgdx的論壇裡面有,比如:
Java代碼
- somePatch1: [
- { height: 13, width: 9, x: 761, y: 78 },
- { height: 13, width: 1, x: 770, y: 78 },
- { height: 13, width: 9, x: 771, y: 78 },
- { height: 1, width: 9, x: 761, y: 91 },
- { height: 1, width: 1, x: 770, y: 91 },
- { height: 1, width: 9, x: 771, y: 91 },
- { height: 13, width: 9, x: 761, y: 92 },
- { height: 13, width: 1, x: 770, y: 92 },
- { height: 13, width: 9, x: 771, y: 92 }
- ]
或者
Java代碼
- somePatch2: [
- { height: 13, width: 9, x: 761, y: 78 },
- ]
 Android游戲引擎libgdx使用教程17:TiledMap中角色的行動路徑
 Android游戲開發教程之六:進度條加載
 Android游戲引擎libgdx使用教程8:相機和觀察點
 23天從0開始完成一款Android游戲開發 – 第12~14天