libgdx的UI改進很大,原來各種稀奇古怪的問題都已經解決了,而且UI的類型也基本上完全了。推薦大家下載最近的版本使用。
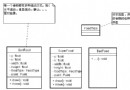
UI的使用我覺得唯一復雜的就是各種樣式的制定,比如TextButton:
Java代碼
- public TextButtonStyle (NinePatch down, NinePatch up, NinePatch checked, float pressedOffsetX, float pressedOffsetY,float unpressedOffsetX, float unpressedOffsetY, BitmapFont font, Color fontColor, Color downFontColor,Color checkedFontColor)
再看看List:
public ListStyle (BitmapFont font, Color fontColorSelected, Color fontColorUnselected, NinePatch selectedPatch)
每次使用都需要實例化若干個Texture,NinePatch什麼的還是有點麻煩,還好libgdx給出了一個解決方案:Skin。
Skin保存了UI的樣式和相關的資源,定義使用的是Json或者Json-like。API地址:http://libgdx.l33tlabs.org/docs/api/com/badlogic/gdx/scenes/scene2d/ui/Skin.html
先看看基本格式:
Java代碼
- {
- resources: {
- className: {
- name: value,
- ...
- },
- ...
- },
- styles: {
- className: {
- name: value,
- ...
- },
- ...
- }
- }
由兩個大塊定義:資源和樣式。先做個fnt文件以便支持中文。
保持為chinese.fnt和chinese.png。再做張圖: 全部拷貝到項目文件中(我是新建了一個UI文件夾)。我們先寫個Label試試。定義需要的NinePath:
Java代碼
- com.badlogic.gdx.graphics.g2d.NinePatch: {
- default-rect-red: [
- { width: 2, height: 1, x: 1, y: 43 },
- { width: 1, height: 1, x: 2, y: 43 },
- { width: 2, height: 1, x: 3, y: 43 },
- { width: 2, height: 1, x: 1, y: 45 },
- { width: 1, height: 1, x: 2, y: 45 },
- { width: 2, height: 1, x: 3, y: 45 },
- { width: 2, height: 1, x: 1, y: 43 },
- { width: 1, height: 1, x: 2, y: 43 },
- { width: 2, height: 1, x: 3, y: 43 }
- ],
- default-rect-yellow: [
- { width: 2, height: 1, x: 1, y: 54 },
- { width: 1, height: 1, x: 2, y: 54 },
- { width: 2, height: 1, x: 3, y: 54 },
- { width: 2, height: 1, x: 1, y: 55 },
- { width: 1, height: 1, x: 2, y: 55 },
- { width: 2, height: 1, x: 3, y: 55 },
- { width: 2, height: 1, x: 1, y: 54 },
- { width: 1, height: 1, x: 2, y: 54 },
- { width: 2, height: 1, x: 3, y: 54 }
- ]
- }
再定義一個白色:
Java代碼
- com.badlogic.gdx.graphics.Color: {
- white: { a: 1, b: 1, g: 1, r: 1 }
- }
然後我們的字體:
Java代碼
- com.badlogic.gdx.graphics.g2d.BitmapFont: {
- default-font: { file: chinese.fnt }
- }
然後在樣式中聲明一個Label樣式:
Java代碼
- com.badlogic.gdx.scenes.scene2d.ui.Label$LabelStyle: {
- default: { font: default-font, fontColor: white}
- }
使用時:
Java代碼
- Skin skin = new Skin(Gdx.files.internal("ui/uiskin.json"), Gdx.files.internal("ui/ui.jpg")); //加載樣式
-
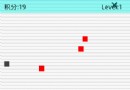
- final Label label = new Label("FPS:", skin.getStyle("default",LabelStyle.class), "fpsLabel"); //獲取Label樣式
效果:
然後再來試試TextButton:
Java代碼
- com.badlogic.gdx.scenes.scene2d.ui.TextButton$TextButtonStyle: {
- default: { down: default-rect-red, up: default-rect-yellow,fontColor: white, font: default-font}
- }
調用:
Java代碼
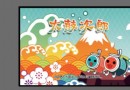
- final TextButton textButton = new TextButton("確認", skin.getStyle("default", TextButtonStyle.class), "okButton");
效果:
按下去的時候會變黃(沒截起圖)…
Skin真的用著很方便,特別是你大量使用了libgdx的UI的時候。
寫在最後:
1、Skin支不支持xml?
說實話我也很想知道,因為gdx-tests裡面skin 的配置文件有兩個,一個是json格式,另外一個是xml格式。但是我試了一下直接加載xml會報錯。
其實我比較推薦用xml格式,因為Json格式書寫時候容易寫錯(少個逗號或者括號什麼的),而且eclipse的自動縮進沒有發揮作用(難道是配置問題?)。
2、Skin支持不一個配置文件多個圖片文件,這個情況推薦將圖片合並或者干脆用多個Skin就行了。
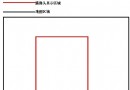
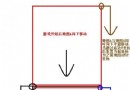
3、Skin的圖片定義的原點是左上角。
 Android游戲開發教程:手把手教你寫跳躍類游戲(三)
 Android游戲開發12:使用SharedPreference與FileInputStream/FileOutputStream保存數據
 Android游戲開發教程之二:攝像頭更新
 Android游戲開發教程之十:飛行射擊游戲