雖說可以用Image什麼的當個背景,但是要是做個RPG類的游戲就有點復雜了。為了追求效率一般可以使用libgdx的SpriteCache,但是如果習慣於TiledMap的話libgdx也是支持的。
相關的類是TiledMap,TileAtlas,TileMapRenderer,都在com.badlogic.gdx.graphics.g2d.tiled之中。
現在我們從頭來看看TiledMap的使用。
1.制作TiledMap。
我使用的是Tile Map editor,下載地址:http://www.mapeditor.org/
先新建一個地圖,大小50*30,每個塊的大小是32*32。
然後我使用的圖塊資源是從網上下的,具體出處不知了,對於資源奉獻者表示感謝~
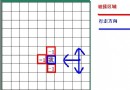
添加一個新圖塊
塊的高寬都是32.邊距和間距都是1px,這些數值是取決你的圖塊資源本身的。效果如下:
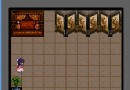
然後發揮想象吧,畫一幅地圖。
保存tmx文件。然後用gdx-tiled-preprocessor處理一下。
處理完成後會多三個文件,覆蓋原來的同名文件:
tilest1.png文件:

終於可以開始繪制了…
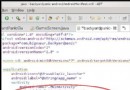
Java代碼
- map = TiledLoader.createMap(mapHandle);
- atlas = new TileAtlas(map, new FileHandle("map/"));
- tileMapRenderer = new TileMapRenderer(map, atlas, 10, 10)
最後在render用tileMapRenderer.render(cam);繪制
而在TileMapRenderer(map, atlas, 10, 10)這句中後面兩個10是緩沖的塊數,可以酌情調整。我是隨意寫的。
我個人比較喜歡舞台,其實tiledmap一樣可以在舞台中使用。
我在舞台繪制一個標簽作為例子。
其實原理很簡單,從Stage獲取Camera,然後給Render用,最後在Stage繪制。
關鍵代碼:
Java代碼
- Gdx.gl.glClear(GL10.GL_COLOR_BUFFER_BIT);
- OrthographicCamera c = (OrthographicCamera) stage.getCamera();
- ((Label) stage.findActor("fpsLabel")).setText("FPS: "
- + Gdx.graphics.getFramesPerSecond());
- stage.act(Gdx.graphics.getDeltaTime());
- tileMapRenderer.render(c);
- stage.draw();
完整代碼:
Java代碼
- package com.cnblogs.htynkn.game;
-
- import com.badlogic.gdx.ApplicationListener;
- import com.badlogic.gdx.Gdx;
- import com.badlogic.gdx.files.FileHandle;
- import com.badlogic.gdx.graphics.Color;
- import com.badlogic.gdx.graphics.GL10;
- import com.badlogic.gdx.graphics.OrthographicCamera;
- import com.badlogic.gdx.graphics.g2d.BitmapFont;
- import com.badlogic.gdx.graphics.g2d.tiled.TileAtlas;
- import com.badlogic.gdx.graphics.g2d.tiled.TileMapRenderer;
- import com.badlogic.gdx.graphics.g2d.tiled.TiledLoader;
- import com.badlogic.gdx.graphics.g2d.tiled.TiledMap;
- import com.badlogic.gdx.math.Vector2;
- import com.badlogic.gdx.math.Vector3;
- import com.badlogic.gdx.scenes.scene2d.Stage;
- import com.badlogic.gdx.scenes.scene2d.ui.Image;
- import com.badlogic.gdx.scenes.scene2d.ui.Label;
- import com.badlogic.gdx.scenes.scene2d.ui.Label.LabelStyle;
-
- public class JavaGame implements ApplicationListener {
-
- Stage stage;
- float width;
- float height;
- private TiledMap map;
- private TileAtlas atlas;
- private TileMapRenderer tileMapRenderer;
-
- Vector3 camDirection = new Vector3(1, 1, 0);
- Vector2 maxCamPosition = new Vector2(0, 0);
-
- Image image;
-
- @Override
- public void create() {
- final String path = "map/";
- final String mapname = "tilemap";
- FileHandle mapHandle = Gdx.files.internal(path + mapname + ".tmx");
- map = TiledLoader.createMap(mapHandle);
- atlas = new TileAtlas(map, new FileHandle("map/"));
- tileMapRenderer = new TileMapRenderer(map, atlas, 10, 10);
- maxCamPosition.set(tileMapRenderer.getMapWidthUnits(), tileMapRenderer
- .getMapHeightUnits());
-
- width = Gdx.graphics.getWidth();
- height = Gdx.graphics.getHeight();
- stage = new Stage(width, height, true);
- Label label = new Label("FPS:", new LabelStyle(new BitmapFont(Gdx.files
- .internal("font/blue.fnt"),
- Gdx.files.internal("font/blue.png"), false), Color.BLACK),
- "fpsLabel");
- stage.addActor(label);
- Gdx.input.setInputProcessor(stage);
- }
-
- @Override
- public void dispose() {
- // TODO Auto-generated method stub
-
- }
-
- @Override
- public void pause() {
- // TODO Auto-generated method stub
-
- }
-
- @Override
- public void render() {
- Gdx.gl.glClear(GL10.GL_COLOR_BUFFER_BIT);
- OrthographicCamera c = (OrthographicCamera) stage.getCamera();
- ((Label) stage.findActor("fpsLabel")).setText("FPS: "
- + Gdx.graphics.getFramesPerSecond());
- stage.act(Gdx.graphics.getDeltaTime());
- tileMapRenderer.render(c);
- stage.draw();
- }
-
- @Override
- public void resize(int width, int height) {
- // TODO Auto-generated method stub
-
- }
-
- @Override
- public void resume() {
- // TODO Auto-generated method stub
-
- }
- }
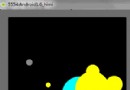
效果不是很明顯,左下角有個Label。
雖說我們繪制出來了Map,但是還沒有角色,而且還沒有設置牆壁等障礙,接下來的幾篇文章會說說這些。
寫在最後:
1.做好的TMX文件一定要處理以後再用,用TiledMapPacker處理,不是TexturePacker。我起初弄混淆了,結果把這一塊的代碼讀懂了才反應過來…
2.Stage和TiledMap混用時,一定是stage的繪制在後。
3.Stage的相機可以移動,移動時會產生地圖移動效果(比如主角向前走),但是一定要更新Stage的Actors的位置。
這篇博文寫了一天半,主要是我粗心把TiledMapPacker和TexturePacker搞錯,仔細看了看TexturePacker,覺得TexturePacker也是很有用的東西。算法很有趣,而且還有熱心網友做的一個GUI界面,用這個就不用自己辛苦拉圖了。