游戲開發與軟件開發多線程的重要性
如果程序主線程被阻塞超過5秒,系統會提示“應用程序無響應” 這就是ANR 。 ANR的全稱是Application Not Responding,使用多線程可以避免ANR。但是這裡要注意一下不要為了避免ANR而過多的使用多線程,除非萬不得已的情況。 比如訪問網絡服務端返回的過慢、數據過多導致滑動屏幕不流暢、或者I/O讀取過大的資源等等。這裡可以開啟一個新線程來處理這些耗時的操作。 如果過多使用多線程會出現數據同步的問題須要程序員去處理,所以使用多線程的時候盡量保持它的獨立不會被其它線程干預。java語言提供了一個線程鎖的概念 synchronized 可以添加對象鎖與方法鎖專門避免多線程同時訪問一個方法或者一個對象導致的問題,有興趣的朋友可以去看看這裡我不羅嗦啦 。
1.Thread與Handler執行多線程
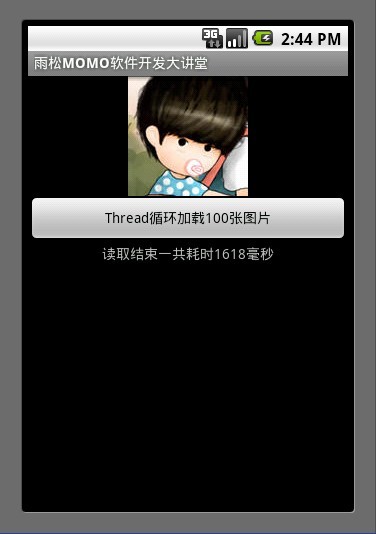
Handler主要用於程序主線程與我們自己創建的線程進行通信。在這個例子中點擊按鈕後創建一個新的線程去循環的加載100張圖片每加載完一張圖片在Thread中使用Handler發送消息通知UI線程更新顯示,直到加在完畢通知UI顯示加載完成一共耗時多少秒。可見Handler的重要性它就是主線程與我們自己創建的線程的橋梁啊~~~
Java代碼
- import java.io.InputStream;
-
- import android.app.Activity;
- import android.content.Context;
- import android.graphics.Bitmap;
- import android.graphics.BitmapFactory;
- import android.os.Bundle;
- import android.os.Handler;
- import android.os.Message;
- import android.view.View;
- import android.view.View.OnClickListener;
- import android.widget.Button;
- import android.widget.TextView;
-
- public class SingleActivity extends Activity {
-
- /**讀取進度**/
- public final static int LOAD_PROGRESS = 0;
-
- /**標志讀取進度結束**/
- public final static int LOAD_COMPLETE = 1;
-
- /** 開始加載100張圖片按鈕 **/
- Button mButton = null;
- /** 顯示內容 **/
- TextView mTextView = null;
- /** 加載圖片前的時間 **/
- Long mLoadStatr = 0L;
- /** 加載圖片後的時間 **/
- Long mLoadEnd = 0L;
-
- Context mContext = null;
-
- //接收傳遞過來的信息
- Handler handler = new Handler() {
- @Override
- public void handleMessage(Message msg) {
- switch (msg.what) {
- case LOAD_PROGRESS:
- mTextView.setText("當前讀取到第" + msg.arg1 + "張圖片");
- break;
- case LOAD_COMPLETE:
- mTextView.setText("讀取結束一共耗時" + msg.arg1 + "毫秒");
- break;
- }
- super.handleMessage(msg);
- }
- };
-
- @Override
- protected void onCreate(Bundle savedInstanceState) {
- setContentView(R.layout.single);
- mContext = this;
-
- /** 拿到button 與 TextView 對象 **/
- mButton = (Button) findViewById(R.id.button0);
- mTextView = (TextView) findViewById(R.id.textView0);
- mTextView.setText("點擊按鈕開始更新時間");
- mButton.setOnClickListener(new OnClickListener() {
- @Override
- public void onClick(View arg0) {
- //開始讀取圖片
- LoadImage();
- }
- });
-
- super.onCreate(savedInstanceState);
- }
-
- public void LoadImage() {
- new Thread() {
- @Override
- public void run() {
- //得到加載圖片開始的時間
- mLoadStatr = System.currentTimeMillis();
-
- for (int i = 0; i < 100; i++) {
- // 這裡循環加載圖片100遍
- ReadBitMap(mContext, R.drawable.bg);
-
- // 每讀取完一張圖片將進度甩給handler
- Message msg = new Message();
- msg.what = LOAD_PROGRESS;
- msg.arg1 = i + 1;
- handler.sendMessage(msg);
- }
-
- //得到加載圖片結束的時間
- mLoadEnd = System.currentTimeMillis();
-
- //100張圖片加載完成
- Message msg = new Message();
- msg.what = LOAD_COMPLETE;
- msg.arg1 = (int) (mLoadEnd - mLoadStatr);
- handler.sendMessage(msg);
- }
- }.start();
-
- }
-
- /**
- * 讀取本地資源的圖片
- *
- * @param context
- * @param resId
- * @return
- */
- public Bitmap ReadBitMap(Context context, int resId) {
- BitmapFactory.Options opt = new BitmapFactory.Options();
- opt.inPreferredConfig = Bitmap.Config.RGB_565;
- opt.inPurgeable = true;
- opt.inInputShareable = true;
- // 獲取資源圖片
- InputStream is = context.getResources().openRawResource(resId);
- return BitmapFactory.decodeStream(is, null, opt);
- }
- }
2.TimerTask與Handler延遲多線程
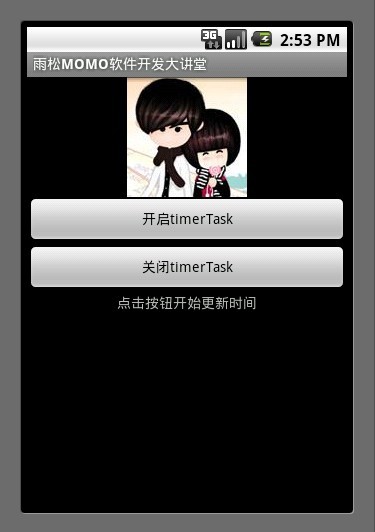
Timer與TimerTask可以構建一個延遲器 就好比開啟一個線程每隔一段規定的時間訪問一次。可以在這個線程中去關閉這個Timer 與TimerTask ,舉個例子比如現在我要做一個網游帳號登錄超時客戶端的檢測 用戶輸入完帳號密碼點擊登錄這時候我開啟一個TimerTask每過1秒檢查一下用戶是否登錄成功,過了10秒如果還沒有登錄成功提示他登陸超時。這個時候我就須要在這個檢測線程中去關閉Timer 與TimerTask 因為不需要它在循環檢測了。 調用cancel()就可以關閉,請同學們閱讀下面這個例子。
Java代碼
- import java.util.Timer;
- import java.util.TimerTask;
- import android.app.Activity;
- import android.content.Context;
- import android.os.Bundle;
- import android.os.Handler;
- import android.os.Message;
- import android.view.View;
- import android.view.View.OnClickListener;
- import android.widget.Button;
- import android.widget.TextView;
-
- public class TimerTaskActivity extends Activity {
-
- /**執行Timer進度**/
- public final static int LOAD_PROGRESS = 0;
-
- /**關閉Timer進度**/
- public final static int CLOSE_PROGRESS = 1;
-
- /** 開始TimerTask按鈕 **/
- Button mButton0 = null;
-
- /** 關閉TimerTask按鈕 **/
- Button mButton1 = null;
-
- /** 顯示內容 **/
- TextView mTextView = null;
-
- Context mContext = null;
-
- /**Timer對象**/
- Timer mTimer = null;
-
- /**TimerTask對象**/
- TimerTask mTimerTask = null;
-
- /**記錄TimerID**/
- int mTimerID = 0;
-
- /**接收傳遞過來的信息**/
- Handler handler = new Handler() {
- @Override
- public void handleMessage(Message msg) {
- switch (msg.what) {
- case LOAD_PROGRESS:
- mTextView.setText("當前TimerID為" + msg.arg1 );
- break;
- case CLOSE_PROGRESS:
- mTextView.setText("當前Timer已經關閉請重新開啟" );
- break;
-
- }
- super.handleMessage(msg);
- }
- };
-
- @Override
- protected void onCreate(Bundle savedInstanceState) {
- setContentView(R.layout.timer);
- mContext = this;
-
- /** 拿到button 與 TextView 對象 **/
- mButton0 = (Button) findViewById(R.id.button0);
- mButton1 = (Button) findViewById(R.id.button1);
- mTextView = (TextView) findViewById(R.id.textView0);
- mTextView.setText("點擊按鈕開始更新時間");
-
- //開始
- mButton0.setOnClickListener(new OnClickListener() {
- @Override
- public void onClick(View arg0) {
- //開始執行timer
- StartTimer();
- }
- });
-
- //關閉
- mButton1.setOnClickListener(new OnClickListener() {
- @Override
- public void onClick(View arg0) {
- //停止執行timer
- CloseTimer();
- }
- });
-
- super.onCreate(savedInstanceState);
- }
-
- public void StartTimer() {
-
- if (mTimer == null) {
- mTimerTask = new TimerTask() {
- public void run() {
- //mTimerTask與mTimer執行的前提下每過1秒進一次這裡
- mTimerID ++;
- Message msg = new Message();
- msg.what = LOAD_PROGRESS;
- msg.arg1 = (int) (mTimerID);
- handler.sendMessage(msg);
- }
- };
- mTimer = new Timer();
-
- //第一個參數為執行的mTimerTask
- //第二個參數為延遲的時間 這裡寫1000的意思是mTimerTask將延遲1秒執行
- //第三個參數為多久執行一次 這裡寫1000表示每1秒執行一次mTimerTask的Run方法
- mTimer.schedule(mTimerTask, 1000, 1000);
- }
-
- }
-
- public void CloseTimer() {
-
- //在這裡關閉mTimer 與 mTimerTask
- if (mTimer != null) {
- mTimer.cancel();
- mTimer = null;
- }
- if (mTimerTask != null) {
- mTimerTask = null;
- }
-
- /**ID重置**/
- mTimerID = 0;
-
- //這裡發送一條只帶what空的消息
- handler.sendEmptyMessage(CLOSE_PROGRESS);
- }
- }
3.AsyncTask執行多線程

執行AsyncTask
onPreExecute()///首先執行這個方法,它在UI線程中 可以執行一些異步操作 比如初始化一些東西
doInBackground(Object… arg0) //異步後台執行 ,執行完畢可以返回出去一個結果object對象
onPostExecute(Object result) //可以拿到執行中的進度 當然進度須要在doInBackground中手動調用publishProgress()方法返回通過例子可以清楚的看到計算出讀取100張圖片的時間,執行的效率上來說AsyncTask 沒有Thread效率塊,但是AsyncTask 比Thread更規整,它可是時時的拿到異步線程中進度以及最後的結果集,可以讓我們的代碼更佳規范。這裡說一下 Thread能做到的事AsyncTask 都可以做到 但是AsyncTask 能做到的事Thread 不一定能做到就算勉強做到也很麻煩 。我給大家的建議是如果處理大量的異步操作就用AsyncTask 如果少部分的則使用Thread
Java代碼
- import java.io.InputStream;
- import java.util.Timer;
- import java.util.TimerTask;
- import android.app.Activity;
- import android.content.Context;
- import android.graphics.Bitmap;
- import android.graphics.BitmapFactory;
- import android.os.AsyncTask;
- import android.os.Bundle;
- import android.view.View;
- import android.view.View.OnClickListener;
- import android.widget.Button;
- import android.widget.TextView;
-
- public class AsyncTaskActivity extends Activity {
-
- /**執行Timer進度**/
- public final static int LOAD_PROGRESS = 0;
-
- /**關閉Timer進度**/
- public final static int CLOSE_PROGRESS = 1;
-
- /** 開始StartAsync按鈕 **/
- Button mButton0 = null;
-
- /** 顯示內容 **/
- TextView mTextView = null;
-
- Context mContext = null;
-
- /**Timer對象**/
- Timer mTimer = null;
-
- /**TimerTask對象**/
- TimerTask mTimerTask = null;
-
- /**記錄TimerID**/
- int mTimerID = 0;
-
- @Override
- protected void onCreate(Bundle savedInstanceState) {
- setContentView(R.layout.async);
- mContext = this;
-
- /** 拿到button 與 TextView 對象 **/
- mButton0 = (Button) findViewById(R.id.button0);
- mTextView = (TextView) findViewById(R.id.textView0);
- //開始
- mButton0.setOnClickListener(new OnClickListener() {
- @Override
- public void onClick(View arg0) {
- //開始執行StartAsync
- StartAsync();
- }
- });
-
- super.onCreate(savedInstanceState);
- }
-
- public void StartAsync() {
- new AsyncTask<Object, Object, Object>() {
-
- @Override
- protected void onPreExecute() {
- //首先執行這個方法,它在UI線程中 可以執行一些異步操作
- mTextView.setText("開始加載進度");
- super.onPreExecute();
- }
-
- @Override
- protected Object doInBackground(Object... arg0) {
- //異步後台執行 ,執行完畢可以返回出去一個結果object對象
-
- //得到開始加載的時間
- Long startTime = System.currentTimeMillis();
- for (int i = 0; i < 100; i++) {
- // 這裡循環加載圖片100遍
- ReadBitMap(mContext, R.drawable.bg);
- //執行這個方法會異步調用onProgressUpdate方法,可以用來更新UI
- publishProgress(i);
- }
- //得到結束加載的時間
- Long endTime = System.currentTimeMillis();
-
- //將讀取時間返回
- return endTime - startTime;
- }
-
- @Override
- protected void onPostExecute(Object result) {
- //doInBackground之行結束以後在這裡可以接收到返回的結果對象
-
- mTextView.setText("讀取100張圖片一共耗時" + result+ "毫秒");
-
- super.onPostExecute(result);
- }
-
- @Override
- protected void onProgressUpdate(Object... values) {
- //時時拿到當前的進度更新UI
-
- mTextView.setText("當前加載進度" + values[0]);
- super.onProgressUpdate(values);
- }
- }.execute();//可以理解為執行 這個AsyncTask
-
- }
- /**
- * 讀取本地資源的圖片
- *
- * @param context
- * @param resId
- * @return
- */
- public Bitmap ReadBitMap(Context context, int resId) {
- BitmapFactory.Options opt = new BitmapFactory.Options();
- opt.inPreferredConfig = Bitmap.Config.RGB_565;
- opt.inPurgeable = true;
- opt.inInputShareable = true;
- // 獲取資源圖片
- InputStream is = context.getResources().openRawResource(resId);
- return BitmapFactory.decodeStream(is, null, opt);
- }
- }
4.多線程Looper的使用

Looper用來管理線程的消息隊列與循環隊列,在handler中默認為mainlooper來進行消息循環,如果在handler中開啟一個新的線程那麼在這個新的線程中就沒有Looper循環,如果想讓這個新的線程具有消息隊列與消息循環我們須要調用 Looper.prepare();拿到它的loop ,這樣就好比在Thread中創建了消息隊列與循環 需要調用 Looper.loop(); 它的意思就是執行這個消息循環,下面我給出一個例子希望大家好好閱讀。
Java代碼
- import java.io.InputStream;
-
- import android.app.Activity;
- import android.content.Context;
- import android.graphics.Bitmap;
- import android.graphics.BitmapFactory;
- import android.os.Bundle;
- import android.os.Handler;
- import android.os.Looper;
- import android.os.Message;
- import android.view.View;
- import android.view.View.OnClickListener;
- import android.widget.Button;
- import android.widget.Toast;
-
- public class LooperActivity extends Activity {
- /** 發送消息按鈕 **/
- Button mButton = null;
- /** 加載圖片前的時間 **/
- Long mLoadStatr = 0L;
- /** 加載圖片後的時間 **/
- Long mLoadEnd = 0L;
-
- Context mContext = null;
-
- private Handler handler = new Handler() {
- public void handleMessage(Message msg) {
- new Thread() {
- @Override
- public void run() {
-
- //如果handler不指定looper的話
- //默認為mainlooper來進行消息循環,
- //而當前是在一個新的線程中它沒有默認的looper
- //所以我們須要手動調用prepare()拿到他的loop
- //可以理解為在Thread創建Looper的消息隊列
- Looper.prepare();
-
- Toast.makeText(LooperActivity.this, "收到消息",Toast.LENGTH_LONG).show();
-
- //在這裡執行這個消息循環如果沒有這句
- //就好比只創建了Looper的消息隊列而
- //沒有執行這個隊列那麼上面Toast的內容是不會顯示出來的
- Looper.loop();
-
- //如果沒有 Looper.prepare(); 與 Looper.loop();
- //會拋出異常Can't create handler inside thread that has not called Looper.prepare()
- //原因是我們新起的線程中是沒有默認的looper所以須要手動調用prepare()拿到他的loop
-
- }
- }.start();
- }
- };
-
- @Override
- protected void onCreate(Bundle savedInstanceState) {
- setContentView(R.layout.loop);
- mContext = this;
-
- /** 拿到button 與 TextView 對象 **/
- mButton = (Button) findViewById(R.id.button0);
- mButton.setOnClickListener(new OnClickListener() {
- @Override
- public void onClick(View arg0) {
- new Thread() {
- @Override
- public void run() {
-
- //發送一條空的消息
- //空消息中必需帶一個what字段
- //用於在handler中接收
- //這裡暫時我先寫成0
- handler.sendEmptyMessage(0);
-
- }
- }.start();
- }
- });
-
- super.onCreate(savedInstanceState);
- }
- /**
- * 讀取本地資源的圖片
- *
- * @param context
- * @param resId
- * @return
- */
- public Bitmap ReadBitMap(Context context, int resId) {
- BitmapFactory.Options opt = new BitmapFactory.Options();
- opt.inPreferredConfig = Bitmap.Config.RGB_565;
- opt.inPurgeable = true;
- opt.inInputShareable = true;
- // 獲取資源圖片
- InputStream is = context.getResources().openRawResource(resId);
- return BitmapFactory.decodeStream(is, null, opt);
- }
- }
源碼下載地址:http://vdisk.weibo.com/s/aakLw
 Android游戲開發教程之六:進度條加載
 23天從0開始完成一款Android游戲開發 – 第6~8天
 Android游戲開發19:SurfaceView運行機制剖析
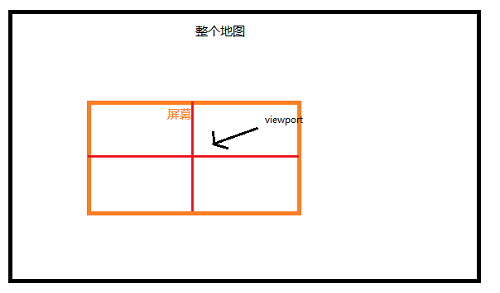
 Android游戲開發21:Android設備掩蓋真實分辨率的解決方法及游戲引擎的用法簡述