編輯:關於Android編程
介紹:
Retrofit 是Square公司開發的一款針對Android網絡請求的框架,Retrofit2底層基於OkHttp實現的,OkHttp現在已經得到Google官方認可,大量的app都采用OkHttp做網絡請求。本文使用Retrofit2.0.0版本進行實例演示。
使用Retrofit可以進行GET,POST,PUT,DELETE等請求方式。
同步請求:需要在子線程中完成,會阻塞主線程。
Response response = call.execute().body();
異步請求:請求結果在主線程中回調,可以在onResponse()回調方法進行更新UI。
call.enqueue(Callback callback)
使用步驟:
(1) 創建工程,添加jar:
compile 'com.squareup.retrofit2:retrofit:2.0.0'
compile 'com.squareup.retrofit2:converter-gson:2.0.0' //這兩個jar版本要一致,否則會有沖突
(2) 創建業務請求接口,具體代碼如下
/**
 * 創建業務請求接口
 */

public interface IUserService {
 /**
  * GET請求
  */
 @GET("Servlet/UserServlet")
 Call<User> getUser(@Query("email") String email);

 /**
  * POST請求
  */
 @FormUrlEncoded
 @POST("UserServlet")
 Call<User> postUser(@Field("name") String name, @Field("email") String email);
}
解釋說明:
@GET注解表示GET請求,@Query表示請求參數,將會以key=value(@Query注解參數名稱為key,調用傳進來的值為value)的方式拼接在url後面.
@POST注解表示POST請求,@FormUrlEncoded將會自動將請求參數的類型設置為application/x-www-form-urlencoded,@FormUrlEncoded注解不能用於Get請求。@Field注解將每一個請求參數都存放至請求體中,還可以添加encoded參數,該參數為boolean型,具體的用法為:
@Field(value = "password", encoded = true) String pwd
encoded參數為true的話,key-value-pair將會被編碼,即將中文和特殊字符進行編碼轉換.
(3)創建Retrofit對象
Retrofit retrofit = new Retrofit.Builder()
    .baseUrl(Constant.BASE_URL)
    .addConverterFactory(GsonConverterFactory.create())
    .build();
IUserService iUserService = retrofit.create(IUserService.class);
解釋說明:
baseUrl()方法制定網絡請求的固定絕對地址,一般包括請求協議(如Http)、域名或IP地址、端口號。
創建Retrofit實例時,若沒有配置addConverterFactory(GsonConverterFactory.create())將會回調出JSON字符串,配置了將會回調實體對象。
支持的JSON解析庫:
Gson: compile ‘com.squareup.retrofit2:converter-gson:2.0.1'
Jackson: compile ‘com.squareup.retrofit2:converter-jackson:2.0.1'
Moshi: compile ‘com.squareup.retrofit2:converter-moshi:2.0.1'
Protobuf: compile ‘com.squareup.retrofit2:converter-protobuf:2.0.1'
Wire: compile ‘com.squareup.retrofit2:converter-wire:2.0.1'
Simple XML: compile ‘com.squareup.retrofit2:converter-simplexml:2.0.1'
Scalars (primitives, boxed, and String): compile ‘com.squareup.retrofit2:converter-scalars:2.0.1'
(4) 調用請求方法,並得到Call實例
Call<ResponseBody> call = iUserService.getUser([email protected]);
(5) 使用Call實例完成同步或異步請求
/**
  * 發送GET請求
  */
 private void getRequest() {
  Retrofit retrofit = new Retrofit.Builder()
    .baseUrl(Constant.BASE_URL)
    .addConverterFactory(GsonConverterFactory.create())
    .build();
  IUserService iUserService = retrofit.create(IUserService.class);
  Call<User> call = iUserService.getUser("[email protected]");
  call.enqueue(new Callback<User>() {
   @Override
   public void onResponse(Call<User> call, Response<User> response) {

    Log.i("MainActivity", "response = " + response);
    User user = response.body();
    resTxtView.setText(user.toString());
   }

   @Override
   public void onFailure(Call<User> call, Throwable t) {

   }
  });
 }
請求方式:
(1)GET 請求:
GET 請求返回 JSON 字符串:
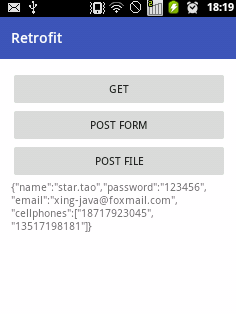
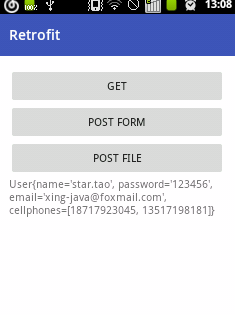
GET 請求返回實體對象:
(2) POST發送表單:
 /**
  * 發送POST請求
  */
 private void postRequest() {
  Retrofit retrofit = new Retrofit.Builder()
    .baseUrl(Constant.BASE_URL)
    .addConverterFactory(GsonConverterFactory.create())
    .build();
  IUserService iUserService = retrofit.create(IUserService.class);
  Call<User> call = iUserService.postUser("star.tao", "[email protected]");
  call.enqueue(new Callback<User>() {
   @Override
   public void onResponse(Call<User> call, Response<User> response) {
   }

   @Override
   public void onFailure(Call<User> call, Throwable throwable) {

   }
  });
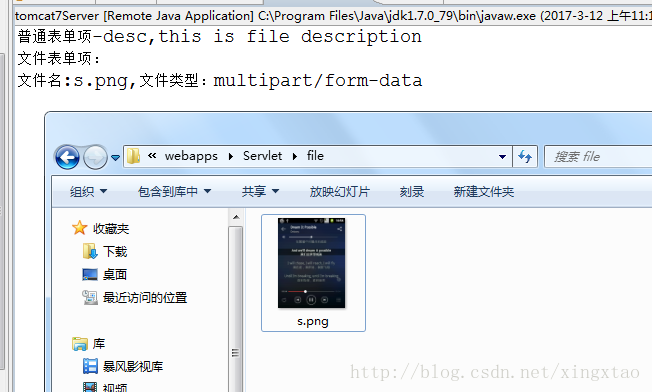
服務端接收到的結果:

(3)文件上傳:
private void uploadFile() {
  Retrofit retrofit = new Retrofit.Builder()
    .addConverterFactory(GsonConverterFactory.create())
    .baseUrl(Constant.BASE_URL)
    .build();
  IUserService iUserService = retrofit.create(IUserService.class);
  File file = new File("/sdcard/s.png");
  RequestBody fileRequestBody = RequestBody.create(MediaType.parse("multipart/form-data"), file);
  MultipartBody.Part multipartBody = MultipartBody.Part.createFormData("upload_file", file.getName(), fileRequestBody);
  String desc = "this is file description";
  RequestBody descRequestBody = RequestBody.create(MediaType.parse("multipart/form-data"), desc);
  Call<ResponseBody> call = iUserService.uploadFile(descRequestBody, multipartBody);
  call.enqueue(new Callback<ResponseBody>() {
   @Override
   public void onResponse(Call<ResponseBody> call, Response<ResponseBody> response) {
    Log.i("debug", "upload success");
   }

   @Override
   public void onFailure(Call<ResponseBody> call, Throwable t) {

   }
  });

 }
以上就是本文的全部內容,希望對大家的學習有所幫助,也希望大家多多支持本站。
 android解析XML總結(SAX、Pull、Dom三種方式)
歡迎我的獨立博客,博客地址http://yywang.info 在android開發中,經常用到去解析xml文件,常見的解析xml的方式有一下三種:SAX、Pu
 Android開發之使用HTTP訪問網絡資源
使用HTTP訪問網絡資源 前面介紹了 URLConnection己經可以非常方便地與指定站點交換信息,URLConnection還有一個子類:HttpURL
 [Android 插件化(一)] DynamicLoadApk的用法
1 簡介Android大型項目中為了減小apk的體積,可以采用插件化的方法,即一些不常用的功能獨立成插件,當用戶需要的使用的時候再從服務器上下載回來,動態加載。這樣就避免
 android launcher3桌面快捷方式分析
背景一般情況下,為了讓用戶更方便的打開應用,程序會在桌面上生成一些快捷方式。本來呢,如果是原生的桌面,其實是十分簡單,直接調用系統相關的API就行了。但是眾多的系統廠商以