編輯:關於Android編程
程序編寫完成後進行測試一定是必不可少的,Android Sdk給我們提供了Monkey和Monkeyrunner這兩個自動化測試工具。時光境遷,隨著版本的不斷更新迭代,Monkey和Monkeyrunner也在不斷的改變,改變的速度甚至已經到了官方文檔有時都跟不上了,這無疑給我們的學習帶來很多困擾。
今天我把我近期使用Monkey和Monkeyrunner的一些體會與大家分享,Sdk版本為Rev22.01,Api17(4.22).
Monkey是一個命令行工具,可以運行在模擬器裡或實際設備中。它向系統發送偽隨機的用戶事件流,實現對正在開發的應用程序進行壓力測試。Monkey包括許多選項,它們大致分為四大類:
· 基本配置選項,如設置嘗試的事件數量。
· 運行約束選項,如設置只對單獨的一個包進行測試。
· 事件類型和頻率。
· 調試選項。
二、Monkey的基本用法
基本語法如下:
$ adb shell monkey [options] <event-count>
如果不指定options,Monkey將以無反饋模式啟動,並把事件任意發送到安裝在目標環境中的全部包。下面是一個更為典型的命令行示例,它啟動指定的應用程序,並向其發送500個偽隨機事件:
$ adb shell monkey -p your.package.name -v 500
一些常用的參數信息:
-v
命令行的每一個-v將增加反饋信息的級別。Level 0(缺省值)除啟動提示、測試完成和最終結果之外,提供較少信息。Level 1提供較為詳細的測試信息,如逐個發送到Activity的事件。Level 2提供更加詳細的設置信息,如測試中被選中的或未被選中的Activity。
事件
-s <seed>
偽隨機數生成器的seed值。如果用相同的seed值再次運行Monkey,它將生成相同的事件序列。
--throttle <milliseconds>
在事件之間插入固定延遲。通過這個選項可以減緩Monkey的執行速度。如果不指定該選項,Monkey將不會被延遲,事件將盡可能快地被產成。
--pct-touch <percent>
調整觸摸事件的百分比(觸摸事件是一個down-up事件,它發生在屏幕上的某單一位置)。
--pct-motion <percent>
調整動作事件的百分比(動作事件由屏幕上某處的一個down事件、一系列的偽隨機事件和一個up事件組成)。
--pct-trackball <percent>
調整軌跡事件的百分比(軌跡事件由一個或幾個隨機的移動組成,有時還伴隨有點擊)。
--pct-nav <percent>
調整“基本”導航事件的百分比(導航事件由來自方向輸入設備的up/down/left/right組成)。
--pct-majornav <percent>
調整“主要”導航事件的百分比(這些導航事件通常引發圖形界面中的動作,如:5-way鍵盤的中間按鍵、回退按鍵、菜單按鍵)
--pct-syskeys <percent>
調整“系統”按鍵事件的百分比(這些按鍵通常被保留,由系統使用,如Home、Back、Start Call、End Call及音量控制鍵)。
--pct-appswitch <percent>
調整啟動Activity的百分比。在隨機間隔裡,Monkey將執行一個startActivity()調用,作為最大程度覆蓋包中全部Activity的一種方法。
--pct-anyevent <percent>
調整其它類型事件的百分比。它包羅了所有其它類型的事件,如:按鍵、其它不常用的設備按鈕、等等。
約束限制
-p <allowed-package-name>
如果用此參數指定了一個或幾個包,Monkey將只允許系統啟動這些包裡的Activity。如果你的應用程序還需要訪問其它包裡的Activity(如選擇取一個聯系人),那些包也需要在此同時指定。如果不指定任何包,Monkey將允許系統啟動全部包裡的Activity。要指定多個包,需要使用多個 -p選項,每個-p選項只能用於一個包。
-c <main-category>
如果用此參數指定了一個或幾個類別,Monkey將只允許系統啟動被這些類別中的某個類別列出的Activity。如果不指定任何類別,Monkey將選 擇下列類別中列出的Activity: Intent.CATEGORY_LAUNCHER或Intent.CATEGORY_MONKEY。要指定多個類別,需要使用多個-c選項,每個-c選 項只能用於一個類別。
調試
--dbg-no-events
設置此選項,Monkey將執行初始啟動,進入到一個測試Activity,然後不會再進一步生成事件。為了得到最佳結果,把它與-v、一個或幾個包約 束、以及一個保持Monkey運行30秒或更長時間的非零值聯合起來,從而提供一個環境,可以監視應用程序所調用的包之間的轉換。
--hprof
設置此選項,將在Monkey事件序列之前和之後立即生成profiling報告。這將會在data/misc中生成大文件(~5Mb),所以要小心使用它。
--ignore-crashes
通常,當應用程序崩潰或發生任何失控異常時,Monkey將停止運行。如果設置此選項,Monkey將繼續向系統發送事件,直到計數完成。
--ignore-timeouts
通常,當應用程序發生任何超時錯誤(如“Application Not Responding”對話框)時,Monkey將停止運行。如果設置此選項,Monkey將繼續向系統發送事件,直到計數完成。
--ignore-security-exceptions
通常,當應用程序發生許可錯誤(如啟動一個需要某些許可的Activity)時,Monkey將停止運行。如果設置了此選項,Monkey將繼續向系統發送事件,直到計數完成。
--kill-process-after-error
通常,當Monkey由於一個錯誤而停止時,出錯的應用程序將繼續處於運行狀態。當設置了此選項時,將會通知系統停止發生錯誤的進程。注意,正常的(成功的)結束,並沒有停止啟動的進程,設備只是在結束事件之後,簡單地保持在最後的狀態。
--monitor-native-crashes
監視並報告Android系統中本地代碼的崩潰事件。如果設置了--kill-process-after-error,系統將停止運行。
--wait-dbg
停止執行中的Monkey,直到有調試器和它相連接。-v
命令行的每一個-v將增加反饋信息的級別。Level 0(缺省值)除啟動提示、測試完成和最終結果之外,提供較少信息。Level 1提供較為詳細的測試信息,如逐個發送到Activity的事件。Level 2提供更加詳細的設置信息,如測試中被選中的或未被選中的Activity。
事件
-s <seed>
偽隨機數生成器的seed值。如果用相同的seed值再次運行Monkey,它將生成相同的事件序列。
--throttle <milliseconds>
在事件之間插入固定延遲。通過這個選項可以減緩Monkey的執行速度。如果不指定該選項,Monkey將不會被延遲,事件將盡可能快地被產成。
--pct-touch <percent>
調整觸摸事件的百分比(觸摸事件是一個down-up事件,它發生在屏幕上的某單一位置)。
--pct-motion <percent>
調整動作事件的百分比(動作事件由屏幕上某處的一個down事件、一系列的偽隨機事件和一個up事件組成)。
--pct-trackball <percent>
調整軌跡事件的百分比(軌跡事件由一個或幾個隨機的移動組成,有時還伴隨有點擊)。
--pct-nav <percent>
調整“基本”導航事件的百分比(導航事件由來自方向輸入設備的up/down/left/right組成)。
--pct-majornav <percent>
調整“主要”導航事件的百分比(這些導航事件通常引發圖形界面中的動作,如:5-way鍵盤的中間按鍵、回退按鍵、菜單按鍵)
--pct-syskeys <percent>
調整“系統”按鍵事件的百分比(這些按鍵通常被保留,由系統使用,如Home、Back、Start Call、End Call及音量控制鍵)。
--pct-appswitch <percent>
調整啟動Activity的百分比。在隨機間隔裡,Monkey將執行一個startActivity()調用,作為最大程度覆蓋包中全部Activity的一種方法。
--pct-anyevent <percent>
調整其它類型事件的百分比。它包羅了所有其它類型的事件,如:按鍵、其它不常用的設備按鈕、等等。
約束限制
-p <allowed-package-name>
如果用此參數指定了一個或幾個包,Monkey將只允許系統啟動這些包裡的Activity。如果你的應用程序還需要訪問其它包裡的Activity(如選擇取一個聯系人),那些包也需要在此同時指定。如果不指定任何包,Monkey將允許系統啟動全部包裡的Activity。要指定多個包,需要使用多個 -p選項,每個-p選項只能用於一個包。
-c <main-category>
如果用此參數指定了一個或幾個類別,Monkey將只允許系統啟動被這些類別中的某個類別列出的Activity。如果不指定任何類別,Monkey將選 擇下列類別中列出的Activity: Intent.CATEGORY_LAUNCHER或Intent.CATEGORY_MONKEY。要指定多個類別,需要使用多個-c選項,每個-c選 項只能用於一個類別。
調試
--dbg-no-events
設置此選項,Monkey將執行初始啟動,進入到一個測試Activity,然後不會再進一步生成事件。為了得到最佳結果,把它與-v、一個或幾個包約 束、以及一個保持Monkey運行30秒或更長時間的非零值聯合起來,從而提供一個環境,可以監視應用程序所調用的包之間的轉換。
--hprof
設置此選項,將在Monkey事件序列之前和之後立即生成profiling報告。這將會在data/misc中生成大文件(~5Mb),所以要小心使用它。
--ignore-crashes
通常,當應用程序崩潰或發生任何失控異常時,Monkey將停止運行。如果設置此選項,Monkey將繼續向系統發送事件,直到計數完成。
--ignore-timeouts
通常,當應用程序發生任何超時錯誤(如“Application Not Responding”對話框)時,Monkey將停止運行。如果設置此選項,Monkey將繼續向系統發送事件,直到計數完成。
--ignore-security-exceptions
通常,當應用程序發生許可錯誤(如啟動一個需要某些許可的Activity)時,Monkey將停止運行。如果設置了此選項,Monkey將繼續向系統發送事件,直到計數完成。
--kill-process-after-error
通常,當Monkey由於一個錯誤而停止時,出錯的應用程序將繼續處於運行狀態。當設置了此選項時,將會通知系統停止發生錯誤的進程。注意,正常的(成功的)結束,並沒有停止啟動的進程,設備只是在結束事件之後,簡單地保持在最後的狀態。
--monitor-native-crashes
監視並報告Android系統中本地代碼的崩潰事件。如果設置了--kill-process-after-error,系統將停止運行。
--wait-dbg
停止執行中的Monkey,直到有調試器和它相連接。
三、Monkey實例測試
Windows下(注:2—4步是為了查看我們可以測試哪些應用程序包,可省略):
1、 通過eclipse啟動一個Android的emulator
2、 在命令行中輸入:adb devices查看設備連接情況
List of devices attached
emulator-5554 device
3、 在有設備連接的前提下,在命令行中輸入:adb shell 進入shell界面
#
4、 查看data/data文件夾下的應用程序包。注:我們能測試的應用程序包都在這個目錄下面
如:
com.android.htmlviewer
com.android.settings
com.android.netspeed
com.android.providers.userdictionary
com.android.browser
com.android.contacts
com.android.alarmclock
等
5.在其中找到我們需要測試的包名com.marshalchen.MonkeyTest1
6、 以com.marshalchen.MonkeyTest1 作為對象進行MonkeyTest
#monkey -p com.marshalchen.MonkeyTest1 -v 500
其中-p表示對象包 –v 表示事件數量
運行過程中,Emulator中的應用程序在不斷地切換畫面。
按照選定的不同級別的反饋信息,在Monkey中還可以看到其執行過程報告和生成的事件。
如:Sending Pointer ACTION_DOWN x=35.0 y=259.0
:Sending Pointer ACTION_UP x=195.0 y=259.0
:Sending Pointer ACTION_DOWN x=295.0 y=223.0
:Dropped: keys=0 pointers=0 trackballs=0 flips=0
等等信息。
四、Monkey停止的條件
Monkey Test執行過程中在下列三種情況下會自動停止:
1、如果限定了Monkey運行在一個或幾個特定的包上,那麼它會監測試圖轉到其它包的操作,並對其進行阻止。
2、如果應用程序崩潰或接收到任何失控異常,Monkey將停止並報錯。
3、如果應用程序產生了應用程序不響應(application not responding)的錯誤,Monkey將會停止並報錯。
通過多次並且不同設定下的Monkey測試才算它是一個穩定性足夠的程序。
MonkeyRunner 使用
Monkey的使用簡潔有效,但是總是給人感覺功能不夠強大。所以,接下來向大家介紹非常給力的工具MonkeyRunner。
一、什麼是MonkeyRunner
monkeyrunner工具提供了一個API,使用此API寫出的程序可以在Android代碼之外控制Android設備和模擬器。通過monkeyrunner,您可以寫出一個Python程序去安裝一個Android應用程序或測試包,運行它,向它發送模擬擊鍵,截取它的用戶界面圖片,並將截圖存儲於工作站上。monkeyrunner工具的主要設計目的是用於測試功能/框架水平上的應用程序和設備,或用於運行單元測試套件,但您當然也可以將其用於其它目的。
monkeyrunner工具與monkey工具並無關聯。monkey工具直接運行在設備或模擬器的adbshell中,生成用戶或系統的偽隨機事件流。而monkeyrunner工具則是在工作站上通過API定義的特定命令和事件控制設備或模擬器。
monkeyrunner工具為Android測試提供了以下特性:
1.多設備控制:monkeyrunner API可以跨多個設備或模擬器實施測試套件。您可以在同一時間接上所有的設備或一次啟動全部模擬器(或統統一起),依據程序依次連接到每一個,然後運行一個或多個測試。您也可以用程序啟動一個配置好的模擬器,運行一個或多個測試,然後關閉模擬器。
2.功能測試: monkeyrunner可以為一個應用自動貫徹一次功能測試。您提供按鍵或觸摸事件的輸入數值,然後觀察輸出結果的截屏。
3.回歸測試:monkeyrunner可以運行某個應用,並將其結果截屏與既定已知正確的結果截屏相比較,以此測試應用的穩定性。
4.可擴展的自動化:由於monkeyrunner是一個API工具包,您可以基於Python模塊和程序開發一整套系統,以此來控制Android設備。除了使用monkeyrunner API之外,您還可以使用標准的Python os和subpress模塊來調用如adb這樣的Android工具。
您還可以向monkeyrunner API中添加您自己的類。
monkeyrunner工具使用Jython(使用Java編程語言的一種Python實現)。Jython允許monkeyrunnerAPI與Android框架輕松的進行交互。使用Jython,您可以使用Python語法來獲取API中的常量、類以及方法。
二、一個簡單的MonkeyRunner實例
您可以直接使用一個代碼文件運行monkeyrunner,抑或在交互式對話中輸入monkeyrunner語句。不論使用哪種方式,您都需要調用SDK目錄的tools子目錄下的monkeyrunner命令。如果您提供一個文件名作為運行參數,則monkeyrunner將視文件內容為Python程序,並加以運行;否則,它將提供一個交互對話環境。
monkeyrunner的命令語法為:
monkeyrunner -plugin <plugin_jar> <program_filename> <program_options>
monkeyrunnerbasic.py:
[python]
# 導入此程序所需的monkeyrunner模塊
from com.android.monkeyrunner import MonkeyRunner, MonkeyDevice
# 連接當前設備,返回一個MonkeyDevice對象
device = MonkeyRunner.waitForConnection()
# 安裝Android包,注意,此方法返回的返回值為boolean,由此您可以判斷安裝過程是否正常
device.installPackage('myproject/bin/MyApplication.apk')
# 運行此應用中的一個活動device.startActivity(component='com.marshalchen.Monkeyrunner.MainActivity')
# 按下菜單按鍵
device.press('KEYCODE_MENU','DOWN_AND_UP')
# 截取屏幕截圖
result = device.takeSnapShot
# 將截圖保存至文件
result.writeToFile('myproject/shot1.png','png')
然後轉到$SDK\TOOLS下執行 monkeyrunner monkeyrunnerbasic.py 就可執行測試了。
PS:上述內容,部分參考了 子楊 的博客,在此表示感謝。
三、常用功能的Monkeyrunner python腳本介紹:
1.輸入等基本操作測試
[python]
import sys
from com.android.monkeyrunner import MonkeyRunner as mr
from com.android.monkeyrunner import MonkeyDevice as md
from com.android.monkeyrunner import MonkeyImage as mi
#connect device 連接設備
#第一個參數為等待連接設備時間
#第二個參數為具體連接的設備
device = mr.waitForConnection(1.0,'emulator-5554')
if not device:
print >> sys.stderr,"fail"
sys.exit(1)
#定義要啟動的Activity
componentName='kg.monkey/.MonkeyActivity'
#啟動特定的Activity
device.startActivity(component=componentName)
mr.sleep(3.0)
#do someting 進行我們的操作
#輸入 a s d
device.type('asd')
#輸入回車
device.press('KEYCODE_ENTER')
#return keyboard 點擊返回用於取消等下看到截圖的下方的白條
#device.press('KEYCODE_BACK')
#------
#takeSnapshot截圖
mr.sleep(3.0)
result = device.takeSnapshot()
#save to file 保存到文件
result.writeToFile('takeSnapshot\\result1.png','png');
2.圖形化記錄與回放
利用
[plain]
SPAN style="FONT-FAMILY: SimSun">monkeyrunner monkey_recorder.py</SPAN>
monkeyrunner monkey_recorder.py
腳本,可以打開如圖所示可視化模擬器,各種操作可以顯示在屏幕右側,並且通過“Export Actions”導出。
導出之後可以運行monkeyrunner monkey_playback.py monkey_test1.mr,(monkey_test1.mr為剛才保存的腳本),這時可以看到模擬器,進行剛才一樣的操作。
補充多設備操作:可以在monkey_playback.py中的main()方法的device設備獲取時指定多設備。
下面是這兩個有用的腳本:
monkey_recorder.py:
[python]
#!/usr/bin/env monkeyrunner
# Copyright 2010, The Android Open Source Project
#
# Licensed under the Apache License, Version 2.0 (the "License");
# you may not use this file except in compliance with the License.
# You may obtain a copy of the License at
#
# http://www.apache.org/licenses/LICENSE-2.0
#
# Unless required by applicable law or agreed to in writing, software
# distributed under the License is distributed on an "AS IS" BASIS,
# WITHOUT WARRANTIES OR CONDITIONS OF ANY KIND, either express or implied.
# See the License for the specific language governing permissions and
# limitations under the License.
from com.android.monkeyrunner import MonkeyRunner as mr
from com.android.monkeyrunner.recorder import MonkeyRecorder as recorder
device = mr.waitForConnection()
recorder.start(device)
monkey_playback.py:
[python]
#!/usr/bin/env monkeyrunner
# Copyright 2010, The Android Open Source Project
#
# Licensed under the Apache License, Version 2.0 (the "License");
# you may not use this file except in compliance with the License.
# You may obtain a copy of the License at
#
# http://www.apache.org/licenses/LICENSE-2.0
#
# Unless required by applicable law or agreed to in writing, software
# distributed under the License is distributed on an "AS IS" BASIS,
# WITHOUT WARRANTIES OR CONDITIONS OF ANY KIND, either express or implied.
# See the License for the specific language governing permissions and
# limitations under the License.
import sys
from com.android.monkeyrunner import MonkeyRunner
# The format of the file we are parsing is very carfeully constructed.
# Each line corresponds to a single command. The line is split into 2
# parts with a | character. Text to the left of the pipe denotes
# which command to run. The text to the right of the pipe is a python
# dictionary (it can be evaled into existence) that specifies the
# arguments for the command. In most cases, this directly maps to the
# keyword argument dictionary that could be passed to the underlying
# command.
# Lookup table to map command strings to functions that implement that
# command.
CMD_MAP = {
'TOUCH': lambda dev, arg: dev.touch(**arg),
'DRAG': lambda dev, arg: dev.drag(**arg),
'PRESS': lambda dev, arg: dev.press(**arg),
'TYPE': lambda dev, arg: dev.type(**arg),
'WAIT': lambda dev, arg: MonkeyRunner.sleep(**arg)
}
# Process a single file for the specified device.
def process_file(fp, device):
for line in fp:
(cmd, rest) = line.split('|')
try:
# Parse the pydict
rest = eval(rest)
except:
print 'unable to parse options'
continue
if cmd not in CMD_MAP:
print 'unknown command: ' + cmd
continue
CMD_MAP[cmd](device, rest)
def main():
file = sys.argv[1]
fp = open(file, 'r')
device = MonkeyRunner.waitForConnection()
process_file(fp, device)
fp.close();
if __name__ == '__main__':
main()
PS:腳本內容 部分參考了 youxilua ,非常感謝。
四、使用插件擴展Monkeyrunner
您可以用Java語言創建新的類,並打包成一個或多個.jar文件,以此來擴展monkeyrunnerAPI。您可以使用您自己寫的類或者繼承現有的類來擴展monkeyrunnerAPI。您還可以使用此功能來初始化monkeyrunner環境。
為了使monkeyrunner加載一個插件,您應當如使用如表1中所述的-plugin參數來調用monkeyrunner命令。
在您編寫的插件中,您可以導入或繼承位於com.android.monkeyrunner包中的幾個主要的monkeyrunner類:MonkeyDevice, MonkeyImage和MonkeyRunner.
請注意,插件無法讓你訪問Android的SDK。您不能導入com.android.app等包。這是因為monkeyrunner是在框架API層次之下與設備或模擬器進行交互的。
插件啟動類
用於插件的.jar文件可以指定一個類,使其在腳本執行之前就實例化。如欲指定這個類,您需要在.jar文件的manifest中添加鍵MonkeyRunnerStartupRunner。其值為啟動時運行的類的名稱。以下代碼段顯示了如何在一個ant構建腳本達到這樣的目的:
如欲訪問monkeyrunner的運行時環境,啟動類可以實現com.google.common.base.Predicate。例如,用這個類在默認的命名空間中設置一些變量:
[python]
package com.android.example;
import com.google.common.base.Predicate;
import org.python.util.PythonInterpreter;
public class Main implements Predicate {
@Override
public boolean apply(PythonInterpreter anInterpreter) {
/*
* Examples of creating and initializing variables in the monkeyrunner environment's
* namespace. During execution, the monkeyrunner program can refer to the variables "newtest"
* and "use_emulator"
*
*/
anInterpreter.set("newtest", "enabled");
anInterpreter.set("use_emulator", 1);
return true;
}
}
五、常見問題(評論中的問題會不斷補充)
1.“device.touch(10,100, 'DOWN_AND_UP')” 為什麼報錯?ANS:可以把 'DOWN_AND_UP' 替換為 'MonkeyDevice.DOWN_AND_UP' ,這個問題的主要原因跟Monkeyrunner有關。
2.我輸入了很多指令,但是很多沒有執行Ans:可以嘗試 MonkeyRunner.sleep(time_in_seconds) 方法,讓不同的動作之間有間隔。
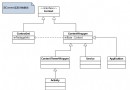
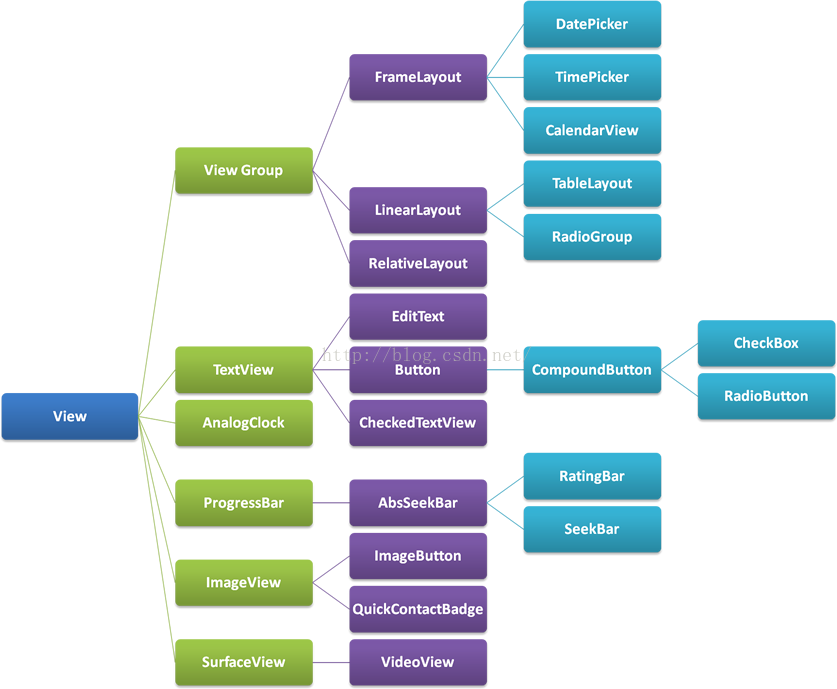 Android深入淺出自定義控件(二)
什麼是ViewGroup?在Android的樹狀結構圖中,ViewGroup類衍生出我們所熟悉的LinearLayout、RelativeLayout等布局:
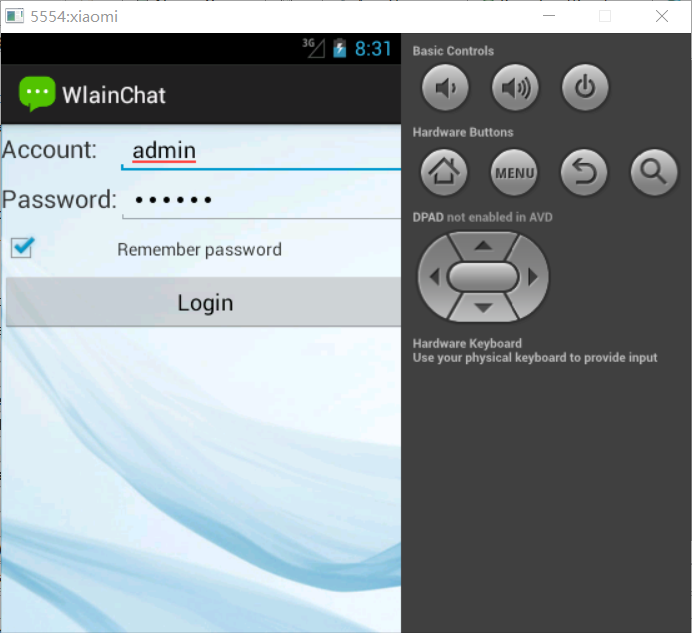 制作精美的QQ聊天界面和登錄界面詳解
主要實現制作聊天的登錄界面,並且能實現記住密碼功能。效果如如下:1.WlainChat的布局文件,使用TableLayout布局(login.xml)
 Android使用ViewDragHelper實現QQ6.X最新版本側滑界面效果實例代碼
(一).前言: 這兩天QQ進行了重大更新(6.X)尤其在UI風格上面由之前的藍色換成了白色居多了,側滑效果也發生了一些變化,那我們今天來模仿實現一個QQ6.X版本的側滑界
 詳解Android中的Context抽象類
關於Context我們首先應該知道:(1)它描述的是一個應用程序環境的信息,即上下文。(2)該類是一個抽象(abstract class)類,Android提供了該抽象類