編輯:關於Android編程
Note: Using AIDL is necessary only if you allow clients from different applications to access your service for IPC and want to handle multithreading in your service. If you do not need to perform concurrent IPC across different applications, you should create your interface by implementing a Binder or, if you want to perform IPC, but do not need to handle multithreading, implement your interface using a Messenger. Regardless, be sure that you understand Bound Services before implementing an AIDL.第一句最重要,“只有當你允許來自不同的客戶端訪問你的服務並且需要處理多線程問題時你才必須使用AIDL”,其他情況下你都可以選擇其他方法,如使用Messager,也能跨進程通訊。可見AIDL是處理多線程、多客戶端並發訪問的。而Messager是單線程處理。還是官方文檔說的明白,一句話就可以理解為什麼要有AIDL。那麼是不是這樣的寫個AIDL試試。
// IRemoteService.aidl
package com.example.android;

// Declare any non-default types here with import statements

/** Example service interface */
interface IRemoteService {
    /** Request the process ID of this service, to do evil things with it. */
    int getPid();

    /** Demonstrates some basic types that you can use as parameters
     * and return values in AIDL.
     */
    void basicTypes(int anInt, long aLong, boolean aBoolean, float aFloat,
            double aDouble, String aString);
}
這段代碼也是官方文檔的。命名為IRemoteService.aidl,放在com.example.android包下(這個可以隨意),保存後Android編譯器會在gen目錄下自動生成IRemoteService.java文件
第二、定義我們的服務,DDService.java,並且需要在AndroidManifest.xml中注冊,並添加“duanqing.test.aidl” 的ACTION
package com.example.service;

import com.example.android.IRemoteService;

import android.app.Service;
import android.content.Intent;
import android.os.IBinder;
import android.os.Process;

public class DDService extends Service {
	@Override
	public void onCreate() {
		super.onCreate();
		System.out.println("DDService onCreate........" + "Thread: " + Thread.currentThread().getName());
	}
	@Override
	public IBinder onBind(Intent arg0) {
		System.out.println("DDService onBind");
		return mBinder;
	}

	private final IRemoteService.Stub mBinder = new IRemoteService.Stub() {
	    public int getPid(){
	    	System.out.println("Thread: " + Thread.currentThread().getName());
	    	System.out.println("DDService getPid ");
	        return Process.myPid();
	    }
	    public void basicTypes(int anInt, long aLong, boolean aBoolean,
	        float aFloat, double aDouble, String aString) {
	    	System.out.println("Thread: " + Thread.currentThread().getName());
	    	System.out.println("basicTypes aDouble: " + aDouble +" anInt: " + anInt+" aBoolean " + aBoolean+" aString " + aString);
	    }
	};

}
package com.example.aidlclient;

import android.app.Activity;
import android.content.ComponentName;
import android.content.Context;
import android.content.Intent;
import android.content.ServiceConnection;
import android.os.Bundle;
import android.os.IBinder;
import android.os.Process;
import android.os.RemoteException;
import android.view.View;

import com.example.android.IRemoteService;

public class MainActivity extends Activity {
	private IRemoteService remoteService;
    @Override
    public void onCreate(Bundle savedInstanceState) {
        super.onCreate(savedInstanceState);
        setContentView(R.layout.activity_main);
    }

    ServiceConnection conn = new ServiceConnection() {

		@Override
		public void onServiceDisconnected(ComponentName name) {
		}

		@Override
		public void onServiceConnected(ComponentName name, IBinder service) {
			remoteService =	IRemoteService.Stub.asInterface(service);
			try {
				int pid = remoteService.getPid();
				int currentPid = Process.myPid();
				System.out.println("currentPID: " + currentPid +"  remotePID: " + pid);
				remoteService.basicTypes(12, 1223, true, 12.2f, 12.3, "我們的愛,我明白");
			} catch (RemoteException e) {
				e.printStackTrace();
			}
			System.out.println("bind success! " + remoteService.toString());
		}
	};

    /**
     * 監聽按鈕點擊
     * @param view
     */
    public void buttonClick(View view) {
    	System.out.println("begin bindService");
    	Intent intent = new Intent("duanqing.test.aidl");
    	bindService(intent, conn, Context.BIND_AUTO_CREATE);
    }

    @Override
    protected void onDestroy() {
    	super.onDestroy();
    	unbindService(conn);
    }
}
4、執行
點擊客戶端按鈕,執行,看打印信息: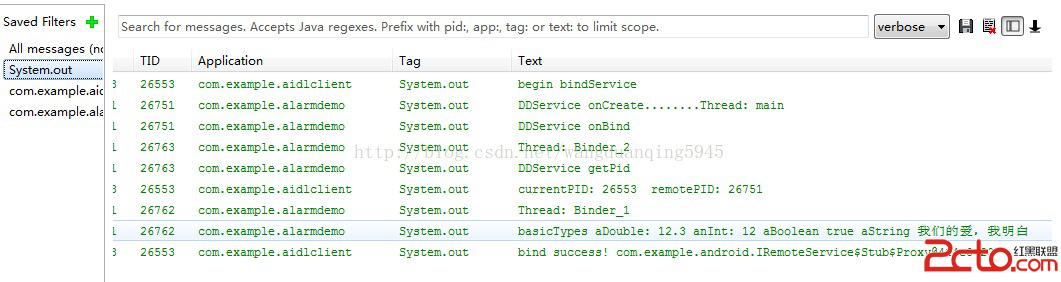
 Android實現圖片異步加載及本地緩存
在android項目中訪問網絡圖片是非常普遍性的事情,如果我們每次請求都要訪問網絡來獲取圖片,會非常耗費流量,而且圖片占用內存空間也比較大,圖片過多且不釋放的話很容易造成
 Android之Gallery使用例子
剛剛學習Android,用Gallery作了一個小demo,用來記錄一下。package com.example.galleryex02;import android.a
 Android 吸入動畫效果實現分解
Android 吸入動畫效果詳解 . 這裡,我要介紹的是如何在Android上面實現一個類似的效果。先看看我實現的效果圖。 上圖演示了動畫的某幾幀
 Android源碼系列之深入理解ImageView的ScaleType屬性
做Android開發的童靴們肯定對系統自帶的控件使用的都非常熟悉,比如Button、TextView、ImageView等。如果你問我具體使用,我會給說:拿ImageVi