編輯:關於Android編程
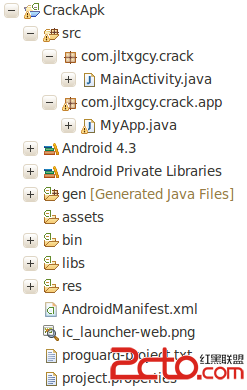
網上大多數都是把android的工程放到unity裡來打包成.apk。但是我感覺那樣不好,因為我延用了ios的思想,unity和ios交互是使用unity導出xcode工程進行二次開發,其實unity也可以導出eclipse進行二次開發,我用的版本是unity4.3,我記得之前我用4.0導出eclipse工程會生成三個.java腳本,現在只生成一個,UnityPlayerNativeActivity,不過這個類往上繼承兩層也是UnityPlayerActivity,都一樣一樣的,只能說4.3更簡化了unity和android的交互,
我做了個測試完全無壓力交互。
unity測試代碼,
using UnityEngine;
using System.Collections;

public class Test : MonoBehaviour {
	bool isSend = false;
	// Use this for initialization
	void Start () {

	}

	// Update is called once per frame
	void Update () {

	}
	void OnGUI()
	{
		if(GUI.Button(new Rect(0,0,200,200),"one"))
		{
			using(AndroidJavaClass jc = new AndroidJavaClass("com.unity3d.player.UnityPlayer"))
			{
				using(AndroidJavaObject jo = jc.GetStatic("currentActivity"))
				{
					AndroidJavaClass cls = new AndroidJavaClass("com.dilitechcompany.demotest.UnityPlayerNativeActivity");

					//cls.CallStatic("_hideView", "one");
					jo.Call("_hideView","two");
				}
			}


		}
		if(GUI.Button(new Rect(0,200,200,200),"two"))
		{
			using(AndroidJavaClass jc = new AndroidJavaClass("com.unity3d.player.UnityPlayer"))
			{
				using(AndroidJavaObject jo = jc.GetStatic("currentActivity"))
				{
					AndroidJavaClass cls = new AndroidJavaClass("com.dilitechcompany.demotest.UnityPlayerNativeActivity");

					//cls.CallStatic("_Display", "one");
					jo.Call("_Display","two");
				}
			}


		}
		if(isSend)
		{
			GUI.Button(new Rect(200,0,200,200),"testbtn");
		}
	}
	void AndroidSendMessage(string name)
	{
		isSend = !isSend;
	}
}
這是一種固定寫法,參數是寫死的
另外可以使用AndroidJavaClass cls_CompassActivity = new AndroidJavaClass("com.dilitechcompany.demotest.UnityPlayerNativeActivity");
就是你導出的android工程包名+主activity,其實道理一樣的也可以調用成功,
這樣交互的代碼只能寫在主activity裡了。
package com.dilitechcompany.demotest;

import com.unity3d.player.UnityPlayer;
import android.app.NativeActivity;
import android.content.res.Configuration;
import android.graphics.PixelFormat;
import android.os.Bundle;
import android.util.Log;
import android.view.KeyEvent;
import android.view.View;
import android.view.Window;
import android.view.WindowManager;

public class UnityPlayerNativeActivity extends NativeActivity
{
	protected UnityPlayer mUnityPlayer;		// don't change the name of this variable; referenced from native code

	// UnityPlayer.init() should be called before attaching the view to a layout - it will load the native code.
	// UnityPlayer.quit() should be the last thing called - it will unload the native code.
	protected void onCreate (Bundle savedInstanceState)
	{
		requestWindowFeature(Window.FEATURE_NO_TITLE);
		super.onCreate(savedInstanceState);

		getWindow().takeSurface(null);
		setTheme(android.R.style.Theme_NoTitleBar_Fullscreen);
		getWindow().setFormat(PixelFormat.RGB_565);

		mUnityPlayer = new UnityPlayer(this);
		if (mUnityPlayer.getSettings ().getBoolean ("hide_status_bar", true))
			getWindow ().setFlags (WindowManager.LayoutParams.FLAG_FULLSCREEN,
			                       WindowManager.LayoutParams.FLAG_FULLSCREEN);

		int glesMode = mUnityPlayer.getSettings().getInt("gles_mode", 1);
		boolean trueColor8888 = false;
		mUnityPlayer.init(glesMode, trueColor8888);

		View playerView = mUnityPlayer.getView();
		setContentView(playerView);
		playerView.requestFocus();
//		View rootView=mUnityPlayer.getView();
//
//		Toast.makeText(this, "class:"+rootView.getClass().getName(), Toast.LENGTH_LONG).show();
//
	}

	public  void _hideView(String name) {
		UnityPlayer.UnitySendMessage("Main Camera", "AndroidSendMessage", "");
		Log.v("unity3d", "hide view");
	}
	public  void _Display(String name) {
		UnityPlayer.UnitySendMessage("Main Camera", "AndroidSendMessage", "");
		Log.v("unity3d", "display");
	}
	protected void onDestroy ()
	{
		mUnityPlayer.quit();
		super.onDestroy();
	}

	// onPause()/onResume() must be sent to UnityPlayer to enable pause and resource recreation on resume.
	protected void onPause()
	{
		super.onPause();
		mUnityPlayer.pause();
	}
	protected void onResume()
	{
		super.onResume();
		mUnityPlayer.resume();
	}
	public void onConfigurationChanged(Configuration newConfig)
	{
		super.onConfigurationChanged(newConfig);
		mUnityPlayer.configurationChanged(newConfig);
	}
	public void onWindowFocusChanged(boolean hasFocus)
	{
		super.onWindowFocusChanged(hasFocus);
		mUnityPlayer.windowFocusChanged(hasFocus);
	}
	public boolean dispatchKeyEvent(KeyEvent event)
	{
		if (event.getAction() == KeyEvent.ACTION_MULTIPLE)
			return mUnityPlayer.onKeyMultiple(event.getKeyCode(), event.getRepeatCount(), event);
		return super.dispatchKeyEvent(event);
	}

}
 Android 混淆機制
一、為什麼要加入混淆機制? 為了防止apk被反編譯後,很容易被其他人看懂。 混淆機制的本質是什麼? 把原來有具體含義的類名
 Android數據的四種存儲方式之SharedPreferences
除了SQLite數據庫外,SharedPreferences也是一種輕型的數據存儲方式,它的本質是基於XML文件存儲key-value鍵值對數據,通常用來存
 Android解決Failed to initialize Monitor Thread: Unable to establish loopback connection錯誤
本人使用Win8系統時間久了系統垃圾一大堆 ,後來重裝了Win8系統,再用ADT(adt-bunlde-windows),總會出現ddms初始化錯誤,logcat也無法
 Android應用中使用TabHost組件繼承TabActivity的布局方法
繼承TabActivity並以activity布局先查看下最終效果圖:再看下代碼結構:其中black.gif顧名思義就是一個黑背景圖片,grey.gif就是一張灰色的背景