編輯:關於Android編程
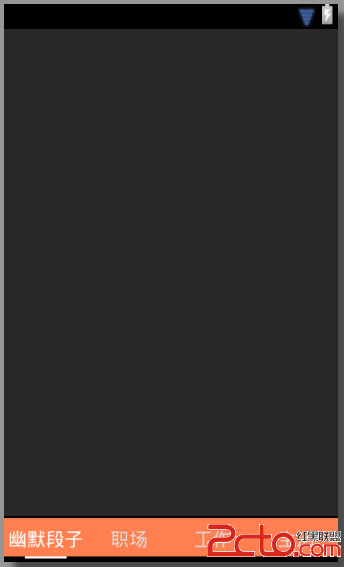
項目中需要用到底欄導航欄,滑動或者點擊會切換上面的視圖,如圖:
這個效果使用Viewpager+Fragmen實現是主流方案,加入你之前對fragment不太了解,可以先看android之Fragment(官網資料翻譯)
整個文件如下:
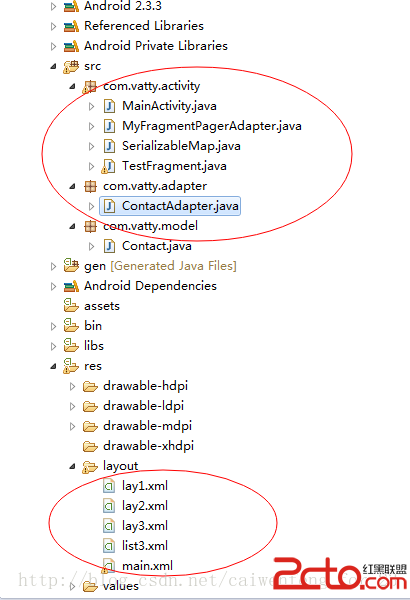
好了廢話少說,先上布局文件:main.xml
其實上面的整個布局非常簡單,就是ViewPager+LinearLayout,寫完mian後,後面寫lay1,lay2,lay3等文件,都只是普通布局文件,就不貼代碼了,回頭可以下載代碼查看。
接下來是 MainActivity.java
package com.vatty.activity;

import java.util.ArrayList;
import java.util.HashMap;
import java.util.Map;


import android.content.res.Resources;
import android.os.Bundle;
import android.support.v4.app.Fragment;
import android.support.v4.app.FragmentActivity;
import android.support.v4.view.ViewPager;
import android.support.v4.view.ViewPager.OnPageChangeListener;
import android.util.DisplayMetrics;
import android.util.Log;
import android.view.View;
import android.view.Window;
import android.view.animation.Animation;
import android.view.animation.TranslateAnimation;
import android.widget.ImageView;
import android.widget.TextView;

/**
 *
 * MainActivity.java
 * @author mayi
 * 2014-8-2 下午11:51:28
 *
 */
public class MainActivity extends FragmentActivity {
    private static final String TAG = MainActivity;
    private ViewPager mPager;
    private ArrayList fragmentsList;
    private ImageView ivBottomLine;
    private TextView tv_tab_1, tv_tab_2, tv_tab_3, tv_tab_4;

    private int currIndex = 0;
    private int bottomLineWidth;
    private int offset = 0;
    private int position_one;
    private int position_two;
    private int position_three;
    private Resources resources;

    @Override
    public void onCreate(Bundle savedInstanceState) {
        super.onCreate(savedInstanceState);
        requestWindowFeature(Window.FEATURE_NO_TITLE);

        setContentView(R.layout.main);

        resources = getResources();

        InitWidth();

        InitTextView();

        InitViewPager();
    }

    /**
     * 獲取底欄中的控件並添加監聽事件
     */
    private void InitTextView() {
        tv_tab_1 = (TextView) findViewById(R.id.tv_tab_1);
        tv_tab_2 = (TextView) findViewById(R.id.tv_tab_2);
        tv_tab_3 = (TextView) findViewById(R.id.tv_tab_3);
        tv_tab_4 = (TextView) findViewById(R.id.tv_tab_4);

        tv_tab_1.setOnClickListener(new MyOnClickListener(0));
        tv_tab_2.setOnClickListener(new MyOnClickListener(1));
        tv_tab_3.setOnClickListener(new MyOnClickListener(2));
        tv_tab_4.setOnClickListener(new MyOnClickListener(3));
    }
    /**
     * 初始化ViewPager
     */
    private void InitViewPager() {
    	//獲取布局中的viewpager控件
        mPager = (ViewPager) findViewById(R.id.vPager);
        //Fragment容器
        fragmentsList = new ArrayList();

        Map paramMap = new HashMap();
        paramMap.put(userid,小洪);
        paramMap.put(age,23);


        Map paramMap2 = new HashMap();
        paramMap2.put(userid,vatty);
        paramMap2.put(age,24);

        Map paramMap3 = new HashMap();
        paramMap3.put(userid,小明);
        paramMap3.put(age,25);


        Map paramMap4 = new HashMap();
        paramMap4.put(userid,hongshengpeng.com);
        paramMap4.put(age,26);

        //生成每個tab對應的fragment
        Fragment activityfragment = TestFragment.newInstance(Hello Activity.,paramMap);
        Fragment groupFragment = TestFragment.newInstance(Hello Group.,paramMap2);
        Fragment friendsFragment=TestFragment.newInstance(Hello Friends.,paramMap3);
        Fragment chatFragment=TestFragment.newInstance(Hello Chat.,paramMap4);
        //添加到Fragment容器中
        fragmentsList.add(activityfragment);
        fragmentsList.add(groupFragment);
        fragmentsList.add(friendsFragment);
        fragmentsList.add(chatFragment);
        //給ViewPager添加適配器
        mPager.setAdapter(new MyFragmentPagerAdapter(getSupportFragmentManager(), fragmentsList));
        //設置默認的視圖為第0個
        mPager.setCurrentItem(0);
        //給Viewpager添加監聽事件
        mPager.setOnPageChangeListener(new MyOnPageChangeListener());
    }

    /**
     *  初始化底欄,獲取相應寬度信息
     */
    private void InitWidth() {
        ivBottomLine = (ImageView) findViewById(R.id.iv_bottom_line);
        //獲取底欄白色滑動線的寬度
        bottomLineWidth = ivBottomLine.getLayoutParams().width;
        Log.d(TAG, cursor imageview width= + bottomLineWidth);

        //獲取屏幕寬度
        DisplayMetrics dm = new DisplayMetrics();
        getWindowManager().getDefaultDisplay().getMetrics(dm);
        int screenW = dm.widthPixels;
        //屏幕分4份,計算出每份中白色滑條外的間隔距離
        offset = (int) ((screenW / 4.0 - bottomLineWidth) / 2);
        Log.i(MainActivity, offset= + offset);

        //計算出底欄的位置
        position_one = (int) (screenW / 4.0);
        position_two = position_one * 2;
        position_three = position_one * 3;
    }


    /**
     * 自定義監聽類   如此定義監聽類,可以實現共用。
     * @author Administrator
     *
     */
    public class MyOnClickListener implements View.OnClickListener {
        private int index = 0;

        public MyOnClickListener(int i) {
            index = i;
        }

        @Override
        public void onClick(View v) {
        	//設置ViewPager的當前view
            mPager.setCurrentItem(index);
        }
    };

    /**
     * 頁面滑動監聽
     * @author Administrator
     *
     */
    public class MyOnPageChangeListener implements OnPageChangeListener {

        @Override
        public void onPageSelected(int index) {
        	//動畫
            Animation animation = null;
            switch (index) {
            case 0:
                if (currIndex == 1) {
                	//代碼生成滑動動畫
                	animation = new TranslateAnimation(position_one, 0, 0, 0);
                	//改變tv_tab_2的顏色值,使其沒有選中的效果
                    tv_tab_2.setTextColor(resources.getColor(R.color.lightwhite));
                } else if (currIndex == 2) {
                    animation = new TranslateAnimation(position_two, 0, 0, 0);
                    tv_tab_3.setTextColor(resources.getColor(R.color.lightwhite));
                } else if (currIndex == 3) {
                    animation = new TranslateAnimation(position_three, 0, 0, 0);
                    tv_tab_4.setTextColor(resources.getColor(R.color.lightwhite));
                }
                //改變tv_tab_1的顏色值,使其有選中的效果
                tv_tab_1.setTextColor(resources.getColor(R.color.white));
                break;
            case 1:
                if (currIndex == 0) {
                    animation = new TranslateAnimation(0, position_one, 0, 0);
                    tv_tab_1.setTextColor(resources.getColor(R.color.lightwhite));
                } else if (currIndex == 2) {
                    animation = new TranslateAnimation(position_two, position_one, 0, 0);
                    tv_tab_3.setTextColor(resources.getColor(R.color.lightwhite));
                } else if (currIndex == 3) {
                    animation = new TranslateAnimation(position_three, position_one, 0, 0);
                    tv_tab_4.setTextColor(resources.getColor(R.color.lightwhite));
                }
                tv_tab_2.setTextColor(resources.getColor(R.color.white));
                break;
            case 2:
                if (currIndex == 0) {
                    animation = new TranslateAnimation(0, position_two, 0, 0);
                    tv_tab_1.setTextColor(resources.getColor(R.color.lightwhite));
                } else if (currIndex == 1) {
                    animation = new TranslateAnimation(position_one, position_two, 0, 0);
                    tv_tab_2.setTextColor(resources.getColor(R.color.lightwhite));
                } else if (currIndex == 3) {
                    animation = new TranslateAnimation(position_three, position_two, 0, 0);
                    tv_tab_4.setTextColor(resources.getColor(R.color.lightwhite));
                }
                tv_tab_3.setTextColor(resources.getColor(R.color.white));
                break;
            case 3:
                if (currIndex == 0) {
                    animation = new TranslateAnimation(0, position_three, 0, 0);
                    tv_tab_1.setTextColor(resources.getColor(R.color.lightwhite));
                } else if (currIndex == 1) {
                    animation = new TranslateAnimation(position_one, position_three, 0, 0);
                    tv_tab_2.setTextColor(resources.getColor(R.color.lightwhite));
                } else if (currIndex == 2) {
                    animation = new TranslateAnimation(position_two, position_three, 0, 0);
                    tv_tab_3.setTextColor(resources.getColor(R.color.lightwhite));
                }
                tv_tab_4.setTextColor(resources.getColor(R.color.white));
                break;
            }
            //記錄當前的頁面位置
            currIndex = index;
            //動畫播放完後,保持結束時的狀態
            animation.setFillAfter(true);
            //動畫持續時間
            animation.setDuration(300);
            //底欄滑動白線開始動畫
            ivBottomLine.startAnimation(animation);
        }

        @Override
        public void onPageScrolled(int arg0, float arg1, int arg2) {

        }

        @Override
        public void onPageScrollStateChanged(int arg0) {

        }
    }
}
接下來就是Fragment模塊:
TestFragment.java
package com.vatty.activity;

import java.util.ArrayList;
import java.util.Map;

import android.os.Bundle;
import android.support.v4.app.Fragment;
import android.view.LayoutInflater;
import android.view.View;
import android.view.ViewGroup;
import android.widget.ListView;

import com.vatty.adapter.ContactAdapter;
import com.vatty.model.Contact;

/**
 *
 * TestFragment.java
 * @author mayi
 * 2014-8-2 下午11:54:19
 *
 */
public class TestFragment extends Fragment {
	private static final String TAG = TestFragment;
	private Map maplist;

	/**
	 * 獲取新的Fragment
	 * @param s
	 * @param map
	 * @return
	 */
	static TestFragment newInstance(String s, Map map) {
		TestFragment newFragment = new TestFragment();
		final SerializableMap myMap = new SerializableMap();
		myMap.setMap(map);
		//Bundle 存儲數據
		Bundle bundle = new Bundle();
		bundle.putSerializable(map, myMap);
		//Fragment傳送數據
		newFragment.setArguments(bundle);
		return newFragment;

	}

	@Override
	public void onCreate(Bundle savedInstanceState) {
		super.onCreate(savedInstanceState);
//		Log.d(TAG, TestFragment-----onCreate);
		//獲取Fragment傳送的數據
		Bundle bundle = getArguments();
		SerializableMap serializableMap = (SerializableMap) bundle.get(map);

		maplist = serializableMap.getMap();
	}

	@Override
	public View onCreateView(LayoutInflater inflater, ViewGroup container,
			Bundle savedInstanceState) {
//		Log.d(TAG, TestFragment-----onCreateView);

		//加載要在此Fragment中顯示的layout(布局文件)
		View view = inflater.inflate(R.layout.lay1, container, false);

		//-------------------------------以下的根據自己項目的需要做開發----------------------------------------------
		//獲取layout中的控件
		ListView lv = (ListView) view.findViewById(R.id.listView3);

		//getActivity().getApplicationContext()方法  獲取Context
		ContactAdapter hc = new ContactAdapter(getActivity().getApplicationContext(), getContact());
		lv.setAdapter(hc);
		lv.setCacheColorHint(0);

		return view;

	}

	private ArrayList getContact() {
		ArrayList hcList = new ArrayList();

		for (int i = 0; i < 10; i++) {
			Contact c0 = new Contact();
			c0.setTxPath(R.drawable.more_game + );

			c0.setName(maplist.get(userid) +   年齡: + maplist.get(age));
			hcList.add(c0);
		}

		return hcList;
	}

	@Override
	public void onDestroy() {
		super.onDestroy();
//		Log.d(TAG, TestFragment-----onDestroy);
	}

}
 Android 安卓 VPN設置 L2TP教程
第一步: 打開手機主菜單,選擇“設置”,然後選擇“無線和網絡”第二步:選擇“虛擬專用網設置&rd
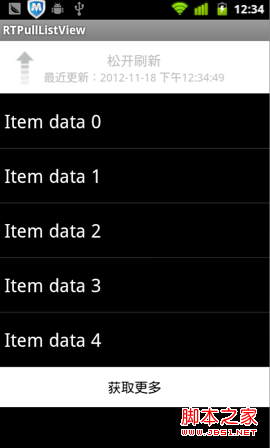 Android下拉刷新ListView——RTPullListView(demo)
下拉刷新在越來越多的App中使用,已經形成一種默認的用戶習慣,遇到列表顯示的內容時,用戶已經開始習慣性的拉拉。在交互習慣上已經形成定性。之前在我的文章《IOS學習筆記34
 Android jPBC 2.0.0配置與測試
我在前面的一片博客中,介紹了jPBC 2.0.0在PC平台上面的配置和測試。既然jPBC是Java平台上面實現的,那麼jPBC能不能在Android這個以Java為主要語
 Mac中Eclipse連不上Android手機的解決方法
現象是:Windows下Eclipse可以連接Device裡能顯示設備名稱,但是在Mac OS X下的Eclipse Device始終不能顯示連接。解決方法:1.把And