編輯:關於Android編程
Camera是Android framework裡面支持的,允許你拍照和拍攝視頻的設備,那麼,在使用camera開發中總是會遇到一些問題,例如以下這樣子的:
E/AndroidRuntime(1542): java.lang.RuntimeException: setParameters failed
E/AndroidRuntime(1542): at android.hardware.Camera.native_setParameters(Native Method)
E/AndroidRuntime(1542): at android.hardware.Camera.setParameters(Camera.java:914)
出現這種錯誤,根據錯誤提示我們可以知道是android的setParameters方法出錯了。
我們知道camera的parameters中也有很多參數設置的,是哪個出錯了呢?很多人不知所以然就上網開始找,找不到就開始各種猜測,一個個參數設置過去,其實最有效的方式是到底層找原因。ok,讓我們打開android代碼找到camera類。然後查找setParameters方法。
 private native final void native_setParameters(String params);

    /**
     * Changes the settings for this Camera service.
     *
     * @param params the Parameters to use for this Camera service
     * @throws RuntimeException if any parameter is invalid or not supported.
     * @see #getParameters()
     */
    public void setParameters(Parameters params) {
        native_setParameters(params.flatten());
} /**
* Creates a single string with all the parameters set in
* this Parameters object.
* The {@link #unflatten(String)} method does the reverse.
*
* @return a String with all values from this Parameters object, in
* semi-colon delimited key-value pairs
*/
public String flatten() {
StringBuilder flattened = new StringBuilder();
for (String k : mMap.keySet()) {
flattened.append(k);
flattened.append("=");
flattened.append(mMap.get(k));
flattened.append(";");
}
// chop off the extra semicolon at the end
flattened.deleteCharAt(flattened.length()-1);
return flattened.toString();
}/**
* Takes a flattened string of parameters and adds each one to
* this Parameters object.
* The {@link #flatten()} method does the reverse.
*
* @param flattened a String of parameters (key-value paired) that
* are semi-colon delimited
*/
public void unflatten(String flattened) {
mMap.clear();
StringTokenizer tokenizer = new StringTokenizer(flattened, ";");
while (tokenizer.hasMoreElements()) {
String kv = tokenizer.nextToken();
int pos = kv.indexOf('=');
if (pos == -1) {
continue;
}
String k = kv.substring(0, pos);
String v = kv.substring(pos + 1);
mMap.put(k, v);
}
}
/**
* Sets a String parameter.
*
* @param key the key name for the parameter
* @param value the String value of the parameter
*/
public void set(String key, String value) {
if (key.indexOf('=') != -1 || key.indexOf(';') != -1) {
Log.e(TAG, "Key \"" + key + "\" contains invalid character (= or ;)");
return;
}
if (value.indexOf('=') != -1 || value.indexOf(';') != -1) {
Log.e(TAG, "Value \"" + value + "\" contains invalid character (= or ;)");
return;
}
mMap.put(key, value);
}
/**
* Sets an integer parameter.
*
* @param key the key name for the parameter
* @param value the int value of the parameter
*/
public void set(String key, int value) {
mMap.put(key, Integer.toString(value));
}
private void set(String key, List areas) {
if (areas == null) {
set(key, "(0,0,0,0,0)");
} else {
StringBuilder buffer = new StringBuilder();
for (int i = 0; i < areas.size(); i++) {
Area area = areas.get(i);
Rect rect = area.rect;
buffer.append('(');
buffer.append(rect.left);
buffer.append(',');
buffer.append(rect.top);
buffer.append(',');
buffer.append(rect.right);
buffer.append(',');
buffer.append(rect.bottom);
buffer.append(',');
buffer.append(area.weight);
buffer.append(')');
if (i != areas.size() - 1) buffer.append(',');
}
set(key, buffer.toString());
}
}
/**
* Returns the value of a String parameter.
*
* @param key the key name for the parameter
* @return the String value of the parameter
*/
public String get(String key) {
return mMap.get(key);
}
/**
* Sets the dimensions for preview pictures. If the preview has already
* started, applications should stop the preview first before changing
* preview size.
*
* The sides of width and height are based on camera orientation. That
* is, the preview size is the size before it is rotated by display
* orientation. So applications need to consider the display orientation
* while setting preview size. For example, suppose the camera supports
* both 480x320 and 320x480 preview sizes. The application wants a 3:2
* preview ratio. If the display orientation is set to 0 or 180, preview
* size should be set to 480x320. If the display orientation is set to
* 90 or 270, preview size should be set to 320x480. The display
* orientation should also be considered while setting picture size and
* thumbnail size.
*
* @param width the width of the pictures, in pixels
* @param height the height of the pictures, in pixels
* @see #setDisplayOrientation(int)
* @see #getCameraInfo(int, CameraInfo)
* @see #setPictureSize(int, int)
* @see #setJpegThumbnailSize(int, int)
*/
public void setPreviewSize(int width, int height) {
String v = Integer.toString(width) + "x" + Integer.toString(height);
set(KEY_PREVIEW_SIZE, v);
}
/**
         * Sets the dimensions for EXIF thumbnail in Jpeg picture. If
         * applications set both width and height to 0, EXIF will not contain
         * thumbnail.
         *
         * Applications need to consider the display orientation. See {@link
         * #setPreviewSize(int,int)} for reference.
         *
         * @param width  the width of the thumbnail, in pixels
         * @param height the height of the thumbnail, in pixels
         * @see #setPreviewSize(int,int)
         */
        public void setJpegThumbnailSize(int width, int height) {
            set(KEY_JPEG_THUMBNAIL_WIDTH, width);
            set(KEY_JPEG_THUMBNAIL_HEIGHT, height);
        }


        /**
         * Sets the quality of the EXIF thumbnail in Jpeg picture.
         *
         * @param quality the JPEG quality of the EXIF thumbnail. The range is 1
         *                to 100, with 100 being the best.
         */
        public void setJpegThumbnailQuality(int quality) {
            set(KEY_JPEG_THUMBNAIL_QUALITY, quality);
        }


        /**
         * Sets Jpeg quality of captured picture.
         *
         * @param quality the JPEG quality of captured picture. The range is 1
         *                to 100, with 100 being the best.
         */
        public void setJpegQuality(int quality) {
            set(KEY_JPEG_QUALITY, quality);
        }


        /**
         * Sets the rate at which preview frames are received. This is the
         * target frame rate. The actual frame rate depends on the driver.
         *
         * @param fps the frame rate (frames per second)
         * @deprecated replaced by {@link #setPreviewFpsRange(int,int)}
         */
        @Deprecated
        public void setPreviewFrameRate(int fps) {
            set(KEY_PREVIEW_FRAME_RATE, fps);
        }


        /**
         * Sets the maximum and maximum preview fps. This controls the rate of
         * preview frames received in {@link PreviewCallback}. The minimum and
         * maximum preview fps must be one of the elements from {@link
         * #getSupportedPreviewFpsRange}.
         *
         * @param min the minimum preview fps (scaled by 1000).
         * @param max the maximum preview fps (scaled by 1000).
         * @throws RuntimeException if fps range is invalid.
         * @see #setPreviewCallbackWithBuffer(Camera.PreviewCallback)
         * @see #getSupportedPreviewFpsRange()
         */
        public void setPreviewFpsRange(int min, int max) {
            set(KEY_PREVIEW_FPS_RANGE, "" + min + "," + max);
        }


        /**
         * Sets the image format for preview pictures.
         * If this is never called, the default format will be
         * {@link android.graphics.ImageFormat#NV21}, which
         * uses the NV21 encoding format.
         *
         * @param pixel_format the desired preview picture format, defined
         *   by one of the {@link android.graphics.ImageFormat} constants.
         *   (E.g., ImageFormat.NV21 (default),
         *                      ImageFormat.RGB_565, or
         *                      ImageFormat.JPEG)
         * @see android.graphics.ImageFormat
         */
        public void setPreviewFormat(int pixel_format) {
            String s = cameraFormatForPixelFormat(pixel_format);
            if (s == null) {
                throw new IllegalArgumentException(
                        "Invalid pixel_format=" + pixel_format);
            }

            set(KEY_PREVIEW_FORMAT, s);
        }


        /**
         * Sets the dimensions for pictures.
         *
         * Applications need to consider the display orientation. See {@link
         * #setPreviewSize(int,int)} for reference.
         *
         * @param width  the width for pictures, in pixels
         * @param height the height for pictures, in pixels
         * @see #setPreviewSize(int,int)
         *
         */
        public void setPictureSize(int width, int height) {
            String v = Integer.toString(width) + "x" + Integer.toString(height);
            set(KEY_PICTURE_SIZE, v);
        }


        /**
         * Sets the image format for pictures.
         *
         * @param pixel_format the desired picture format
         *                     (ImageFormat.NV21,
         *                      ImageFormat.RGB_565, or
         *                      ImageFormat.JPEG)
         * @see android.graphics.ImageFormat
         */
        public void setPictureFormat(int pixel_format) {
            String s = cameraFormatForPixelFormat(pixel_format);
            if (s == null) {
                throw new IllegalArgumentException(
                        "Invalid pixel_format=" + pixel_format);
            }

            set(KEY_PICTURE_FORMAT, s);
        }
ok,錯誤的地方,我們就定位在這麼幾個地方了。在自己寫的代碼裡面,查看一下是否調用了這幾個方法~~~。android源碼還是注釋得比較清晰的,看看方法英文說明,看是否參數有出現了錯誤。
當時我的是使用setPictureSize時出現了錯誤,根據方法說明,我簡單解釋下,為什麼會出錯。因為parameters.setPictureSize(320, 480)(設置分辨率)的參數有誤,如果不清楚分辨率可以卻掉這句話,再運行就OK了。
注:最後找了一下原因,感覺很簡單,在實際 開發中,有時候一個小問題,就讓人忙乎一個下午也是正常滴。
 Android開發筆記(一百一十二)開發工具
Eclipse/ADTADT是Google在Eclipse基礎上封裝了Android開發工具的環境,最新版本是2014年7月2日發布的adt-bundle-windows
 ListView詳解之二----XListView
本次分析的是github上一個用於下拉刷新上拉加載的控件XListView,這個開源的ListView相信大家在開發的過程中會經常用到。https://github.co
 Android開之在非UI線程中更新UI
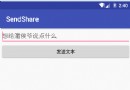
當在非UI線程中更新UI(程序界面)時會出現如下圖所示的異常: 那如何才能在非UI線程中更細UI呢? 方法有很多種,在這裡主要介紹兩種: 第一種:在需要更新UI的代碼
 android圖片壓縮上傳系列-service篇
本篇文章是繼續上篇文章的續篇。主要目的是:通過Service來執行圖片壓縮任務來討論如何使用Service,如何處理任務量大的並發問題。了解下Service大家都知道如果