編輯:關於Android編程
之前寫的第一篇Fragment實例,和大多數人一開始學的一樣,都是通過FragmentTransaction的replace方法來實現,replace方法相當於先移除remove()原來所有已存在的fragments,然後添加add()當前這個fragment。這就導致了一個問題,我們切換一次,然後再切換回來,相當於重新加載了這個fragment,原來的狀態不復存在,這顯然與我們的日常使用不符。想要保存切換後的狀態,思路還是很簡單的,我們先添加了若干fragments,切換後將所有fragments都隱藏hide(),並顯示show()切換後的fragment即可。
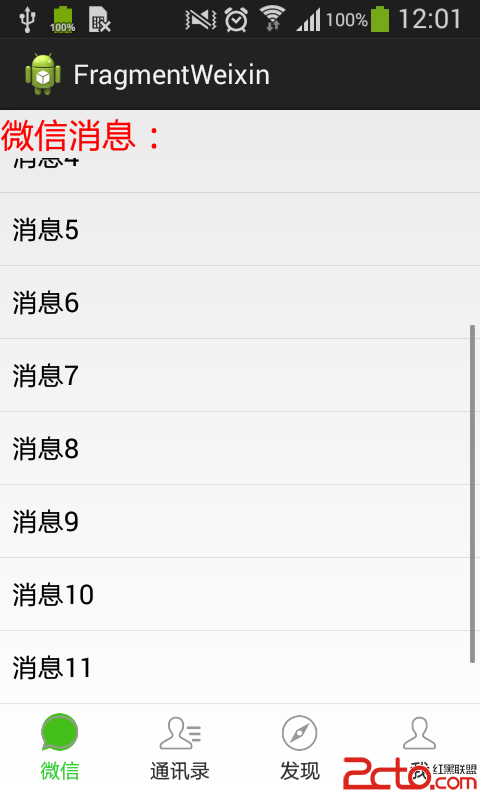
實例:山寨微信
由於代碼較長,這裡只講核心的部分,有興趣的可以下載源碼來看一下
public class MainActivity extends ActionBarActivity implements OnClickListener {

	private View weixinLayout, tongxunluLayout, faxianLayout, woLayout;
	private TextView weixinTv, tongxunluTv, faxianTv, woTv;
	private ImageView weixinIv, tongxunluIv, faxianIv, woIv;
	private Fragment1 fragment1;
	private Fragment2 fragment2;
	private Fragment3 fragment3;
	private Fragment4 fragment4;
	private FragmentManager fm;

	@Override
	protected void onCreate(Bundle savedInstanceState) {
		super.onCreate(savedInstanceState);
		setContentView(R.layout.activity_main);
		// 初始化
		initViews();

		fm = getFragmentManager();

		// 初識狀態是顯示微信
		weixinIv.setBackgroundResource(R.drawable.weixin2);
		weixinTv.setTextColor(getResources().getColor(R.color.green));
		showFragment(1);
	}

	void initViews() {
		// 注冊各IamgeView
		weixinIv = (ImageView) findViewById(R.id.weixin_iv);
		tongxunluIv = (ImageView) findViewById(R.id.tongxunlu_iv);
		faxianIv = (ImageView) findViewById(R.id.faxian_iv);
		woIv = (ImageView) findViewById(R.id.wo_iv);

		// 注冊各TextView
		weixinTv = (TextView) findViewById(R.id.weixin_tv);
		tongxunluTv = (TextView) findViewById(R.id.tongxunlu_tv);
		faxianTv = (TextView) findViewById(R.id.faxian_tv);
		woTv = (TextView) findViewById(R.id.wo_tv);

		// 注冊各Layout
		weixinLayout = (View) findViewById(R.id.weixin_layout);
		tongxunluLayout = (View) findViewById(R.id.tongxunlu_layout);
		faxianLayout = (View) findViewById(R.id.faxian_layout);
		woLayout = (View) findViewById(R.id.wo_layout);

		// 各Layout注冊監聽器
		weixinLayout.setOnClickListener(this);
		tongxunluLayout.setOnClickListener(this);
		faxianLayout.setOnClickListener(this);
		woLayout.setOnClickListener(this);

	}

	@Override
	public void onClick(View arg0) {
		// TODO Auto-generated method stub
		// 當點擊某個layout時,先清除狀態,這裡的狀態指的是布局裡面的圖片和文字
		clearState();
		switch (arg0.getId()) {
		case R.id.weixin_layout:
			// 如果點的是微信,將微信布局的圖片和文字的顏色變為綠色
			weixinIv.setBackgroundResource(R.drawable.weixin2);
			weixinTv.setTextColor(getResources().getColor(R.color.green));
			// 顯示微信的fragment
			showFragment(1);
			break;
		case R.id.tongxunlu_layout:
			tongxunluIv.setBackgroundResource(R.drawable.tongxunlu2);
			tongxunluTv.setTextColor(getResources().getColor(R.color.green));
			showFragment(2);
			break;
		case R.id.faxian_layout:
			faxianIv.setBackgroundResource(R.drawable.faxian2);
			faxianTv.setTextColor(getResources().getColor(R.color.green));
			showFragment(3);
			break;
		case R.id.wo_layout:
			woIv.setBackgroundResource(R.drawable.wo2);
			woTv.setTextColor(getResources().getColor(R.color.green));
			showFragment(4);
			break;
		}
	}

	public void clearState() {
		// 未選中時的圖片
		weixinIv.setBackgroundResource(R.drawable.weixin1);
		tongxunluIv.setBackgroundResource(R.drawable.tongxunlu1);
		faxianIv.setBackgroundResource(R.drawable.faxian1);
		woIv.setBackgroundResource(R.drawable.wo1);
		// 未選中時字體顏色
		weixinTv.setTextColor(getResources().getColor(R.color.black));
		tongxunluTv.setTextColor(getResources().getColor(R.color.black));
		faxianTv.setTextColor(getResources().getColor(R.color.black));
		woTv.setTextColor(getResources().getColor(R.color.black));
	}

	public void showFragment(int index) {
		FragmentTransaction ft = fm.beginTransaction();

		// 想要顯示一個fragment,先隱藏所有fragment,防止重疊
		hideFragments(ft);

		switch (index) {
		case 1:
			// 如果fragment1已經存在則將其顯示出來
			if (fragment1 != null)
				ft.show(fragment1);
			// 否則是第一次切換則添加fragment1,注意添加後是會顯示出來的,replace方法也是先remove後add
			else {
				fragment1 = new Fragment1();
				ft.add(R.id.content, fragment1);
			}
			break;
		case 2:
			if (fragment2 != null)
				ft.show(fragment2);
			else {
				fragment2 = new Fragment2();
				ft.add(R.id.content, fragment2);
			}
			break;
		case 3:
			if (fragment3 != null)
				ft.show(fragment3);
			else {
				fragment3 = new Fragment3();
				ft.add(R.id.content, fragment3);
			}
			break;
		case 4:
			if (fragment4 != null)
				ft.show(fragment4);
			else {
				fragment4 = new Fragment4();
				ft.add(R.id.content, fragment4);
			}
			break;
		}
		ft.commit();
	}

	// 當fragment已被實例化,就隱藏起來
	public void hideFragments(FragmentTransaction ft) {
		if (fragment1 != null)
			ft.hide(fragment1);
		if (fragment2 != null)
			ft.hide(fragment2);
		if (fragment3 != null)
			ft.hide(fragment3);
		if (fragment4 != null)
			ft.hide(fragment4);
	}

}
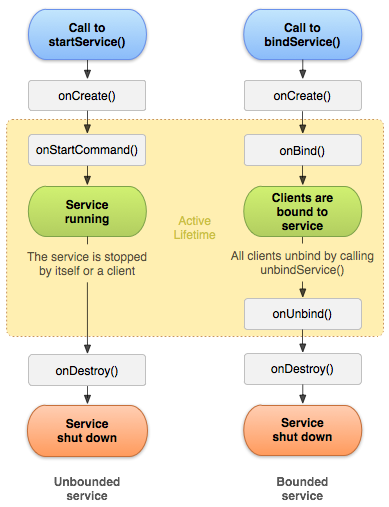
引用上篇文章的fragment生命周期圖:
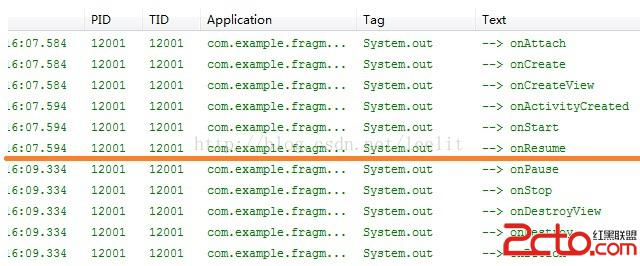
如果是repalce方法,我們切換至當前fragment則進行紅線以上的生命周期,切換到其他fragment後進行紅線以下的生命周期。但是,如果我們使用hide()和show()的方法,切換至當前fragment依然進行紅線以上的生命周期,切換到其他fragment後並沒有進行其他生命周期,只是簡單地隱藏了起來。這樣應該很明了了吧。
源碼:
http://download.csdn.net/detail/leelit/8179147
 AndroidNDK使用簡介
今天我們來簡單說一下Android NDK的使用方法。眾所周知,so文件在Android的開發過程中起到了很重要的作用,無論與底層設備打交道還是在Android安全領域。
 最常用和最難用的Android控件ListView
ListView允許用戶通過手指上下滑動的方式將屏幕外的數據滾動到屏幕內,同時屏幕上原有的數據則會滾動出屏幕.1. ListView的簡單用法首先新建一個ListView
 Android編程繪制圓形圖片的方法
本文實例講述了Android編程繪制圓形圖片的方法。分享給大家供大家參考,具體如下:效果圖如下:第一步:新建RoundView自定義控件繼承Viewpackage com
 微信如何轉發文章 微信轉發文章辦法
微信如何轉發文章,使用微信,有時候會讀到一些覺得很好的文章,我們就想轉發分享給好友,那麼微信如何轉發文章呢,其實很簡單的,下面我就來一步一步的講解給大家。1