編輯:關於Android編程
在Android開發中, 我們經常會遇到一些場景, 需要以一些特殊的形狀顯示圖片, 比如圓角矩形、圓形等等。關於如何繪制這類形狀, 網上已經有很多的方案,比如自定義控件重寫onDraw方法, 通過canvas的各種draw方法進行繪制等。那麼, 更復雜的圖形呢?比如,五角星?比如組合圖形?又或者是各種奇奇怪怪的不規則圖形呢?有同學會說, 如果已知不規則圖形的具體形狀, 那我們就可以通過連接頂點的方式, 找出path, 然後通過drawPath方法繪制出來啊。嗯。。。很有道理, 但是先不說有些圖像,可能頂點巨多, 或者彎彎曲曲很難找出具體的頂點, 難道我們要為每一個特殊的形狀, 單獨寫一個獨立的控件, 或者一套獨立的代碼嗎?
可以肯定是可以,但是我覺得, 最好還是不要這麼做。。於是我有了一個想法, 用一張圖片, 告訴控件,我想要什麼樣的形狀, 然後控件自動按照這個形狀, 幫我把圖片顯示出來。於是有了這個項目--android-anyshape。
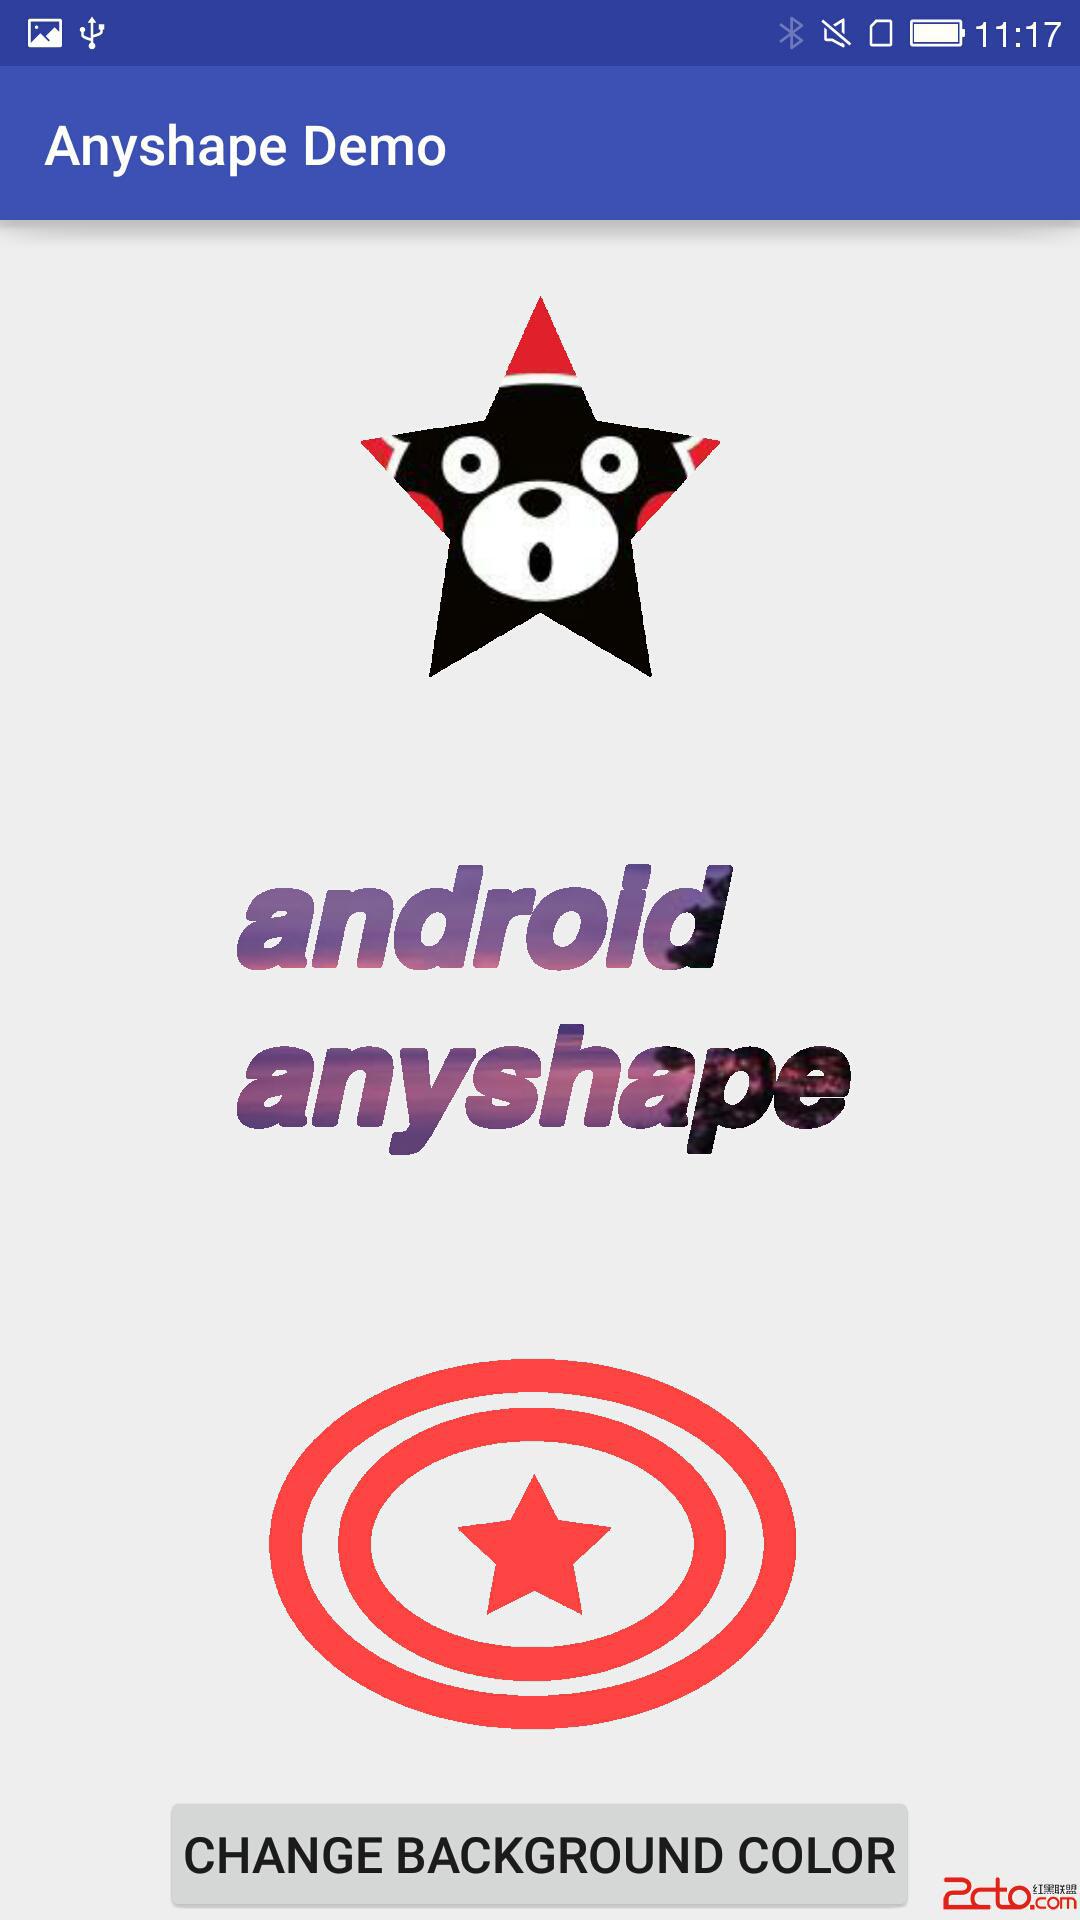
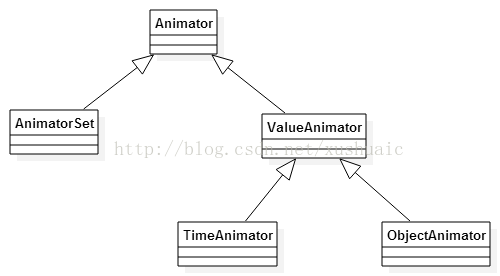
左邊是使用了普通ImageView的展示效果, 右邊是使用了項目中AnyshapeImageView的效果。想使用AnyshapeImageView達到右邊的樣式, 僅需提供三張遮罩圖片,通過”anyshapeMask”參數提供給控件即可(下文會說明)。
三張“遮罩”圖片如下:
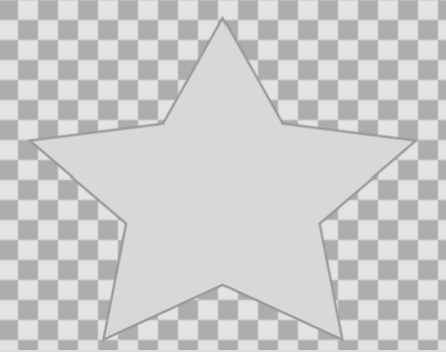
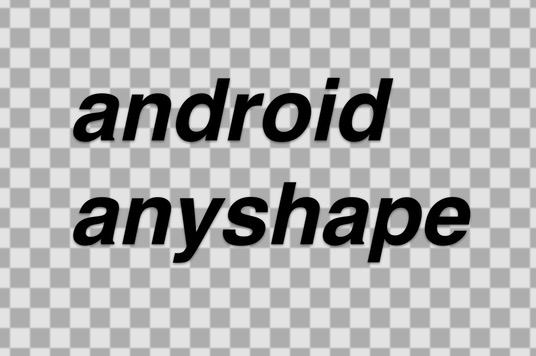
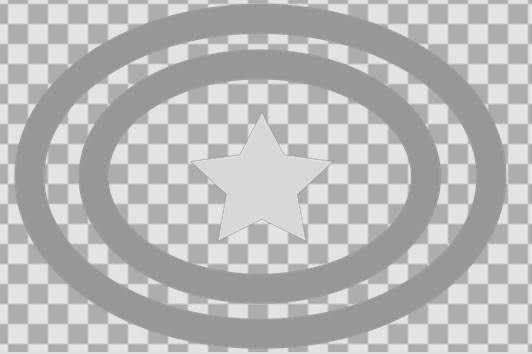
與普通的遮罩圖片不同, 這裡要求圖片的背景完全透明, 即alpha通道的值為0, 而需要顯示的圖形,對具體的顏色沒有任何要求,不透明即可。
控件的使用很簡單, 由於繼承ImageView, 所以使用方法類似於ImageView,但多了一個重要的自定義參數:anyshapeMask
在布局文件中加入這段xml, 展示的就是上面圖中那頭五角星形狀的熊本熊~
但是, 僅僅這麼使用,我們會發現圖像加載出來非常慢。所以強烈建議在程序剛啟動時, 或者在使用AnyshapeImageView前的任意地方, 先調用一下PathInfoManager(與AnyshapeImageView在一個包裡)裡的createPaths方法,參數為所有可能用到的“遮罩”圖片資源id列表。
List ids = new ArrayList<>();
ids.add(R.drawable.singlestar);
ids.add(R.drawable.rings);
ids.add(R.drawable.text);
PathManager.getInstance().createPaths(this, ids);
看到這裡, 有朋友可能說我標題黨了。。。 然而這段代碼跟繪制圖形本身並沒有任何關系, 而是為更快展示圖片所做的優化, 後文會有介紹。需要開發者自己做的, 就這麼多了。。
實現這個功能的思路其實很簡單,通過對一張“遮罩”圖片各像素透明度的掃描,獲得一個Path對象, 該Path對象包含了所有不透明像素的集合。然後就很簡單了, 通過Canvas對象的drawPath方法,將我們要顯示的圖片刷上去即可。
這是這個項目中最重要的部分。代碼如下:
PathInfoManager.getPathFromBitmap:
public Path getPathFromBitmap(Bitmap mask) {
    Path path = new Path();
    int bWidth = mask.getWidth();
    int bHeight = mask.getHeight();
    int[] origin = new int[bWidth];
    int lastA;
    for (int i = 0; i < bHeight; i++) {
        mask.getPixels(origin, 0, bWidth, 0, i, bWidth, 1);
        lastA = 0;
        for (int j = 0; j < bWidth; j++) {
            int a = Color.alpha(origin[j]);
            if (a != 0 && lastA == 0) {
                path.moveTo(j, i);
            } else if (a == 0 && lastA !=0 ) {
                path.lineTo(j - 1, i);
            } else if (a != 0 && j == bWidth - 1) {
                path.lineTo(j, i);
            }
            lastA = a;
        }
    }
    return path;
}
我設計的方案很簡單,逐行掃描Bitmap中的像素,實現方法是用getPixels方法獲得每行的像素數組,然後遍歷分析。步驟如下:
1. 遇到一個不透明像素,進行判斷, 如果它的上一個像素不透明, 或者它本身就是行首, 那我們就把它看作一段不透明區域的開頭,通過moveTo方法將Path移動到此點;
2. 遇到一個透明像素,進行判斷,如果它的上一個像素透明,那我們就把它的上一個像素看作一段不透明區域的結尾, 通過lineTo的方式, 將它與之前的開頭像素連接。
3. 重復1、2步, 直到掃描完全行。需要注意的是, 如果行尾是不透明像素, 那就直接連上。防止最後一段不透明區域只有起點沒有終點。
這樣, 每一行的連接結果,就組成了整張圖片的掃描結果~
先看一下AnyshapeImageView的初始化方法:
public AnyshapeImageView(Context context, AttributeSet attrs, int defStyleAttr) {
    super(context, attrs, defStyleAttr);
    this.context = context;
    TypedArray a = context.getTheme().obtainStyledAttributes(attrs, R.styleable.AnyShapeImageView, defStyleAttr, 0);
    int n = a.getIndexCount();
    for (int i = 0; i < n; i++)
    {
        final int attr = a.getIndex(i);
        if (attr == R.styleable.AnyShapeImageView_anyshapeMask) {
            int maskResId = a.getResourceId(attr, 0);
            if (0 == maskResId) {
                //did not set mask
                continue;
            }
            PathInfo pi = PathManager.getInstance().getPathInfo(maskResId);
            if (null != pi) {
                originMaskPath = pi.path;
                originMaskWidth = pi.width;
                originMaskHeight = pi.height;
            } else {
                Bitmap maskBitmap = BitmapFactory.decodeResource(context.getResources(), a.getResourceId(attr, 0));
                originMaskPath = PathManager.getInstance().getPathFromBitmap(maskBitmap);
                originMaskWidth = maskBitmap.getWidth();
                originMaskHeight = maskBitmap.getHeight();
                pi = new PathInfo();
                pi.height = originMaskHeight;
                pi.width = originMaskWidth;
                pi.path = originMaskPath;
                PathManager.getInstance().addPathInfo(maskResId, pi);
                maskBitmap.recycle();
            }
        } else if (attr == R.styleable.AnyShapeImageView_anyshapeBackColor) {
            backColor = a.getColor(attr, Color.TRANSPARENT);
        }
    }
    a.recycle();
}

public AnyshapeImageView(Context context) {
    this(context, null);
}

public AnyshapeImageView(Context context, AttributeSet attrs) {
    this(context, attrs, 0);
}
其實就是調用通過anyshapeMask參數, 獲得“遮罩”圖片的資源ID,再通過資源ID,生成Bitmap, 從而獲得其中包含的Path。同時記錄了Bitmap對象的寬和高, 保存在一個PathInfo對象裡。
PathInfo:
public class PathInfo {
    public Path path;
    public int width;
    public int height;
}
然而我們看到,用戶進行生成Bitmap-獲取Path這一系列耗時、耗內存操作之前,先會判斷緩存裡是否已經有與該資源ID匹配的PathInfo, 如果有, 則不用進行這部分操作。如果沒有,根據傳入的資源ID,生成PathInfo對象,並存入緩存。
關於這塊緩存,下面會說明。
再看onSizeChanged方法:
protected void onSizeChanged(int w, int h, int oldw, int oldh) {
    super.onSizeChanged(w, h, oldw, oldh);
    vHeight = getHeight();
    vWidth = getWidth();
    if (originMaskPath != null) {
        //scale the size of the path to fit the one of this View
        Matrix matrix = new Matrix();
        matrix.setScale(vWidth * 1f / originMaskWidth, vHeight * 1f / originMaskHeight);
        originMaskPath.transform(matrix, realMaskPath);
    }
}
這裡的代碼, 主要目的是對Path對象進行縮放, 已匹配控件的實際大小。可以看到, 如果不希望展示的形狀被拉伸或者變形, 那麼AnyshapeImageView的寬高比, 最好和“遮罩”圖片的寬高比保持一致。
接下來就是在onDraw裡繪制形狀並刷上圖片了:
@Override
protected void onDraw(Canvas canvas) {
    if (null == originMaskPath) {
        // if the mask is null, the view will work as a normal ImageView
        super.onDraw(canvas);
        return;
    }
    if (vWidth == 0 || vHeight == 0) {
        return;
    }

    paint.reset();
    paint.setStyle(Paint.Style.STROKE);
    //get the drawable to show. if not set the src, will use  backColor
    Drawable showDrawable = getDrawable();
    if (null != showDrawable) {
        Bitmap showBitmap = ((BitmapDrawable) showDrawable).getBitmap();
        Shader shader = new BitmapShader(showBitmap, Shader.TileMode.CLAMP, Shader.TileMode.CLAMP);
        Matrix shaderMatrix = new Matrix();
        float scaleX = vWidth * 1.0f / showBitmap.getWidth();
        float scaleY = vHeight * 1.0f / showBitmap.getHeight();
        shaderMatrix.setScale(scaleX, scaleY);
        shader.setLocalMatrix(shaderMatrix);
        paint.setShader(shader);
    } else {
        //no src , use the backColor to fill the path
        paint.setColor(backColor);
    }
    canvas.drawPath(realMaskPath, paint);

}
看了上面的博文, 各位一定清楚了,作為參數傳入的資源ID,實際上只是為了獲取一個Path對象。那麼我們可以建立一個Integer-Path的映射關系, 用來緩存已經讀取出來的Path。後面需要Path, 只需要通過資源ID去緩存裡尋找即可,畢竟讀取Path是一個費時間又費資源的操作。
這樣看來,我們已經對AnyshapeImageView的使用進行了優化, 畢竟同一個形狀的展示,我們只要執行一次從圖片中解析Path對象的操作即可。但是這還不夠,第一次展示圖片的速度依然會有延遲。(我打點做過統計,需要一點幾秒,人也能有明顯感知。當然,這個數字跟“遮罩”圖片的大小也有關系,所以不建議使用太大的圖片)
PathInfoManager針對這個問題, 提供了一個初始化方案。提供一個初始化方法, 可以在程序開始時,比如Application的onCreate方法中調用,生成Path對象存入緩存。當然, 在其他地方調用也是可以的,但必須在顯示AnyshapeImageView之前, 否則沒有意義。
public void createPaths(Context context, List resList) {
    for (Integer resId : resList) {
        if (resId > 0) {
            PathAsyncTask task = new PathAsyncTask(context);
            task.execute(resId);
        }
    }
}

class PathAsyncTask extends AsyncTask  {
    private Context context;
    public PathAsyncTask(Context context){
        super();
        this.context = context;
    }

    @Override
    protected Path doInBackground(Integer... params) {
        int resId = params[0];
        PathInfo pi = new PathInfo();
        Bitmap maskBitmap = BitmapFactory.decodeResource(context.getResources(), resId);
        pi.path = PathManager.getInstance().getPathFromBitmap(maskBitmap);
        pi.width = maskBitmap.getWidth();
        pi.height = maskBitmap.getHeight();
        //creating is done, add the path info into the cache
        PathManager.getInstance().addPathInfo(resId, pi);
        maskBitmap.recycle();
        return null;
    }

}
可以看到, 這個方法是用了AsyncTask在後台異步執行Path的初始化操作,所以可以放心調用,而不用擔心阻塞。
這個項目,是我花了將近一周時間斷斷續續完成的。代碼不多, 也不復雜,希望能夠幫到大家, 或者為大家提供一些思路。
再貼一下項目的地址, 包括demo在內:
https://github.com/lankton/android-anyshape
如果你覺得這個項目,或者這篇博文對你起到了一些幫助,歡迎star支持一下~
 android 自定義view更新的時候遇到的問題(求解答)
今天遇到一個很奇怪的問題,關於在view裡面更新LRC歌詞的,view裡面有一個成員變量,lrcindex ,在draw裡面會用到它來更新歌詞,歌詞裡面有一行是紅色的,表
 Android學QQ空間相冊浏覽類型橫向滑動效果顯示多圖片MyHorizontalScrollView
我們來定制一下吧布局文件:activity_main.xml <framelayout android:layout_height=0dp android:l
 自定義View 之利用ViewPager 實現畫廊效果(滑動放大縮小)
基本介紹畫廊在很多的App設計中都有,如下圖所示:該例子是我沒事的時候寫的一個小項目,具體源碼地址請訪問https://github.com/AlexSmille/Yin
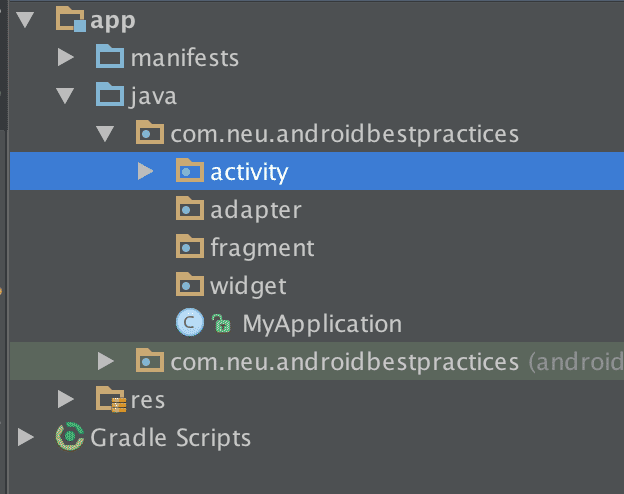 Android開發之RecyclerView控件
現階段,我們創建了最簡單的Android項目,現在在此公布github鏈接https://github.com/neuyu/android-best-practices,