編輯:關於Android編程
現在越來越多的APP都加入了主題切換功能或者是日間模式和夜間模式功能切換等,這些功能不僅增加了用戶體驗也增強了用戶好感,眾所周知QQ和網易新聞的APP做的用戶體驗都非常好,它們也都有日間模式和夜間模式的主題切換功能。體驗過它們的主題切換後你會發現大部分效果是更換相關背景圖片、背景顏色、字體顏色等來完成的,網上這篇文章對主題切換講解的比較不錯,今天我們從源碼的角度來學習一下主題切換功能,如果你對這塊非常熟悉了,請跳過本文(*^__^*) …
在開始講解主題切換之前我們先看一下LayoutInflater吧,大家都應該對LayoutInflater的使用非常熟悉了(如果你對它的使用還不是很清楚請自行查閱)。LayoutInflater的使用場合非常多,常見的比如在Adapter的getView()方法中,在Fragment中的onCreateView()中使用等等,總之如果我們想要把對應的layout.xml文件渲染成對應的View層級視圖,離開LayoutInflater是不行的,那麼我們如何獲取LayoutInflater實例並用其來渲染成對應的View實例對象呢?一般有以下幾種方式:
調用Context.getSystemService()方法LayoutInflater inflater = (LayoutInflater) context.getSystemService(Context.LAYOUT_INFLATER_SERVICE); View rootView = inflater.inflate(R.layout.view_layout, null);直接使用LayoutInflater.from()方法
LayoutInflater inflater = LayoutInflater.from(context); View rootView = inflater.inflate(R.layout.view_layout, null);在Activity下直接調用getLayoutInflater()方法
LayoutInflater inflater = getLayoutInflater(); View rootView = inflater.inflate(R.layout.view_layout, null);使用View的靜態方法View.inflate()
rootView = View.inflate(context, R.layout.view_layout, null);以上4種方式都可以渲染出一個View實例出來但也都是借助LayoutInflater的inflate()方法來完成的,我們先看一下方式2中LayoutInflater.from()是怎麼做的,代碼如下:
/** * Obtains the LayoutInflater from the given context. */ public static LayoutInflater from(Context context) { LayoutInflater LayoutInflater = (LayoutInflater) context.getSystemService(Context.LAYOUT_INFLATER_SERVICE); if (LayoutInflater == null) { throw new AssertionError("LayoutInflater not found."); } return LayoutInflater; }
LayoutInflater.from()方法只不過是對方式1的一層包裝,最終還是通過調用Context的getSystemService()方法獲取到LayoutInflater實例對象,然後通過返回的LayoutInflater實例對象調用其inflate()方法來完成對xml布局文件的渲染並生成相應的View對象。通過和方式1對比你會發現,這兩種方式中的Context如果是相同的那麼獲取的LayoutInflater對象應該是同一個。然後我們在看一下方式3中的實現部分,方式3是在Activity中直接調用Activity的getLayoutInflater()方法,源碼如下:
/** * Convenience for calling * {@link android.view.Window#getLayoutInflater}. */ public LayoutInflater getLayoutInflater() { return getWindow().getLayoutInflater(); }
通過源碼發現Activity的getLayoutInflater()方法輾轉調用到了getWindow()的getLayoutInflater()方法,getWindow()方法返回一個Window類型的對象,其中Window為抽象類在Android中該類的實現類是PhoneWindow,也就是說getWindow().getLayoutInflater()方法最終調用的是PhoneWindow的getLayoutInflater()方法,我們看一下PhoneWindow類中該方法的實現過程,代碼如下:
/** * Return a LayoutInflater instance that can be used to inflate XML view layout * resources for use in this Window. * * @return LayoutInflater The shared LayoutInflater. */ @Override public LayoutInflater getLayoutInflater() { return mLayoutInflater; }
在PhoneWindow類中直接返回了mLayoutInflater對象,那麼mLayoutInflater是在何時何地完成初始化的呢?我們繼續查看mLayoutInflater的初始化在哪完成的,通過查看代碼發現是在PhoneWindow的構造方法中完成初始化的,代碼如下:
public PhoneWindow(Context context) { super(context); mLayoutInflater = LayoutInflater.from(context); }
我們暫且不關心PhoneWindow是何時何地完成初始化的,我們只關心mLayoutInflater的初始化也是直接調用LayoutInflater.from()方法來完成的,這種方式和方式2是一樣的,都是借助傳遞進來的context調用其getSystemService()方法獲取到LayoutInflater實例,也就是說只要PhoneWindow中傳遞進來的context和方式1、方式2是相同的,那麼可以確定獲取到的mLayoutInflater的實例就是同一個。接著我們看方式4的通過調用View的靜態方法inflate()的內部流程是怎樣的,代碼如下:
/** * Inflate a view from an XML resource. This convenience method wraps the {@link * LayoutInflater} class, which provides a full range of options for view inflation. * * @param context The Context object for your activity or application. * @param resource The resource ID to inflate * @param root A view group that will be the parent. Used to properly inflate the * layout_* parameters. * @see LayoutInflater */ public static View inflate(Context context, int resource, ViewGroup root) { LayoutInflater factory = LayoutInflater.from(context); return factory.inflate(resource, root); }
在View的inflate()靜態方法中先是根據傳遞進來的context通過LayoutInflater.from()方法來獲取一個LayoutInflater實例對象,然後調用LayoutInflater的inflate()方法來完成把layout.xml布局文件渲染成對應的View層級視圖然後返回。
通過對以上代碼的分析我們可以得以下出結論:前邊說的無論以哪種方式來渲染View視圖都會先獲取到LayoutInflater的實例,然後通過調用該實例的inflate()方法把xml布局文件渲染出相應的View層級視圖,而獲取LayoutInflater實例是需要Context的,那也就是說如果傳入的Context對象是同一個那麼獲取的LayoutInflater實例也是相同的。這也是我用不小的篇幅從源碼的角度說明這一點的原因所在。
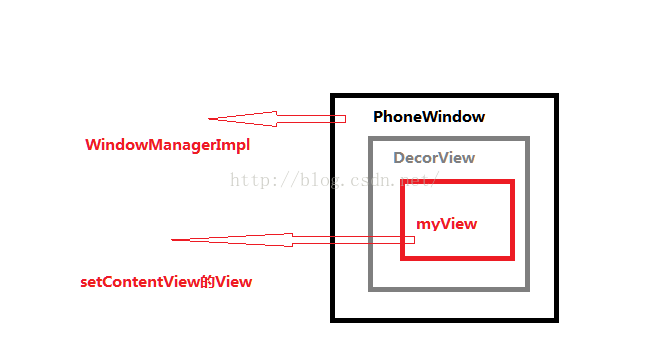
現在我們已經清楚了渲染View是由LayoutInflater來完成的,那麼在Activity的onCreate()方法中通過調用setContentView()為當前Activity設置顯示內容是不是也是通過LayoutInflater的inflater()方法完成的呢?我們接著看代碼,看看Activity的setContentView()裡是如何操作的,代碼如下:
/** * Set the activity content from a layout resource. The resource will be * inflated, adding all top-level views to the activity. * * @param layoutResID Resource ID to be inflated. * * @see #setContentView(android.view.View) * @see #setContentView(android.view.View, android.view.ViewGroup.LayoutParams) */ public void setContentView(int layoutResID) { getWindow().setContentView(layoutResID); initActionBar(); }
setContentView()方法中只是做了一個中轉,接著是調用Window實例的setContentView()方法,剛剛也說過Window為抽象類,它的實現類為PhoneWindow,那也就是最終調用的是PhoneWindow的setContentView()方法,我們看一下PhoneWindow的setContentView()方法,源碼如下:
@Override public void setContentView(int layoutResID) { if (mContentParent == null) { installDecor(); } else { mContentParent.removeAllViews(); } // 這裡同樣是調用了LayoutInflater的inflate()方法 mLayoutInflater.inflate(layoutResID, mContentParent); final Callback cb = getCallback(); if (cb != null && !isDestroyed()) { cb.onContentChanged(); } }
從源碼可以看到在PhoneWindow的setContentView()方法中也同樣使用的是LayoutInflater的inflate()方法。到這裡我們就可以總結出結論:無論是我們自己渲染View還是說為Activity設置顯示內容都是借助LayoutInflater來完成的,而獲取LayoutInflater最終都是通過Context.getSystemService()來得到的,如果Context相同,那麼獲取的LayoutInflater的實例是相同的。
好了,用了不少篇幅講解了有關LayoutInflater的知識都是給主題切換功能做鋪墊的,那怎麼利用LaoutInflater來完成主題切換功能呢?別著急,我們再看一下LayoutInflater的源碼,打開LayoutInflater的源碼你會發現,其內部定義了Factory,Factory2等接口,這兩個接口是干嘛的了?其實他們倆功能是一樣的,Factory2是對Factory的完善,先看Factory的定義說明,代碼如下:
public interface Factory { /** * Hook you can supply that is called when inflating from a LayoutInflater. * You can use this to customize the tag names available in your XML * layout files. * *
* Note that it is good practice to prefix these custom names with your * package (i.e., com.coolcompany.apps) to avoid conflicts with system * names. * * @param name Tag name to be inflated. * @param context The context the view is being created in. * @param attrs Inflation attributes as specified in XML file. * * @return View Newly created view. Return null for the default * behavior. */ public View onCreateView(String name, Context context, AttributeSet attrs); }
接口Factory中定義了onCreateView()方法,該方法返回一個View實例。我們看看該方法的說明,大致意思是說:當我們使用LayoutInflater來渲染View的時候此方法可以支持做Hook操作,我們可以在xml布局文件中使用自定義標簽,需要注意的是不要使用系統名字。那麼這裡究竟該如何使用了?我們先梳理一下使用LayoutInflater渲染View的流程,以方式2為例子做說明吧,在方式2中rootView是由inflater.inflate()方法生成的,我們進入inflate()方法中看一下其內部的執行流程,代碼如下:
/** * Inflate a new view hierarchy from the specified xml resource. Throws * {@link InflateException} if there is an error. * * @param resource ID for an XML layout resource to load (e.g., * R.layout.main_page) * @param root Optional view to be the parent of the generated hierarchy. * @return The root View of the inflated hierarchy. If root was supplied, * this is the root View; otherwise it is the root of the inflated * XML file. */ public View inflate(int resource, ViewGroup root) { return inflate(resource, root, root != null); }
inflate()方法中什麼都沒做直接調用了其同名的重載方法inflate(),我們接著往裡跟進,代碼如下:
/** * Inflate a new view hierarchy from the specified xml resource. Throws * {@link InflateException} if there is an error. * * @param resource ID for an XML layout resource to load (e.g., * R.layout.main_page) * @param root Optional view to be the parent of the generated hierarchy (if * attachToRoot is true), or else simply an object that * provides a set of LayoutParams values for root of the returned * hierarchy (if attachToRoot is false.) * @param attachToRoot Whether the inflated hierarchy should be attached to * the root parameter? If false, root is only used to create the * correct subclass of LayoutParams for the root view in the XML. * @return The root View of the inflated hierarchy. If root was supplied and * attachToRoot is true, this is root; otherwise it is the root of * the inflated XML file. */ public View inflate(int resource, ViewGroup root, boolean attachToRoot) { if (DEBUG) System.out.println("INFLATING from resource: " + resource); XmlResourceParser parser = getContext().getResources().getLayout(resource); try { return inflate(parser, root, attachToRoot); } finally { parser.close(); } }
在該inflate()方法中通過調用getContext().getResource().getLayout()的方式根據傳遞進來的布局資源ID生成一個XmlResourceParser實例對象parser,這個parser就是用來解析布局文件的(有關在Java/" target="_blank">Java中如何解析xml文件,請自行查閱,這裡不再介紹),根據資源ID獲取到解析器parser後調用了參數有XmlPullParser的重載方法inflate(),我們繼續進入該代碼中看一下執行流程,代碼如下:
/** * Inflate a new view hierarchy from the specified XML node. Throws * {@link InflateException} if there is an error. *
*ImportantFor performance * reasons, view inflation relies heavily on pre-processing of XML files * that is done at build time. Therefore, it is not currently possible to * use LayoutInflater with an XmlPullParser over a plain XML file at runtime. * * @param parser XML dom node containing the description of the view * hierarchy. * @param root Optional view to be the parent of the generated hierarchy (if *attachToRootis true), or else simply an object that * provides a set of LayoutParams values for root of the returned * hierarchy (ifattachToRootis false.) * @param attachToRoot Whether the inflated hierarchy should be attached to * the root parameter? If false, root is only used to create the * correct subclass of LayoutParams for the root view in the XML. * @return The root View of the inflated hierarchy. If root was supplied and * attachToRoot is true, this is root; otherwise it is the root of * the inflated XML file. */ public View inflate(XmlPullParser parser, ViewGroup root, boolean attachToRoot) { synchronized (mConstructorArgs) { final AttributeSet attrs = Xml.asAttributeSet(parser); Context lastContext = (Context)mConstructorArgs[0]; mConstructorArgs[0] = mContext; View result = root; try { // Look for the root node. int type; while ((type = parser.next()) != XmlPullParser.START_TAG && type != XmlPullParser.END_DOCUMENT) { // Empty } if (type != XmlPullParser.START_TAG) { throw new InflateException(parser.getPositionDescription() + ": No start tag found!"); } final String name = parser.getName(); if (DEBUG) { System.out.println("**************************"); System.out.println("Creating root view: " + name); System.out.println("**************************"); } if (TAG_MERGE.equals(name)) { if (root == null || !attachToRoot) { throw new InflateException("can be used only with a valid " + "ViewGroup root and attachToRoot=true"); } rInflate(parser, root, attrs, false); } else { // Temp is the root view that was found in the xml View temp; if (TAG_1995.equals(name)) { temp = new BlinkLayout(mContext, attrs); } else { temp = createViewFromTag(root, name, attrs); } ViewGroup.LayoutParams params = null; if (root != null) { if (DEBUG) { System.out.println("Creating params from root: " + root); } // Create layout params that match root, if supplied params = root.generateLayoutParams(attrs); if (!attachToRoot) { // Set the layout params for temp if we are not // attaching. (If we are, we use addView, below) temp.setLayoutParams(params); } } if (DEBUG) { System.out.println("-----> start inflating children"); } // Inflate all children under temp rInflate(parser, temp, attrs, true); if (DEBUG) { System.out.println("-----> done inflating children"); } // We are supposed to attach all the views we found (int temp) // to root. Do that now. if (root != null && attachToRoot) { root.addView(temp, params); } // Decide whether to return the root that was passed in or the // top view found in xml. if (root == null || !attachToRoot) { result = temp; } } } catch (XmlPullParserException e) { InflateException ex = new InflateException(e.getMessage()); ex.initCause(e); throw ex; } catch (IOException e) { InflateException ex = new InflateException( parser.getPositionDescription() + ": " + e.getMessage()); ex.initCause(e); throw ex; } finally { // Don't retain static reference on context. mConstructorArgs[0] = lastContext; mConstructorArgs[1] = null; } return result; } }
該方法代碼有點長,但也是我們今天要講解的重點,主要邏輯就是遞歸解析布局文件並創建View樹結構,然後返回該View樹結構。該段代碼中先通過Xml類的靜態方法生成一個AttributeSet實例對象attrs,AttributeSet對象我們應該很熟悉,裡邊主要包含了相關屬性的鍵值對。接下來就是通過parser解析器循環遍歷查詢布局文件的根節點,若沒有查詢到就會拋出異常。遍歷完成之後獲取到根節點名字存儲在變量name中,然後進行判斷。如果當前根節點標簽名字是mege標簽就走if()語句,否則進入else語句。由於我們在布局文件中沒有使用merge標簽,所以直接進入else語句中。進入else語句後,先定義值為null的臨時變量temp,接著開始做判斷,如果當前根節點標簽名字為BlinkLayout就進入if語句,因為我們沒有使用這個標簽就進入else語句,在else語句中通過調用createViewFromTag()來創建一個View並賦值給temp。接下來又是條件判斷,因為傳遞進來的root為空,所以跳過if(root != null)的判斷語句,接著執行rInflate()方法(該方法是來循環渲染包含的所有的子視圖的)。執行完成後返回temp的值。
我們進入crateViewFromTag()方法中看一下裡邊的執行流程,代碼如下:
View createViewFromTag(View parent, String name, AttributeSet attrs) { if (name.equals("view")) { name = attrs.getAttributeValue(null, "class"); } if (DEBUG) System.out.println("******** Creating view: " + name); try { View view; if (mFactory2 != null) view = mFactory2.onCreateView(parent, name, mContext, attrs); else if (mFactory != null) view = mFactory.onCreateView(name, mContext, attrs); else view = null; if (view == null && mPrivateFactory != null) { view = mPrivateFactory.onCreateView(parent, name, mContext, attrs); } if (view == null) { if (-1 == name.indexOf('.')) { view = onCreateView(parent, name, attrs); } else { view = createView(name, null, attrs); } } if (DEBUG) System.out.println("Created view is: " + view); return view; } catch (InflateException e) { throw e; } catch (ClassNotFoundException e) { InflateException ie = new InflateException(attrs.getPositionDescription() + ": Error inflating class " + name); ie.initCause(e); throw ie; } catch (Exception e) { InflateException ie = new InflateException(attrs.getPositionDescription() + ": Error inflating class " + name); ie.initCause(e); throw ie; } }
方法createViewFromTag()主要流程就是通過標簽名name來創建相應View實例對象並返回。在該方法中首先根據Factory實例對象來創建View,如果創建成功就直接返回,否則執行系統默認創建View流程。這裡需要強調一點,LayoutInflater內部定義了一個boolean類型的mFactorySet開關,其值默認值為false,當我們調用過setFactory()或者是setFactory2()後mFactorySet為true,若我們再次調用這倆方法時會拋出異常,也就是說每一個LayoutInflater實例對象只能賦值一次Factory,若再想賦成其他值只能通過反射先把mFactorySet的值置為false防止拋異常。系統默認創建View流程是先通過判斷標簽名稱中有沒有包含".",如果沒有包含就把標簽名添加前綴"android.view.",最終調用LayoutInflater的createView()方法,注意該方法是public並且是final類型的,是系統默認的創建View的方式,創建完成之後返回該view。
到這裡我們已經清楚了LayoutInflater根據xml布局文件來渲染View視圖的主要流程:先是通過布局文件的資源ID創建一個XmlResourceParser解析器對象parser,再是利用parser遞歸解析xml布局文件,然後根據解析出的標簽名來創建相關View,最終返回層級視圖View。如果LayoutInflater中設置了Factory,那麼在創建每一個View時都會調用該Factory的onCreateView()方法,這個方法就是我們的入口點,如果想在每一個View創建之前做點處理,只需要在Factory的onCreateView()方法中做相關邏輯操作...
既然已經找到了創建View的切入口,那怎麼樣才能實現主題切換功能呢?主題切換通常是更改背景以及文字顏色等,在做更改之前要先知道哪些View需要更改,那我們怎麼才能知道布局文件中的View需要做主題切換了?自定義屬性是推薦的做法,當布局文件中使用了自定義屬性就表示該View是做主題切換功能的,在該View創建後把它裝入集合中,當需要主題切換時循環遍歷該集合更改View相關屬性就好了...
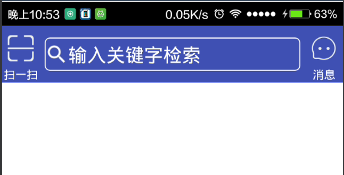 Android自定義View之組合控件實現類似電商app頂部欄
本文實例為大家分享了Android自定義View之組合控件,仿電商app頂部欄的相關代碼,供大家參考,具體內容如下效果圖:分析:左右兩邊可以是TextView和Butto
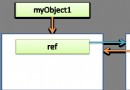
 記一次內存洩露優化過程
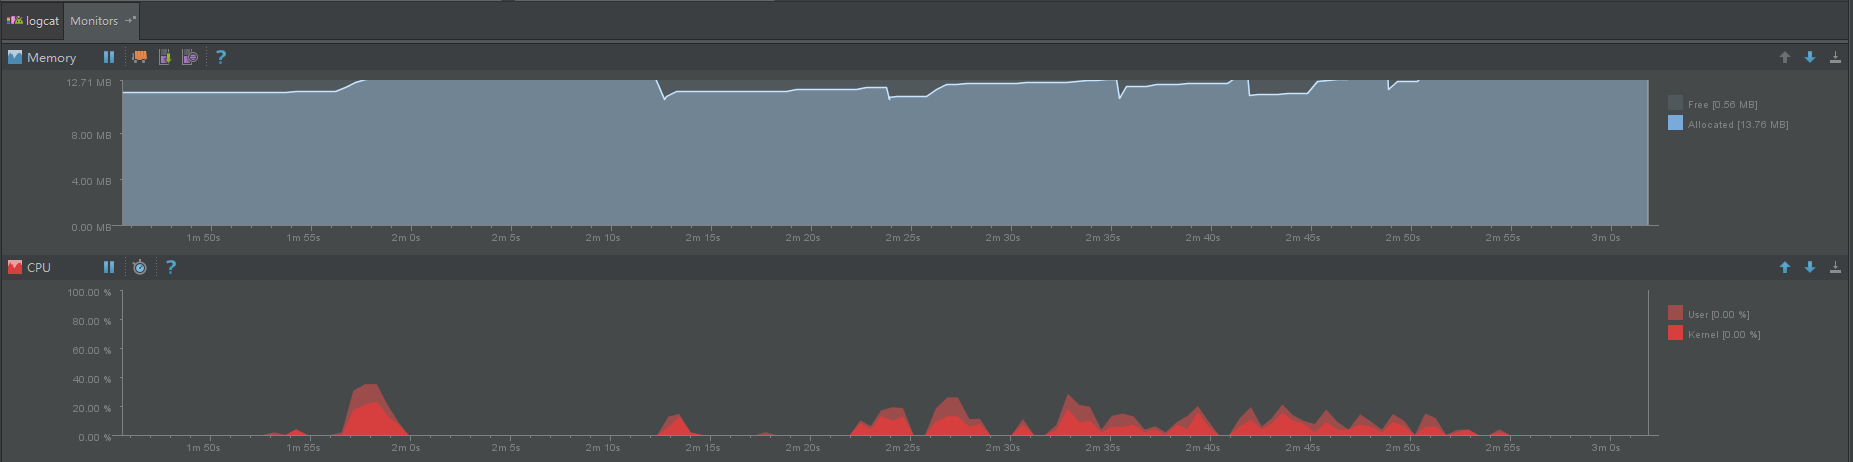
背景項目目前存在使用久了或者重復打開關閉某個頁面,內存會一直飙升,居高不下,頻繁發生GC。靜置一段時間後,情況有所改善,但是問題依舊明顯,如圖1-1、1-2。圖1-1.操
 Android中測試框架使用簡介
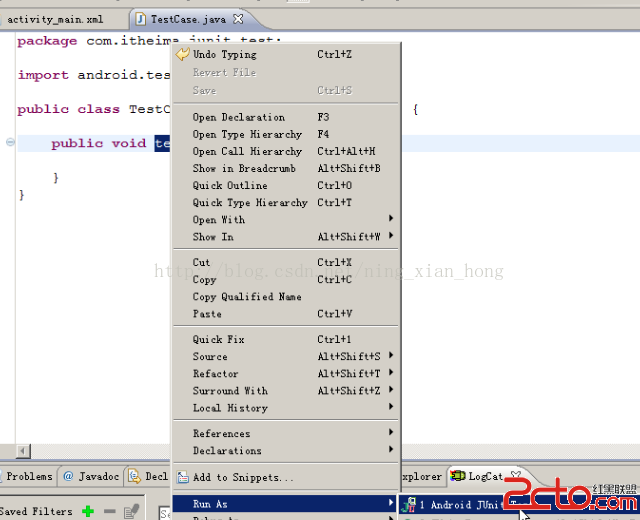
測試好的程序是測出來的。測試的目的:盡可能多的測試出程序中的bug。測試分為黑盒測試:測試業務邏輯白盒測試:測試邏輯方法。一般是寫一段腳本代碼,通過腳本代碼去調用業務邏輯
 安卓技巧三星Galaxy SIII I9300使用必看玩機技巧
I9300相信已經有很多人入手了,不知道大家知道多少I9300的使用技巧在這裡總結了一下,希望對大家有幫助。如果還有什麼不全的地方,歡迎在下方留言。1. 鎖