編輯:關於Android編程
我們知道要想繪制一些特別的效果的話,離不開Paint和Canvas,Paint是你所畫圖形的一些基本屬性,按照面向對象的思想,你要把一個圓畫在畫布上,那麼是有畫筆和畫布,比如你所畫圓的顏色,粗細等都是畫筆的屬性,而決定所畫的位置是由畫布決定的,Paint類一些基本的方法上篇講解了,今天就講解下Canvas一些常用的方法,後期會配合講一些自定義view的一些效果,這樣更加理解Paint和Canvas一些方法怎麼使用以及是怎麼個意思,理論實踐結合才是王道,進入正題
1):畫點
public void drawPoint(float x, float y, Paint paint)
參數說明:
x:表示x軸方法的坐標
y:表示y軸方法的坐標 這坐標是相對於它的父view,而不是屏幕
paint:表示你所畫點用到的畫筆
@Override
protected void onDraw(Canvas canvas) {
    super.onDraw(canvas);
    mPaint.setColor(Color.RED);
    canvas.drawPoint(100,200,mPaint);
}
效果:
怎麼會什麼都沒有呢?這是因為犯了一個很低級的錯誤,你畫筆都沒設置寬度,怎麼可能在畫布上所畫的能看見,所以添加這行代碼即可:mPaint.setStrokeWidth(20); 就可以看見你所畫的點了,
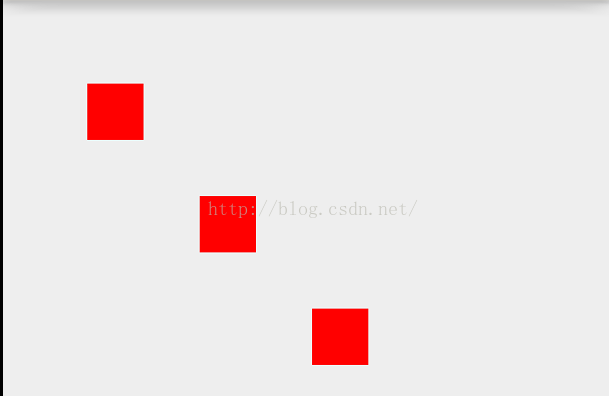
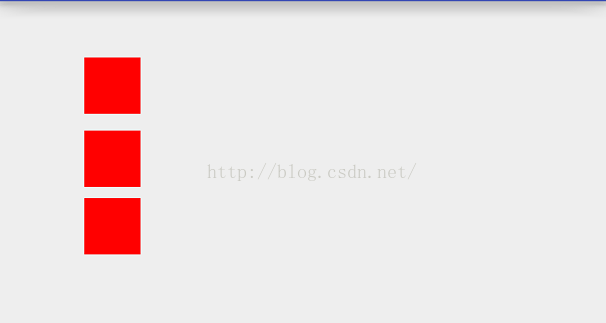
除了上面的方法繪制點以外,還有一次性繪制多個點,
public void drawPoints(float[] pts,Paint paint) 繪制多個點
參數說明:
pts:是一個float數組,存儲的是點的集合,數組的長度必須>=2,而且數組長度必須是2的倍數,它是每2個數代表一個點,第一個數是x軸坐標,第二個參數表示是y軸坐標
paint:繪制點的畫筆
@Override
protected void onDraw(Canvas canvas) {
    super.onDraw(canvas);
    mPaint.setColor(Color.RED);
    mPaint.setStrokeWidth(100);
    float[] pts = {100,200,300,400,500,600};
    canvas.drawPoints(pts,mPaint);
}
這代表繪制3個點(100,200),(300,400),(500,600)效果如下:
繪制多個點還有一個方法就是
public void drawPoints(float[] pts, int offset, int count,Paint paint)
參數說明:
pts:同上
offset:集合中跳過的數值個數,注意不是點的個數!一個點是兩個數值,比如你offset=2就表示跳過一個點
count:參與繪制的數值的個數,指pts[]裡人數值個數,而不是點的個數,因為一個點是兩個數值 比如count=4就表示繪制2個點,因為一個點是等於2個數值(x軸和y軸)
paint:同上
@Override
protected void onDraw(Canvas canvas) {
    super.onDraw(canvas);
    mPaint.setColor(Color.RED);
    mPaint.setStrokeWidth(100);
    float[] pts = {100,100,100,150,100,280,100,400,100,520,100,650};
    canvas.drawPoints(pts,2,6,mPaint);
}
我上面是要繪制(100,100),(100,150),(100,280),(100,400),(100,520),(100,650)這6個點,offset=2表示跳過2個數值,就等於是從第二個點開始畫,count=6就表示繪制6個數值,就是3個點,
2):畫線
public void drawLine(float startX, float startY, float stopX, float stopY,Paint paint) 2點連接成一條線
參數說明:
startX:第一個點的起始x軸坐標
startY:第一個點的起始y軸坐標
stopX:結束點x軸坐標
stopY:結束點y軸坐標
paint:繪制線所用到的畫筆
@Override
protected void onDraw(Canvas canvas) {
    super.onDraw(canvas);
    mPaint.setColor(Color.RED);
    mPaint.setStrokeWidth(10);
    canvas.drawLine(100,100,800,800,mPaint);
}
效果:

這是畫一條線,比如我要畫多條線 是不是要循環調用這個方法呢?,肯定系統會給相應的方法
public void drawLines(float[] pts, Paint paint)
參數說明:
pts:這個和drawPoints中的參數是同一個意思,不解釋
paint:同上
@Override
protected void onDraw(Canvas canvas) {
    super.onDraw(canvas);
    mPaint.setColor(Color.RED);
    mPaint.setStrokeWidth(10);
    float[] pts = {100,100,400,100,400,100,400,400,400,400,100,400,100,400,100,100};
    canvas.drawLines(pts,mPaint);
}
這是由8個點構成了一個矩形,所以畫矩形也可以這麼畫,但幾乎不用,除非特殊的需求下會用:
繪制多條直線還有一個方法,
public void drawLines(float[] pts, int offset, int count, Paint paint)
參數說明:
pts:同上
offset:和drawPoints是一樣
count:和drawPoints是一樣
paint:同上
@Override
protected void onDraw(Canvas canvas) {
    super.onDraw(canvas);
    mPaint.setColor(Color.RED);
    mPaint.setStrokeWidth(10);
    float[] pts = {100,100,400,100,400,100,400,400,400,400,100,400,100,400,100,100};
    canvas.drawLines(pts,4,12,mPaint);
}
在這注意下count的返回時pts的數組長度-offset,在這offet是4而數組的長度為16,所以count的最大值不能超過12,剛才我就犯了這個錯,
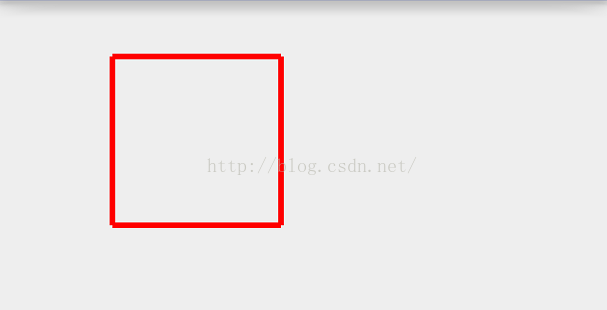
3):繪制矩形
我們知道2個點可以構成一個矩形,那麼第一個繪制矩形的參數就出來了
public void drawRect(float left, float top, float right, float bottom, Paint paint)
參數說明:
left:第一個點距離x軸多少距離(單位像素)
top:第一個點距離y軸多少距離
right:第二個距離x軸多少距離
bottom:第二個點距離y軸多少距離
矩形的長度=right-left 矩形的高度為=bottom-top
@Override
protected void onDraw(Canvas canvas) {
super.onDraw(canvas);
mPaint.setColor(Color.RED);
mPaint.setStrokeWidth(10);
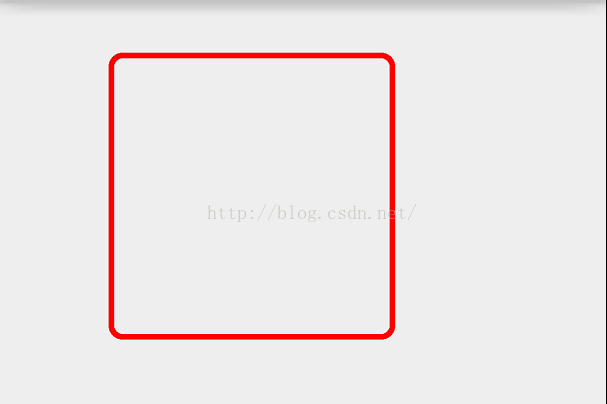
canvas.drawRect(100,100,800,800,mPaint);
}
效果:
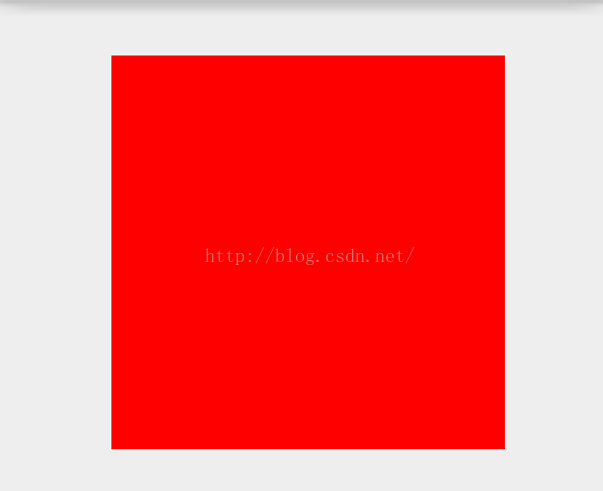
如果覺得一大遍紅色區域不好看的話,可以設置下Paint的style樣式即可,
而矩形在android有二個類,一個是Rect和RectF用法上沒什麼差別,主要是在精度上有差距,RectF精度更准確,其他沒啥,
而Rect有三個構造函數
/**
 * Create a new empty Rect. All coordinates are initialized to 0.
 */
public Rect() {}

/**
 * Create a new rectangle with the specified coordinates. Note: no range
 * checking is performed, so the caller must ensure that left <= right and
 * top <= bottom.
 *
 * @param left   The X coordinate of the left side of the rectangle
 * @param top    The Y coordinate of the top of the rectangle
 * @param right  The X coordinate of the right side of the rectangle
 * @param bottom The Y coordinate of the bottom of the rectangle
 */
public Rect(int left, int top, int right, int bottom) {
    this.left = left;
    this.top = top;
    this.right = right;
    this.bottom = bottom;
}

/**
 * Create a new rectangle, initialized with the values in the specified
 * rectangle (which is left unmodified).
 *
 * @param r The rectangle whose coordinates are copied into the new
 *          rectangle.
 */
public Rect(Rect r) {
    if (r == null) {
        left = top = right = bottom = 0;
    } else {
        left = r.left;
        top = r.top;
        right = r.right;
        bottom = r.bottom;
    }
}
我們知道繪制矩形canvas還有一種方法
public void drawRect(Rect r, Paint paint)
參數說明:
r就是上面2個點封裝成了一個矩形而已,
paint:同上,
如果是創建一個空構造的Rect,傳遞給drawRect的話,這個是看不見的,
@Override
protected void onDraw(Canvas canvas) {
    super.onDraw(canvas);
    mPaint.setColor(Color.RED);
    mPaint.setStrokeWidth(10);
    mPaint.setStyle(Paint.Style.STROKE);
    Rect rect = new Rect();
    canvas.drawRect(rect,mPaint);
}
這樣的話是什麼都看不見,原因是它的2個點都是默認在(0,0)這就導致了矩形長度和寬度為0,可以通過rect.width(); rect.height();去獲取試試看,
那麼矩形除了它有空參數的構造函數還有帶4個參數也就是二個點,這和帶一個參數的傳遞一個Rect是一樣的,
@Override
protected void onDraw(Canvas canvas) {
    super.onDraw(canvas);
    mPaint.setColor(Color.RED);
    mPaint.setStrokeWidth(10);
    mPaint.setStyle(Paint.Style.STROKE);
    Rect rect = new Rect(100,100,300,600);
    canvas.drawRect(rect,mPaint);
}
效果:

4):畫圓角矩形
public void drawRoundRect(float left, float top, float right, float bottom, float rx, float ry,Paint paint)
參數說明:
left 第一個點x軸方向距離(像素)
top:第一個點y軸方向距離
right:第二個點x軸方向距離
bottom:第二個點y軸方向距離
rx:生成圓角橢圓的x軸半徑
ry:生成圓角橢圓的y軸半徑
paint:繪制圓角矩形所需的畫筆
@Override
protected void onDraw(Canvas canvas) {
    super.onDraw(canvas);
    mPaint.setColor(Color.RED);
    mPaint.setStrokeWidth(10);
    mPaint.setStyle(Paint.Style.STROKE);
    canvas.drawRoundRect(100f,100f,600f,600f,20f,20f,mPaint);
}
效果:
繪制圓角矩形還有一個方法: public void drawRoundRect(RectF rect, float rx, float ry, @NonNull Paint paint),這個無非是把上面的2個點構成了一個矩形而已,沒差別,也很好理解
5):畫圓
畫圓要定一個圓心和半徑
public void drawCircle(float cx, float cy, float radius,Paint paint)
參數說明:
cx:圓心x軸方向距離
cy:圓心y軸方向距離
radius:圓的半徑
paint:繪制圓所需的畫筆
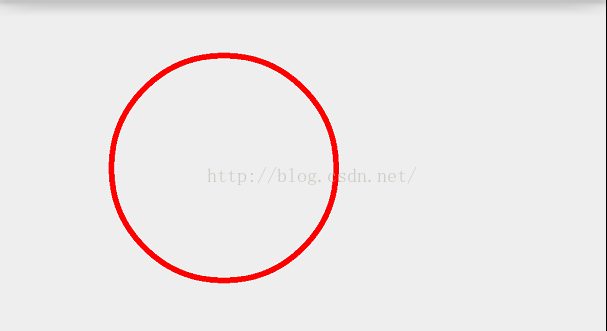
@Override
protected void onDraw(Canvas canvas) {
    super.onDraw(canvas);
    mPaint.setColor(Color.RED);
    mPaint.setStrokeWidth(10);
    mPaint.setStyle(Paint.Style.STROKE);
    canvas.drawCircle(300,300,200,mPaint);
}
效果:
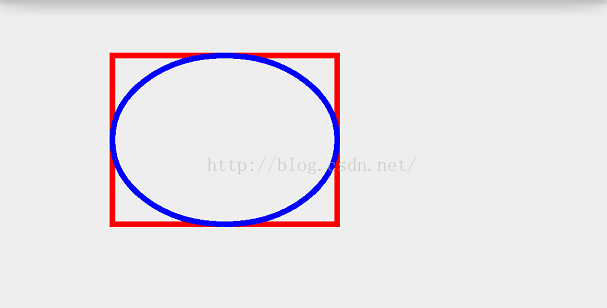
6):畫橢圓
我們高中就學過一個橢圓是根據一個矩形的內切圓而定的,如圖:

這是用電腦自帶的畫畫功能所畫的,裡面的內切圓就是依賴外面的矩形而形成的,以矩形的長為橢圓的X軸,矩形的寬為橢圓的Y軸,建立的橢圓圖形
@Override
protected void onDraw(Canvas canvas) {
    super.onDraw(canvas);
    mPaint.setColor(Color.RED);
    mPaint.setStrokeWidth(10);
    mPaint.setStyle(Paint.Style.STROKE);
    RectF rect = new RectF(100,100,500,400);
    canvas.drawRect(rect,mPaint);
    mPaint.setColor(Color.BLUE);
    canvas.drawOval(rect,mPaint);
}
效果:
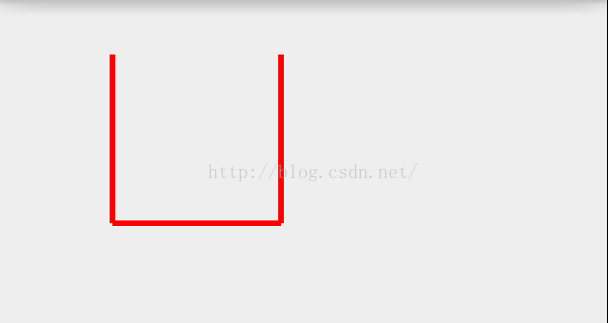
7):畫弧
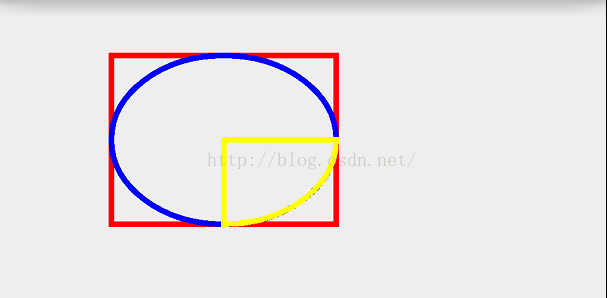
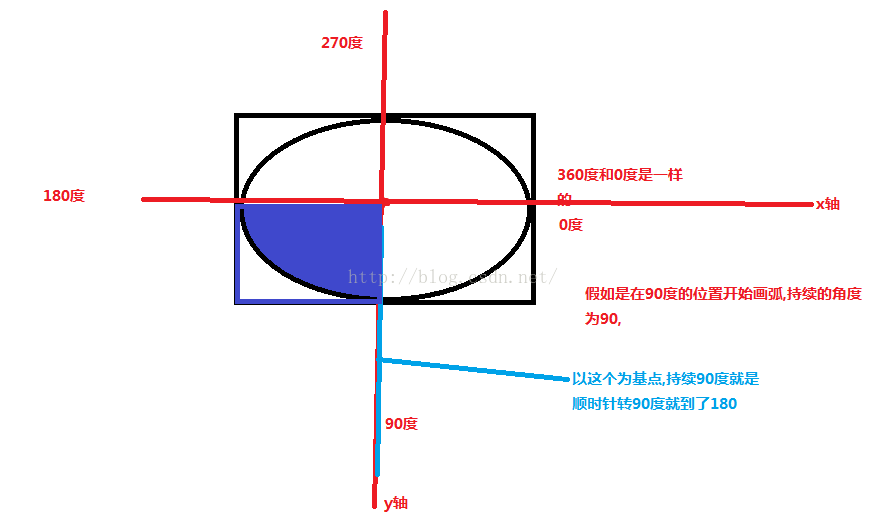
弧是根據橢圓來定的,而上面講了橢圓是根據矩形來定的,所以弧也是根據矩形來定的,
public void drawArc(RectF oval, float startAngle, float sweepAngle, boolean useCenter,Paint paint)
參數說明:
oval:繪制弧所依賴的矩形
startAngle:弧開始的角度,以X軸正方向為0度
sweepAngle:弧持續的角度
useCenter:是否有弧的兩邊,True,還兩邊,False,只有一條弧
@Override
protected void onDraw(Canvas canvas) {
    super.onDraw(canvas);
    mPaint.setColor(Color.RED);
    mPaint.setStrokeWidth(10);
    mPaint.setStyle(Paint.Style.STROKE);
    RectF rect = new RectF(100,100,500,400);
    canvas.drawArc(rect,0,90,true,mPaint);
}
效果:
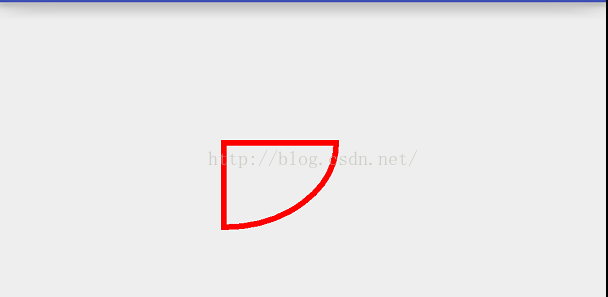
如果把第四個參數傳false,
這個參數非常重要,在做一些進度條或者效果時,大部分都用到了這個,
這個如果把弧所依賴的橢圓和矩形都繪制出來,看效果也許會更好,
@Override
protected void onDraw(Canvas canvas) {
    super.onDraw(canvas);
    mPaint.setColor(Color.RED);
    mPaint.setStrokeWidth(10);
    mPaint.setStyle(Paint.Style.STROKE);
    RectF rect = new RectF(100,100,500,400);
    canvas.drawRect(rect,mPaint);
    mPaint.setColor(Color.BLUE);
    canvas.drawOval(rect,mPaint);
    mPaint.setColor(Color.YELLOW);
    canvas.drawArc(rect,0,90,true,mPaint);
}
效果:
現在看到我們繪制的矩形,我們從中可以得出它的坐標點為圓心點,現在我把弧所持續的角度為-90,
@Override
protected void onDraw(Canvas canvas) {
    super.onDraw(canvas);
    mPaint.setColor(Color.RED);
    mPaint.setStrokeWidth(10);
    mPaint.setStyle(Paint.Style.STROKE);
    RectF rect = new RectF(100,100,500,400);
    canvas.drawRect(rect,mPaint);
    mPaint.setColor(Color.BLUE);
    canvas.drawOval(rect,mPaint);
    mPaint.setColor(Color.YELLOW);
    canvas.drawArc(rect,0,-90,true,mPaint);
}
效果:
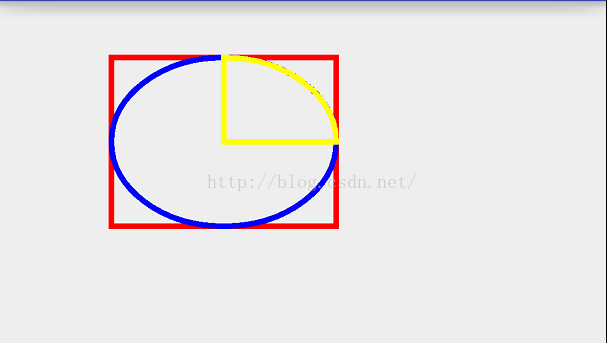
發現當所持續的角度為-90度是逆時針轉90的,從這可以得出一個簡單的結論:當所持續的角度為正數是順時針,當所持續的角度為負數時,是逆時針,
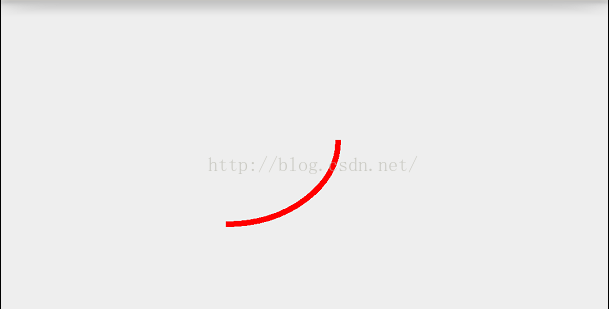
現在還有一個參數startAngle就是弧開始的角度,之前是傳入0,現在改為90,
@Override
protected void onDraw(Canvas canvas) {
    super.onDraw(canvas);
    mPaint.setColor(Color.RED);
    mPaint.setStrokeWidth(10);
    mPaint.setStyle(Paint.Style.STROKE);
    RectF rect = new RectF(100,100,500,400);
    canvas.drawRect(rect,mPaint);
    mPaint.setColor(Color.BLUE);
    canvas.drawOval(rect,mPaint);
    mPaint.setColor(Color.YELLOW);
    canvas.drawArc(rect,90,-90,true,mPaint);
}
效果:
現在畫圖來解釋上面第二個和第三個參數如下圖:
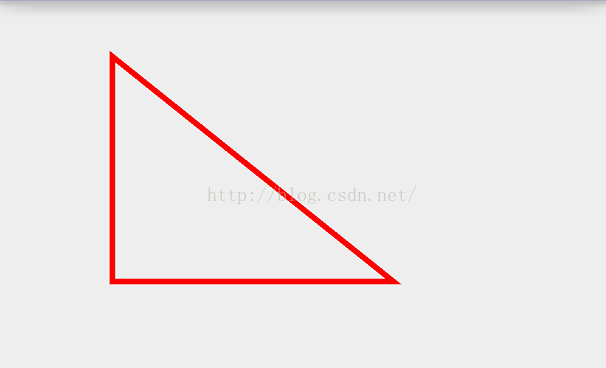
8):畫多邊形
public void drawPath(Path path, Paint paint)
參數說明:
path;路徑
paint:所畫路徑需要的畫筆
@Override
protected void onDraw(Canvas canvas) {
    super.onDraw(canvas);
    mPaint.setColor(Color.RED);
    mPaint.setStrokeWidth(10);
    mPaint.setStyle(Paint.Style.STROKE);

    Path path = new Path();
    path.moveTo(100,100);
    path.lineTo(100,500);
    path.lineTo(600,500);
    path.close();
    canvas.drawPath(path,mPaint);

}
moveTo()方法是繪制多邊形的起點,lineTo()是連接上一個點,構成一條線,path的close()方法一定要記得調用,close()能保證多邊形構成的線能閉合,
我們發現Path類有很多add各種圖形的方法:
@Override
protected void onDraw(Canvas canvas) {
    super.onDraw(canvas);
    mPaint.setColor(Color.RED);
    mPaint.setStrokeWidth(10);
    mPaint.setStyle(Paint.Style.STROKE);

    Path path = new Path();
    path.moveTo(100,100);
    path.lineTo(100,500);
    path.lineTo(600,500);
    path.close();
    path.addCircle(100,100,30, Path.Direction.CW);
    path.addCircle(100,200,30, Path.Direction.CW);
    path.addCircle(100,300,30, Path.Direction.CW);
    path.addCircle(100,400,30, Path.Direction.CW);
    path.addCircle(100,500,30, Path.Direction.CW);
    canvas.drawPath(path,mPaint);
}
效果:
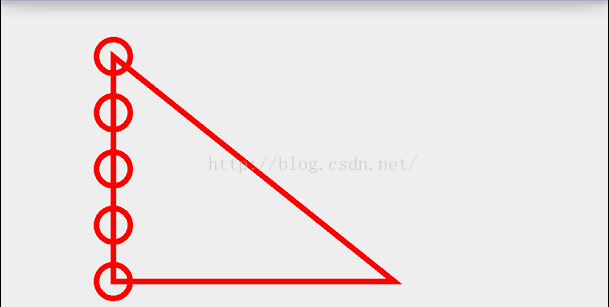
這是在Path上添加圓,當然還可以添加其他圖形了,
9):畫帶文字的多邊形
public void drawTextOnPath(String text,Path path, float hOffset,float vOffset,Paint paint)
參數說明:
text:繪制到path上的文字
path:路徑
float hOffset : 與路徑起始點的水平偏移距離
float vOffset : 與路徑中心的垂直偏移量
paint:同上
@Override
protected void onDraw(Canvas canvas) {
    super.onDraw(canvas);
    mPaint.setColor(Color.RED);
    mPaint.setStrokeWidth(5);
    mPaint.setStyle(Paint.Style.STROKE);
    String text="杭州9月份要開G20峰會,杭州9月份要開G20峰會";
    Path path = new Path();
    Path path1 = new Path();
    path.addCircle(300,300,200, Path.Direction.CCW);
    path1.addCircle(800,300,200, Path.Direction.CCW);
    canvas.drawPath(path,mPaint);
    canvas.drawPath(path1,mPaint);
    mPaint.setTextSize(50);//設置字體
    mPaint.setColor(Color.BLUE);
    mPaint.setAntiAlias(true);
    canvas.drawTextOnPath(text,path,0,0,mPaint);
    canvas.drawTextOnPath(text,path1,20,20,mPaint);
}
效果:
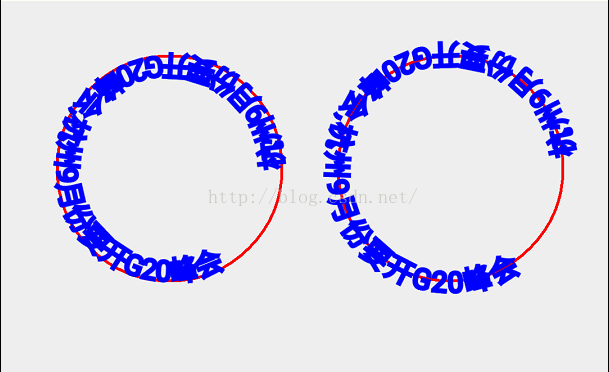
分析圖:
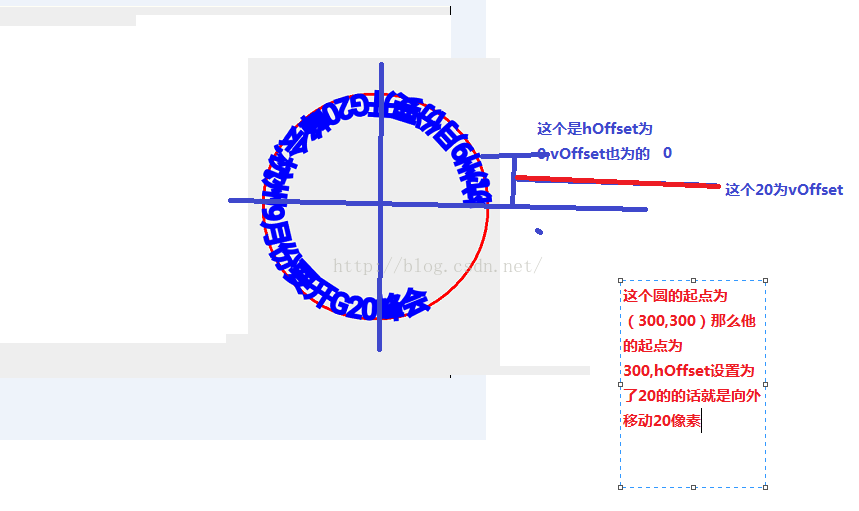
path.addCircle(300,300,200, Path.Direction.CCW);方法的第四個參數講下,
Path.Direction有兩個值:
Path.Direction.CCW:是counter-clockwise縮寫,指創建逆時針方向的矩形路徑;
Path.Direction.CW:是clockwise的縮寫,指創建順時針方向的矩形路徑
源碼:
/**
 * Specifies how closed shapes (e.g. rects, ovals) are oriented when they
 * are added to a path.
 */
public enum Direction {
    /** clockwise */
    CW  (1),    // must match enum in SkPath.h
    /** counter-clockwise */
    CCW (2);    // must match enum in SkPath.h

    Direction(int ni) {
        nativeInt = ni;
    }
    final int nativeInt;
}
它就是Paint中的一個枚舉, clockwise翻譯為順時針方向,而counter-clockwise就為逆時針方向了,比如你畫一個圓肯定是看不出來是順時針還是逆時針,因為它所出的效果是一樣的,但是如果你往這個path上繪制一段文字就可以看出來了,
@Override
protected void onDraw(Canvas canvas) {
    super.onDraw(canvas);
    mPaint.setColor(Color.RED);
    mPaint.setStrokeWidth(5);
    mPaint.setStyle(Paint.Style.STROKE);
    String text="杭州9月份要開G20峰會,杭州9月份要開G20峰會";
    Path path = new Path();
    Path path1 = new Path();
    path.addCircle(300,300,200, Path.Direction.CCW);
    path1.addCircle(800,300,200, Path.Direction.CW);
    canvas.drawPath(path,mPaint);
    canvas.drawPath(path1,mPaint);
    mPaint.setTextSize(50);//設置字體
    mPaint.setColor(Color.BLUE);
    mPaint.setAntiAlias(true);
    canvas.drawTextOnPath(text,path,0,0,mPaint);
    canvas.drawTextOnPath(text,path1,0,0,mPaint);
}
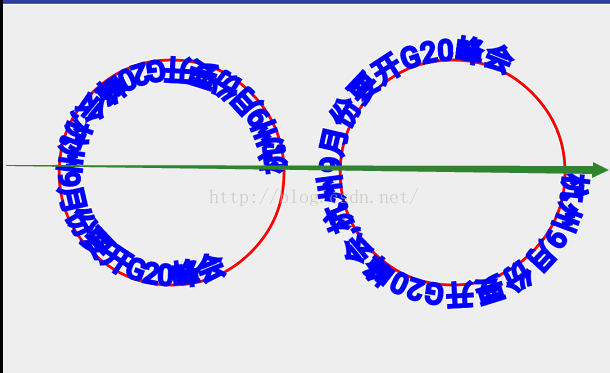
這樣第一個就是逆時針方向 第二個就是順時針方向了,
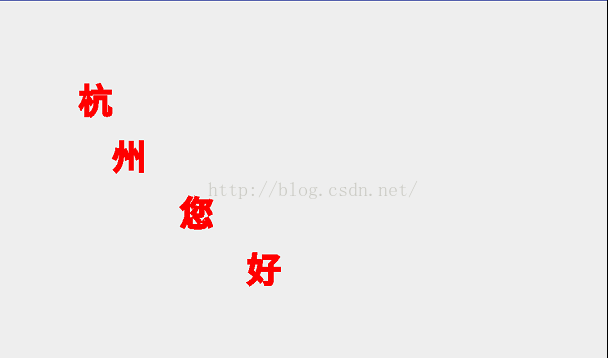
10):畫文字
這裡就不講drawText()了,在講Paint中這個講的比較詳細,可以去看看那個博客,繪制文字講的是這個方法
public void drawPosText(char[] text, int index, int count,float[] pos,Paint paint)
參數說明:
text:所繪制文字的數組
index:從第幾個數組小標位置開始繪制
count:繪制多少文字
paint:同上
pos:是所繪制所在位置的坐標的集合
@Override
protected void onDraw(Canvas canvas) {
    super.onDraw(canvas);
    mPaint.setColor(Color.RED);
    mPaint.setStrokeWidth(5);
    mPaint.setTextSize(60);
    mPaint.setStyle(Paint.Style.STROKE);
    float []pos=new float[]{140,200,
            200,300,
            320,400,
            440,500};
    char[] text={'杭','州','您','好'};
   canvas.drawPosText(text,0,4,pos,mPaint);
}
效果:
講了這麼多canvas所能繪制的東西,現在通過上面講的來畫一個軌跡或者塗鴉功能,
之前講過通過Path來繪制多邊形,這個就是通過Path來實現的,
package com.example.canvasdemo;
import android.content.Context;
import android.graphics.Canvas;
import android.graphics.Color;
import android.graphics.Paint;
import android.graphics.Path;
import android.util.AttributeSet;
import android.view.MotionEvent;
import android.view.View;
/**
 * Created by admin on 2016/5/18.
 */
public class TestCanvasView extends View {
    private Paint mPaint;
    private Path mPath;
    public TestCanvasView(Context context) {
        this(context,null);
    }
    public TestCanvasView(Context context, AttributeSet attrs) {
        this(context, attrs,0);
    }
    public TestCanvasView(Context context, AttributeSet attrs, int defStyleAttr) {
        super(context, attrs, defStyleAttr);
        mPaint = new Paint();
        mPath = new Path();
    }
    @Override
    protected void onDraw(Canvas canvas) {
        super.onDraw(canvas);
        mPaint.setColor(Color.RED);
        mPaint.setStrokeWidth(5);
        mPaint.setTextSize(60);
        mPaint.setStyle(Paint.Style.STROKE);
        canvas.drawPath(mPath,mPaint);
    }
    @Override
    public boolean onTouchEvent(MotionEvent event) {

        switch (event.getAction()){
            case MotionEvent.ACTION_DOWN:
                mPath.moveTo(event.getX(),event.getY());
                return  true;
            case MotionEvent.ACTION_MOVE:
                mPath.lineTo(event.getX(),event.getY());
                invalidate();
                break;
            case MotionEvent.ACTION_UP:
                break;
        }
        return super.onTouchEvent(event);
    }
}
效果:

可以發揮你的藝術細胞在這美女身上隨便亂畫了
canvas還有一個重要的方法就是裁剪,canvas提供了很多關於裁剪的方法如下:

現在拿clipRect()方法來做例子,首先你裁剪得先在畫布上繪制出圖形來後才可以裁剪,不然你在畫布上什麼也沒有,那裁剪個毛線,
@Override
protected void onDraw(Canvas canvas) {
    super.onDraw(canvas);
    Bitmap bitmap = BitmapFactory.decodeResource(getResources(), R.mipmap.meinv);
    canvas.drawColor(Color.BLUE);
    mPaint.setColor(Color.RED);  //設置畫筆顏色
    mPaint.setStyle(Paint.Style.STROKE);//填充樣式改為描邊
    mPaint.setStrokeWidth(5);//設置畫筆寬度
    canvas.drawBitmap(bitmap, bitmap.getWidth(),10,mPaint);
    canvas.clipRect(bitmap.getWidth(), bitmap.getHeight(), bitmap.getWidth()+bitmap.getWidth()/2 , bitmap.getHeight()+bitmap.getHeight()/2);
    canvas.drawBitmap(bitmap, bitmap.getWidth(), bitmap.getHeight(), mPaint);
}
效果:
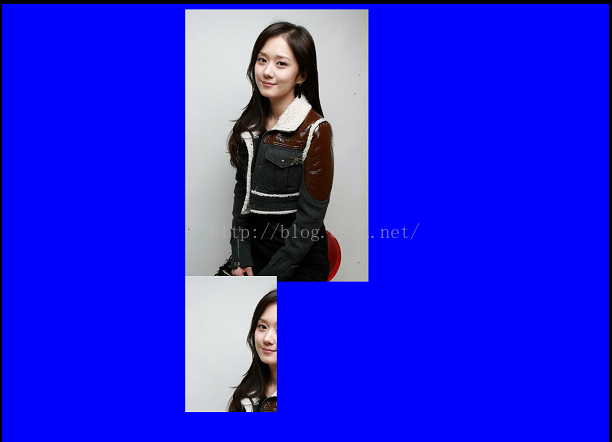
第一張是原圖做對比用的,現在重點講下
public boolean clipRect(int left, int top, int right, int bottom)
參數說明:
left:第一個點所在x軸方向坐標
top:第一個點所在y軸方向坐標值,
right:第二個坐標所在x軸方向坐標值
bottom:第二個坐標所在y軸方向坐標值
剛才上面所說的關於裁剪是關於圖形的是錯的,裁剪是針對在畫布上進行裁剪,
比如我要裁剪一個三角形:
 @Override
    protected void onDraw(Canvas canvas) {
        super.onDraw(canvas);
        Bitmap bitmap = BitmapFactory.decodeResource(getResources(), R.mipmap.meinv);
        canvas.drawColor(Color.BLUE);
        mPaint.setColor(Color.RED);  //設置畫筆顏色
        mPaint.setStyle(Paint.Style.STROKE);//填充樣式改為描邊
        mPaint.setStrokeWidth(5);//設置畫筆寬度
        canvas.drawBitmap(bitmap, bitmap.getWidth(), 10, mPaint);
//        canvas.clipRect(bitmap.getWidth(), bitmap.getHeight(), bitmap.getWidth() + bitmap.getWidth() / 2, bitmap.getHeight() + bitmap.getHeight() / 2);
        Path path = new Path();
        path.moveTo(bitmap.getWidth(), bitmap.getHeight());
        path.lineTo(bitmap.getWidth(),bitmap.getHeight()+200);
        path.lineTo(bitmap.getWidth()+200,bitmap.getHeight()+200);
        path.close();
        canvas.clipPath(path);
        canvas.drawBitmap(bitmap, bitmap.getWidth(), bitmap.getHeight(), mPaint);
    }
效果:

現在我把上面最後二行代碼順序調一下:
canvas.drawBitmap(bitmap, bitmap.getWidth(), bitmap.getHeight(), mPaint);
canvas.clipPath(path);
效果:
你會發現裁剪沒起作用,從此可以得出一個結論
結論:
裁剪要在繪制前面對canvas進行clip,否則無效.
 一個android群組通知APP的數據框架
項目地址:https://github.com/wlkdb/GA_network_info點擊打開鏈接1、整個app分為android客戶端、java服務端和數據層,客戶
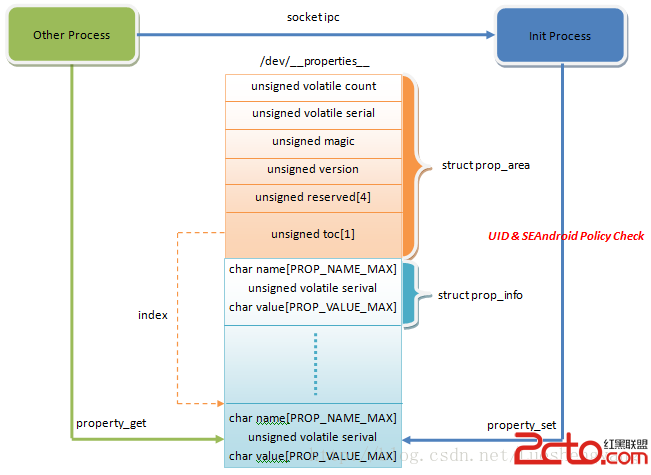 SEAndroid安全機制對Android屬性訪問的保護分析
Android系統通過屬性暴露設備和運行時信息,並且可以通過設置屬性來控制系統行為。因此,屬性也像文件一樣,是一種需要保護的資源。在啟用SEAndroid之前,敏感屬性只
 Android輸入框控件ClearEditText實現清除功能
本文給大家帶來一個很實用的小控件ClearEditText,就是在Android系統的輸入框右邊加入一個小圖標,點擊小圖標可以清除輸入框裡面的內容,IOS上面直接設置某個
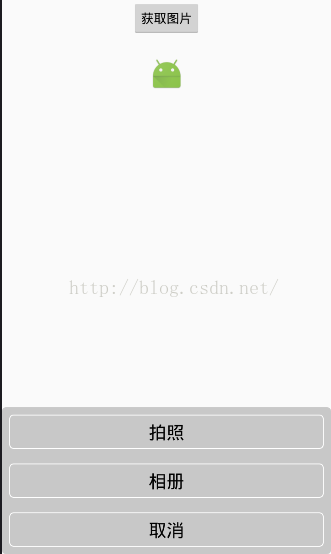 Android中拍照和從相冊選擇圖片,並剪裁(二)
從系統相冊中選擇照片或則調用系統相機。大部分的項目都會用到,我進行了一下封裝,仿ios的效果。效果如下:1、Camera的基類package com.zhang.test