編輯:關於Android編程
最近在做一個Android位圖陰影處理的效果,今天把思路總結一下:
Android sdk提供了BlurMaskFilter工具類可以給圖片添加陰影效果,代碼如下:
—/**
* This takes a mask, and blurs its edge by the specified radius. Whether or
* or not to include the original mask, and whether the blur goes outside,
* inside, or straddles, the original mask’s border, is controlled by the
* Blur enum.
*/
`public class BlurMaskFilter extends MaskFilter {
public enum Blur {
    NORMAL(0),  //!< blur inside and outside of the original border
    SOLID(1),   //!< include the original mask, blur outside
    OUTER(2),   //!< just blur outside the original border
    INNER(3);   //!< just blur inside the original border

    Blur(int value) {
        native_int = value;
    }
    final int native_int;
}

/**
 * Create a blur maskfilter.
 *
 * @param radius The radius to extend the blur from the original mask. Must be > 0.
 * @param style  The Blur to use
 * @return       The new blur maskfilter
 */
public BlurMaskFilter(float radius, Blur style) {
    native_instance = nativeConstructor(radius, style.native_int);
}

private static native int nativeConstructor(float radius, int style);
}
`——-
Note:
BlurMaskFilter 可以在指定的半徑范圍內對一張位圖的邊緣進行模糊處理。是否包括原始面具,是否對位圖內、外或者跨越內外同時進行模糊處理可以通過給代碼中的枚舉Blur初始化不同參數來決定。 Blur 對應的個各個參數含義分別是:(翻譯參考here)
NORMAL(0), //!< 在目標內外顯示面具,從邊緣向目標內和目標外到離邊緣radius寬的地方,向外顯示面具時都會同時顯示在目標邊緣處獲得的顏色。
SOLID(1), //!< 在目標外顯示面具,從邊緣向目標外到離邊緣radius寬的地方,並且該部分會顯示出從目標邊緣獲得的顏色,顯示目標
OUTER(2), //!< 在目標外顯示面具,從邊緣向目標外到離邊緣radius寬的地方,並且該部分會顯示出從目標邊緣獲得的顏色,不顯示目標
INNER(3); //!< 在目標內顯示面具,從邊緣向目標內到離邊緣radius寬的地方顯示,radius為初始化BlurMaskFilter的一個值 構造好一個BlurMaskFilter 對象後可以通過android.graphics.Paint類的setMaskFilter方法傳給畫筆對象,後面我們可以使用這個具有陰影效果的畫筆來對位圖的邊緣進行處理。
現在我們有一個可以進行模糊處理的畫筆,下面該怎麼利用這個畫筆對一個指定的位圖的邊緣進行處理呢?我們還需要看SDK提供的另外一個工具類,這個類是android.graphics.Bitmap的一個方法extractAlpha,代碼如下:
  /**
     * Returns a new bitmap that captures the alpha values of the original.
     * These values may be affected by the optional Paint parameter, which
     * can contain its own alpha, and may also contain a MaskFilter which
     * could change the actual dimensions of the resulting bitmap (e.g.
     * a blur maskfilter might enlarge the resulting bitmap). If offsetXY
     * is not null, it returns the amount to offset the returned bitmap so
     * that it will logically align with the original. For example, if the
     * paint contains a blur of radius 2, then offsetXY[] would contains
     * -2, -2, so that drawing the alpha bitmap offset by (-2, -2) and then
     * drawing the original would result in the blur visually aligning with
     * the original.
     *
     *
The initial density of the returned bitmap is the same as the original's. * * @param paint Optional paint used to modify the alpha values in the * resulting bitmap. Pass null for default behavior. * @param offsetXY Optional array that returns the X (index 0) and Y * (index 1) offset needed to position the returned bitmap * so that it visually lines up with the original. * @return new bitmap containing the (optionally modified by paint) alpha * channel of the original bitmap. This may be drawn with * Canvas.drawBitmap(), where the color(s) will be taken from the * paint that is passed to the draw call. */ public Bitmap extractAlpha(Paint paint, int[] offsetXY) { checkRecycled("Can't extractAlpha on a recycled bitmap"); int nativePaint = paint != null ? paint.mNativePaint : 0; Bitmap bm = nativeExtractAlpha(mNativeBitmap, nativePaint, offsetXY); if (bm == null) { throw new RuntimeException("Failed to extractAlpha on Bitmap"); } bm.mDensity = mDensity; return bm; }
Note:
這個方法的作用是,返回一個新的位圖,這個位圖只是獲取了原始位圖的透明值Alpha,但是沒有RGB,所以我們看到的這個位圖是一個黑色的位圖。關於位圖ARGB的相關知識,可以參考here。 在這個方法裡面有兩個參數,一個是畫筆paint,一個是偏移量offsetXY。我們可以將上面得到的具有陰影效果的畫筆傳進來,這樣得到的新的位圖邊緣就會有陰影的處理;偏移量offsetXY是用來指定畫筆對位圖邊緣繪制陰影效果的半徑范圍,這個值是由上面構造BlurMaskFilter 的時候傳進的radius參數是決定的。要提到的一點是,新得到的位圖大小是可能比原始位圖要大。假設BlurMaskFilter構造的時候傳入的radius值是6,原始位圖大小是144x144,那麼新得到的位圖大小就是(144+6x2)x(144+6x2)。偏移量offsetXY[ 0 ]=offsetXY[ 1 ]=-6。
 原始位圖
原始位圖
 獲取原始位圖透明通道後的新位圖
現在我們已經得到了邊緣具有陰影效果的位圖,我們定義為shadowAlphaBitmap,但是這個位圖還不是我們期望的最終效果,下面我們需要將這個位圖和原始位圖進行拼接。
具體思路是這樣:
首先定義一個新的畫布canvas 給這個畫布canvas初始化一張rgba位圖,位圖的大小跟shadowAlphaBitmap一致。這裡面多提一點細節知識,給canvas初始化的bitmap必須是isMutable的類型,意思就是這個bitmap的像素是允許被修改的,不然會報錯。比如通過資源id加載的位圖就不是可以被改變的,是不可以初始化給canvas使用的。Canvas源碼如下:
/**
     * Construct a canvas with the specified bitmap to draw into. The bitmap
     * must be mutable.
     *
     *
The initial target density of the canvas is the same as the given * bitmap's density. * * @param bitmap Specifies a mutable bitmap for the canvas to draw into. */ public Canvas(Bitmap bitmap) { if (!bitmap.isMutable()) { throw new IllegalStateException("Immutable bitmap passed to Canvas constructor"); } throwIfRecycled(bitmap); mNativeCanvas = initRaster(bitmap.ni()); mFinalizer = new CanvasFinalizer(mNativeCanvas); mBitmap = bitmap; mDensity = bitmap.mDensity; }
將shadowAlphaBitmap繪制到畫布上 將原始位圖制到畫布上。繪制原始位圖的時候需要注意一下,由於原始位圖是比shadowAlphaBitmap小,長寬各小-offsetXY[ 0 ],和-offsetXY[ 1 ],因此我們繪制原始位圖的時候需要對原始位圖做一下平移,這樣才能使得原始位圖在畫布中居中。此時原始位圖和畫布之間就是我們期望看到的陰影了。
具體代碼如下:
   private Bitmap getShadowBitmap(Bitmap srcBitmap){
        Paint shadowPaint = new Paint();
        BlurMaskFilter blurMaskFilter = new BlurMaskFilter(6,BlurMaskFilter.Blur.NORMAL);
        shadowPaint.setMaskFilter(blurMaskFilter);
        int[] offsetXY = new int[2];
        Bitmap shadowBitmap = srcBitmap.extractAlpha(shadowPaint,offsetXY);
        Bitmap canvasBgBitmap = Bitmap.createBitmap(
                shadowBitmap.getWidth(), shadowBitmap.getHeight(), Bitmap.Config.ARGB_8888);
        Canvas canvas = new Canvas();
        canvas.setBitmap(canvasBgBitmap);
        canvas.drawBitmap(shadowBitmap, 0, 0, shadowPaint);
        canvas.drawBitmap(srcBitmap, -offsetXY[0], -offsetXY[1], null);
        shadowBitmap.recycle();
        return canvasBgBitmap;
    }
 最後得到的邊緣有陰影效果的位圖
總結:
獲取圖片陰影效果,重點需要理解下面幾個知識點:
- BlurMaskFilter 的用法。
- Bitmap自帶方法extractAlpha的含義和用法。
- 位圖ARGB基礎支持
- 使用畫布Canvas修改位圖的相關知識
代碼github地址
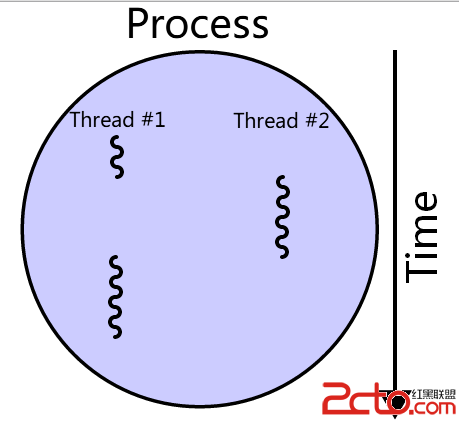 Android--線程詳解
什麼是線程?線程或者線程執行本質上就是一串命令(也是程序代碼),然後我們把它發送給操作系統執行。一般來說,我們的CPU在任何時候一個核只能處理一個線程。多核處理器(目前大
 Picasso,一個強大的Android圖片下載緩存庫,OkHttpUtils的使用,二次封裝PicassoUtils實現微信精選
官網: http://square.github.io/picasso/ 我們在上篇OkHttp的時候說過這個Picasso,學名畢加索,是Square公司開
 【Android應用開發】 Universal Image Loader ( 使用簡介 | 示例代碼解析 )
相關地址介紹 :--Universal Image Loader 項目 GitHub 官方地址https://github.com/nostra13/Android-Un
 Android 高仿微信語音聊天頁面高斯模糊(毛玻璃效果)
目前的應用市場上,使用毛玻璃效果的APP隨處可見,比如用過微信語音聊天的人可以發現,語音聊天頁面就使用了高斯模糊效果。先看下效果圖: 仔細觀察上圖,我們可以發現