編輯:關於Android編程
今天自定義了一個簡單的Android菜單控件。實現方式是:PopupWindow和ListView。
現在來給大家分享一下源碼:
SHContextMenu.java
核心代碼部分:主要是對PopupWindow和ListView的初始化,為ListView設置數據源,以及封裝了菜單的顯示和隱藏的方法。還有提供了菜單的點擊回調。
import android.app.Activity;
import android.content.Context;
import android.graphics.Rect;
import android.graphics.drawable.BitmapDrawable;
import android.view.Gravity;
import android.view.LayoutInflater;
import android.view.View;
import android.view.ViewGroup;
import android.widget.AdapterView;
import android.widget.BaseAdapter;
import android.widget.ImageView;
import android.widget.ListView;
import android.widget.PopupWindow;
import android.widget.TextView;

import com.eroad.ehr.R;
import com.eroad.product.bean.ContextMenuItem;

import java.util.ArrayList;
import java.util.List;

/**
 * 自定義上下文菜單
 * Created by MaJian on 16/4/28.
 */
public class SHContextMenu {

    private Context mContext;
    private List itemList;
    private PopupWindow popupWindow;
    private View contentView;
    private ListView mLvMenuList;
    private MenuAdapter menuAdapter;
    private OnItemSelectListener onItemSelectListener;

    public interface OnItemSelectListener{
        void onItemSelect(int position);
    }

    public void setOnItemSelectListener(OnItemSelectListener onItemSelectListener){
        this.onItemSelectListener = onItemSelectListener;
    }

    public SHContextMenu(Context mContext){
        this.mContext = mContext;
        itemList = new ArrayList<>();
        initPopWindow();
    }

    /**
     * 初始化popwindow菜單
     */
    private void initPopWindow(){
        contentView = LayoutInflater.from(mContext).inflate(R.layout.popwindow_menu, null);
        popupWindow = new PopupWindow(contentView, ViewGroup.LayoutParams.WRAP_CONTENT, ViewGroup.LayoutParams.WRAP_CONTENT);
        popupWindow.setFocusable(true);
        popupWindow.setOutsideTouchable(true);
        // 這個是為了點擊“返回Back”也能使其消失,並且並不會影響你的背景
        popupWindow.setBackgroundDrawable(new BitmapDrawable());
        popupWindow.setAnimationStyle(R.style.PopupAnimation);
        mLvMenuList = (ListView) contentView.findViewById(R.id.lv_menu);
        menuAdapter = new MenuAdapter();
        mLvMenuList.setAdapter(menuAdapter);
        mLvMenuList.setOnItemClickListener(new AdapterView.OnItemClickListener() {
            @Override
            public void onItemClick(AdapterView parent, View view, int position, long id) {
                if (onItemSelectListener != null){
                    onItemSelectListener.onItemSelect(position);
                }
                popupWindow.dismiss();
            }
        });
    }

    /**
     * 設置菜單列表數據源
     * @param itemList
     */
    public void setItemList(List itemList){
        this.itemList = itemList;
        menuAdapter.notifyDataSetChanged();
    }

    public void showMenu(View view){
        if (popupWindow == null)
            return;
        int[] location = new int[2];
        view.getLocationInWindow(location);
        // 狀態欄的高度
        Rect frame = new Rect();
        ((Activity)mContext).getWindow().getDecorView().getWindowVisibleDisplayFrame(frame);
        popupWindow.showAtLocation(((Activity)mContext).getWindow().getDecorView(), Gravity.TOP|Gravity.RIGHT, 0, ((Activity)mContext).getActionBar().getHeight()+frame.top-27);
    }

    /**
     * 上下文菜單列表適配器
     */
    class MenuAdapter extends BaseAdapter{

        /**
         * How many items are in the data set represented by this Adapter.
         *
         * @return Count of items.
         */
        @Override
        public int getCount() {
            return itemList == null ? 0 : itemList.size();
        }

        /**
         * Get the data item associated with the specified position in the data set.
         *
         * @param position Position of the item whose data we want within the adapter's
         *                 data set.
         * @return The data at the specified position.
         */
        @Override
        public Object getItem(int position) {
            return itemList.get(position);
        }

        /**
         * Get the row id associated with the specified position in the list.
         *
         * @param position The position of the item within the adapter's data set whose row id we want.
         * @return The id of the item at the specified position.
         */
        @Override
        public long getItemId(int position) {
            return position;
        }

        /**
         * Get a View that displays the data at the specified position in the data set. You can either
         * create a View manually or inflate it from an XML layout file. When the View is inflated, the
         * parent View (GridView, ListView...) will apply default layout parameters unless you use
         * {@link LayoutInflater#inflate(int, ViewGroup, boolean)}
         * to specify a root view and to prevent attachment to the root.
         *
         * @param position    The position of the item within the adapter's data set of the item whose view
         *                    we want.
         * @param convertView The old view to reuse, if possible. Note: You should check that this view
         *                    is non-null and of an appropriate type before using. If it is not possible to convert
         *                    this view to display the correct data, this method can create a new view.
         *                    Heterogeneous lists can specify their number of view types, so that this View is
         *                    always of the right type (see {@link #getViewTypeCount()} and
         *                    {@link #getItemViewType(int)}).
         * @param parent      The parent that this view will eventually be attached to
         * @return A View corresponding to the data at the specified position.
         */
        @Override
        public View getView(int position, View convertView, ViewGroup parent) {
            ViewHolder viewHolder = null;
            if (convertView == null){
                viewHolder = new ViewHolder();
                convertView = LayoutInflater.from(mContext).inflate(R.layout.popmenu_item, null);
                viewHolder.mIvIcon = (ImageView) convertView.findViewById(R.id.iv_icon);
                viewHolder.mTvTitle = (TextView) convertView.findViewById(R.id.tv_title);
                viewHolder.mViewDivider = convertView.findViewById(R.id.view_divider);
                convertView.setTag(viewHolder);
            } else {
                viewHolder = (ViewHolder) convertView.getTag();
            }
            viewHolder.mTvTitle.setText(itemList.get(position).getTitle());
            viewHolder.mIvIcon.setImageDrawable(itemList.get(position).getImgDrawable());
//            convertView.setBackgroundColor(Color.parseColor(itemList.get(position).getColorString()));
            if (position == itemList.size() - 1){
                viewHolder.mViewDivider.setVisibility(View.INVISIBLE);
            } else {
                viewHolder.mViewDivider.setVisibility(View.VISIBLE);
            }

            return convertView;
        }

        class ViewHolder{
            TextView mTvTitle;
            ImageView mIvIcon;
            View mViewDivider;
        }
    }
}
popwindow_menu.xml
PopupWindow 的布局文件
<linearlayout xmlns:android="http://schemas.android.com/apk/res/android" android:orientation="vertical" android:layout_width="wrap_content" android:layout_height="match_parent">

    <listview android:layout_width="180dp" android:layout_height="match_parent" android:id="@+id/lv_menu" android:divider="@null" android:background="@drawable/ic_bg_contextmenu">

    </listview>
</linearlayout></code>
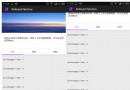
PopupWindow展現樣式
菜單隱藏的動畫anim_popmenu_hide.xml
<set xmlns:android="http://schemas.android.com/apk/res/android">
    <scale android:fromxscale="1.0" android:toxscale="1.25" android:fromyscale="1.0" android:toyscale="1.25" android:pivotx="100%" android:pivoty="0%" android:duration="200">
    <scale android:fromxscale="1.0" android:toxscale="0.48" android:fromyscale="1.0" android:toyscale="0.48" android:pivotx="100%" android:pivoty="0%" android:duration="400" android:delay="200">
    <alpha android:interpolator="@android:anim/linear_interpolator" android:fromalpha="1.0" android:toalpha="0.0" android:duration="400">
</alpha></scale></scale></set>
</code>
菜單顯示的動畫anim_popmenu_show.xml
<set xmlns:android="http://schemas.android.com/apk/res/android">
    <scale android:fromxscale="0.6" android:toxscale="1.1" android:fromyscale="0.6" android:toyscale="1.1" android:pivotx="100%" android:pivoty="0%" android:duration="200">
    <scale android:fromxscale="1.0" android:toxscale="0.91" android:fromyscale="1.0" android:toyscale="0.91" android:pivotx="100%" android:pivoty="0%" android:duration="400" android:delay="200">
    <alpha android:interpolator="@android:anim/linear_interpolator" android:fromalpha="0.0" android:toalpha="1.0" android:duration="400">
</alpha></scale></scale></set>
</code>
上下文菜單Item的Bean
package com.eroad.product.bean;

import android.graphics.drawable.Drawable;

/**
 * 上下文菜單項對象
 * Created by MaJian on 16/4/28.
 */
public class ContextMenuItem {

    private Drawable imgDrawable;
    private String title;
    private boolean visible;
    private String colorString;

    public ContextMenuItem(Drawable imgDrawable, String title, boolean visible, String colorString) {
        this.imgDrawable = imgDrawable;
        this.title = title;
        this.visible = visible;
        this.colorString = colorString;
    }

    public String getColorString() {
        return colorString;
    }

    public void setColorString(String colorString) {
        this.colorString = colorString;
    }

    public boolean isVisible() {
        return visible;
    }

    public void setVisible(boolean visible) {
        this.visible = visible;
    }

    public String getTitle() {
        return title;
    }

    public void setTitle(String title) {
        this.title = title;
    }

    public Drawable getImgDrawable() {
        return imgDrawable;
    }

    public void setImgDrawable(Drawable imgDrawable) {
        this.imgDrawable = imgDrawable;
    }

}
現在和大家說一下菜單的調用方式
SHContextMenu shContextMenu = new SHContextMenu(getActivity());
                List itemList = new ArrayList<>();
                itemList.add(new ContextMenuItem(getResources().getDrawable(R.drawable.ic_create_company), "草稿", true, "#FFFFFF"));
                itemList.add(new ContextMenuItem(getResources().getDrawable(R.drawable.ic_create_company), "草稿", true, "#FFFFFF"));
                itemList.add(new ContextMenuItem(getResources().getDrawable(R.drawable.ic_create_company), "草稿", true, "#FFFFFF"));
                itemList.add(new ContextMenuItem(getResources().getDrawable(R.drawable.ic_create_company), "草稿", true, "#FFFFFF"));
                itemList.add(new ContextMenuItem(getResources().getDrawable(R.drawable.ic_create_company), "草稿", true, "#FFFFFF"));
                shContextMenu.setItemList(itemList);
                shContextMenu.setOnItemSelectListener(new SHContextMenu.OnItemSelectListener() {
                    @Override
                    public void onItemSelect(int position) {
                        SHToast.showToast(getActivity(), position + "");
                    }
                });
                shContextMenu.showMenu(et_search);
當然最後是大家最關心的效果圖:

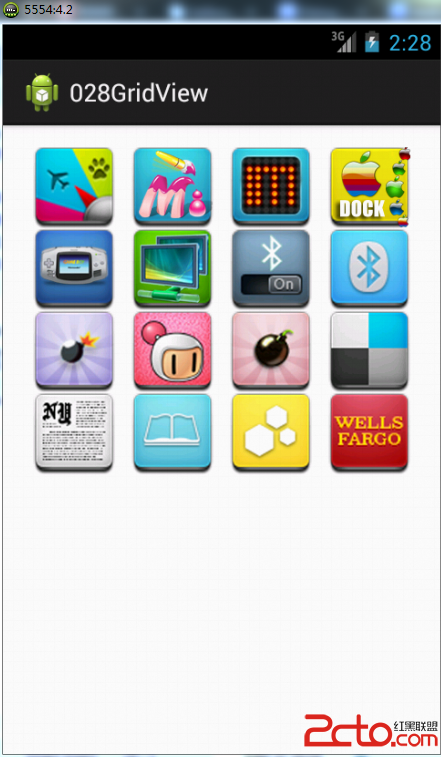 從零開始學android(GridView網格視圖.二十八.)
GridView組件是以網格的形式顯示所有的組件,例如:在制作相冊的時候,所有的圖片都會以相同大小顯示在不同的格子之中,就可以依靠此組件完成,
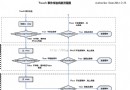 Android事件分發機制總結
理解事件的分發機制,需要對View和ViewGroup事件的分發分別探討。View和ViewGroup的區別,一個View控件是指它裡面不能再包含子控件了,常見的如Tex
 cocos2d-x 3.0游戲實例學習筆記 《跑酷》移植到android手機
說明:這裡是借鑒:曉風殘月前輩的博客,他是將泰然網的跑酷教程,用cocos2d-x 2.X 版本重寫的,目前我正在學習cocos2d-X3.0 於是就用cocos2d-
 Android插件實例——360 DroidPlugin詳解
在中國找到錢不難,但你的一個點子不意味著是一個創業。你談一個再好的想法,比如我今天談一個創意說,新浪為什麼不收購GOOGLE呢?這個創意很好。新浪一收購GOOGLE,是