編輯:關於Android編程
周末在逛慕課網的時候,看到了一張學習計劃報告圖,詳細記錄了自己一周的學習情況,天天都是0節課啊!正好在學習Android自定義View,於是就想著自己去寫了一個,這裡先給出一張慕課網的圖,和自己的效果圖。


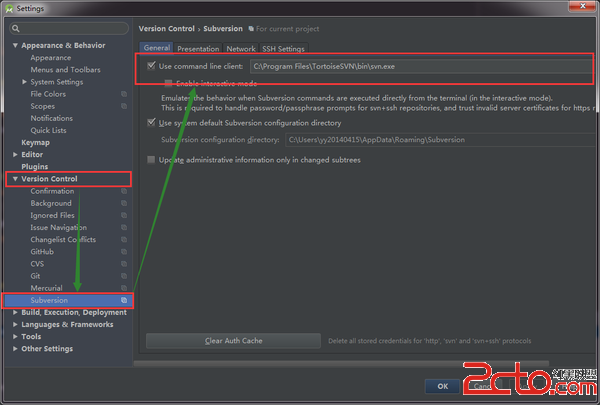
我們要實現這樣一個折線統計圖,必要的信息主要有下面幾個
先看縱軸,縱軸需要的信息有最大值,還有用來確定每個間距代表的單位,比如最大值是100,我們還要有一個將值分為幾份的數據。
接下來看橫軸,因為橫軸的信息一般是文字,不能像數字通過累加就可以得到,所以直接保存一個字符串數組變量。
然後就到了折線了,畫折線只需要每個橫軸單位的縱軸數據y坐標確定然後連接起來就ok了,這裡只需要根據左邊的單位的間距和每個單位的值就可以獲取到y的具體坐標。
那麼總結起來就需要:
1、縱軸最大值
2、縱軸分割數量
3、縱軸每個小單位的值 通過 最大值/分割數量計算
4、用來橫軸顯示的數組
5、橫軸間距、縱軸間距
6、具體的數組(用來畫折線)
有了上面的信息就可以去draw了,下面開始具體的自定義View步驟講解
主要確定該繼承View還是一些特定的View,定義和獲取屬性、添加設置屬性方法。
定義屬性
在構造方法中獲取屬性
public class StatisticsView extends View {

    //畫橫縱軸
    private Paint mBorderPaint;

    //畫坐標點的圓心
    private Paint circlePaint;

    //畫折線圖
    private Paint mPathPaint;

    private Path mPath;

    //縱軸最大值
    private int maxValue = 100;


    //縱軸分割數量
    private int dividerCount = 10;


    private String title = "七日學習情況(單位節)";

    //縱軸每個單位值
    private int perValue = maxValue/dividerCount;

    //底部顯示String
    private String[] bottomStr = {};


    //具體的值
    private float[] values = {};


    //底部橫軸單位間距
    private float bottomGap;


    //左邊縱軸間距
    private float leftGap;

    private TextPaint textPaint;


    public void setValues(float[] values) {
        this.values = values;
        invalidate();
    }


    public void setBottomStr(String[] bottomStr) {
        this.bottomStr = bottomStr;
        requestLayout();
    }

    public StatisticsView(Context context) {
        super(context);
    }

    public StatisticsView(Context context, AttributeSet attrs) {
        this(context, attrs,0);
    }

    public StatisticsView(Context context, AttributeSet attrs, int defStyleAttr) {
        super(context, attrs, defStyleAttr);
        TypedArray array = context.obtainStyledAttributes(attrs, R.styleable.StatisticsView);

        maxValue =array.getInt(R.styleable.StatisticsView_maxValue,100);
        dividerCount = array.getInt(R.styleable.StatisticsView_dividerCount,10);
        title = array.getString(R.styleable.StatisticsView_title);

        int lineColor = array.getColor(R.styleable.StatisticsView_lineColor,Color.BLACK);
        int textColor =array.getColor(R.styleable.StatisticsView_textColor,Color.BLACK);

        mBorderPaint = new Paint();
        circlePaint = new Paint();
        mPathPaint = new Paint();


        mBorderPaint.setAntiAlias(true);
        mBorderPaint.setColor(lineColor);
        mBorderPaint.setStrokeWidth(1);
        mBorderPaint.setStyle(Paint.Style.STROKE);

        mPathPaint.setAntiAlias(true);
        mPathPaint.setStyle(Paint.Style.STROKE);
        mPathPaint.setStrokeWidth(3);

        textPaint = new TextPaint();
        textPaint.setColor(textColor);
        textPaint.setTextSize(dip2px(getContext(),12));
        mPath = new Path();
        circlePaint.setStyle(Paint.Style.FILL);
        circlePaint.setAntiAlias(true);

        array.recycle();

    }
}
上面的代碼簡單的獲取到了屬性、初始化了一些信息。同時對外提供了設置values值的方法
處理布局首先考慮的是根據需要重寫onMeasure方法。這裡為了簡單就直接讓wrap_content的情況下直接寬高相等。當然你也可以有一個代表每個間距寬高的屬性,然後去計算wrap_content下的寬高。
 @Override
    protected void onMeasure(int widthMeasureSpec, int heightMeasureSpec) {
        int widthMode = MeasureSpec.getMode(widthMeasureSpec);
        int widthSize = MeasureSpec.getSize(widthMeasureSpec);
        int heightMode = MeasureSpec.getMode(heightMeasureSpec);
        int heightSize = MeasureSpec.getSize(heightMeasureSpec);

        if (widthMode==MeasureSpec.EXACTLY&&heightMode==MeasureSpec.EXACTLY){
            setMeasuredDimension(widthSize,heightSize);
        }else if (widthMeasureSpec==MeasureSpec.EXACTLY){
            setMeasuredDimension(widthSize,widthSize);
        }else if (heightMeasureSpec==MeasureSpec.EXACTLY){
            setMeasuredDimension(heightSize,heightSize);
        }

    }
由於在draw的時候要確定橫軸的單位間距,我們需要獲取它,一般我們獲取值可以在onSizeChange方法中獲取,但是由於我們底部的gap需要根據要顯示幾個來確定。但是才開始的時候bottomStr[]的length為0,之後通過set方法為bottomStr設置不會再次調用onSizeChange。bottomGap就會是最開始的值,這樣效果會出問題,所以就在onLayout方法中獲取。
    @Override
    protected void onLayout(boolean changed, int left, int top, int right, int bottom) {
        bottomGap = getWidth()/(bottomStr.length+1);
        leftGap = getHeight()/(dividerCount+2);
        super.onLayout(changed, left, top, right, bottom);
    }
接下來就可以實現onDraw()來繪制View了
@Override
    protected void onDraw(Canvas canvas) {
        super.onDraw(canvas);

        if (bottomStr==null||bottomStr.length==0){
            return;
        }

        //畫左邊的線
        canvas.drawLine(bottomGap,getHeight()-leftGap,bottomGap,leftGap,mBorderPaint);


        float fontHeight =(textPaint.getFontMetrics().descent-textPaint.getFontMetrics().ascent);
        //畫下邊線
        canvas.drawLine(bottomGap,getHeight()-leftGap,getWidth()-bottomGap,getHeight()-leftGap,mBorderPaint);
        for (int i = 1;i<=bottomStr.length;i++){
            canvas.drawCircle(i*bottomGap,getHeight()-leftGap,6,circlePaint);
            canvas.drawText(bottomStr[i-1],i*bottomGap-(textPaint.measureText(bottomStr[i-1])/2),getHeight()-leftGap/2+fontHeight/2,textPaint);
        }

        canvas.drawText(title,bottomGap,leftGap/2,textPaint);
        for (int i = 1;i<=dividerCount+1;i++){
             //畫左邊的字
            canvas.drawText(perValue*(i-1)+"",bottomGap/2-(textPaint.measureText(perValue*(i-1)+"")/2),(((dividerCount+2-i)))*leftGap+fontHeight/2,textPaint);

            //畫橫線
            canvas.drawLine(bottomGap,getHeight()-((i)*leftGap),getWidth()-bottomGap,getHeight()-((i)*leftGap),mBorderPaint);
        }


        /**
         * 畫軌跡
         * y的坐標點根據 y/leftGap = values[i]/perValue 計算
         *
         */
        for (int i = 0;i
代碼都加了注釋,主要是一些計算,還有drawLine,drawPath,drawText,以及獲取text寬高的一些知識。
4、使用聲明View,然後在Activity裡獲取View並且調用setBottomStr和setValues方法
 public void invalidate(View view) {
        this.view.setBottomStr(new String[]{"星期一","星期二","星期三","星期四","星期五","星期六","星期天"});
        this.view.setValues(new float[]{10f,90f,33f,66f,42f,99f,0f});
    }
再來一張效果圖

5、總結自定義View就是多練,看到一個喜歡的效果,想不想能不能自己的畫一個,時間久了,相信我們都可以輕松的寫出很好的自定義View
 Android 中實現分享和第三方登陸---以新浪微博為例
第三方登陸和分享功能在目前大部分APP中都有,分享功能可以將自己覺得有意義的東西分享給身邊的朋友,而第三方登陸可以借助已經有巨大用戶基礎的平台(如QQ和新浪
 小米Max卡槽在哪裡 小米Max怎麼插卡 小米Max裝sim卡圖文教程
在小米2016夏季新品發布會上,正式發布了小米Max,與小米5一樣,小米Max也支持全網通,並支持雙卡雙待。最大的特點就是,小米Max配有6.44英寸巨屏,
 Android基於Eclipse開發環境的搭建全總結
開始學習Android應用程序開發,首先碰到的就是開發環境的搭建。說實話此類文章網上很多,我想總結的有以下幾點,以示區分: 一.簡單的開發環境搭建
 AndroidUI組件之AlertDialog
package com.gc.alertdialogdemo; /** * AlertDialog: * 1、AlertDialog的功能很強大,它可以生成各種內容的