編輯:關於Android編程
Service 是Android四大組件之一,通常是在後台運行的,執行一些耗時的操作。
對於Service 我們需要掌握的知識點有:
1、Service 的生命周期
2、Service 的創建
3、遠程服務的AIDL 跨進程通訊
4、提高 Service 的生存率的一些方法
下面我們來一步步學習。
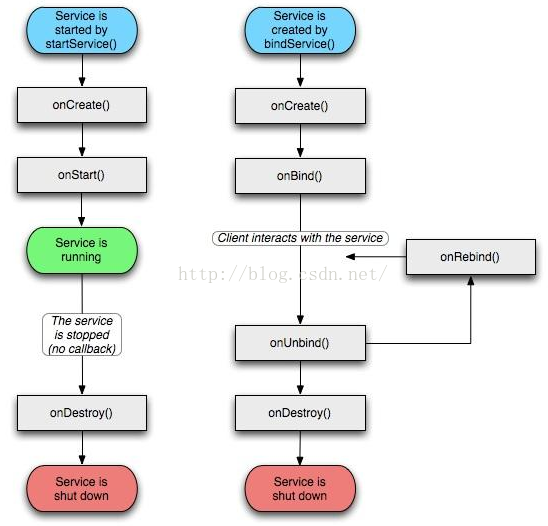
Service 的啟動方式有兩種,下面來分析一下這兩種的區別:
(1)通過 startService 啟動
這種方式啟動的服務跟啟動它的Activity是沒有交互的,即使啟動它的Activity被destory了,該服務還可以繼續運行。那什麼時候銷毀呢?調用stopServive或該服務所在進程被銷毀了,這個服務才可能銷毀。
(2)通過 bindService 啟動
這種方式啟動的服務跟啟動它的Activity是可以交互的,依靠的是Binder進程間通訊機制,啟動它的Activity可以通過binder對象調用Service的一些方法,這個並不是直接調用Service內部的方法,只是先得到一個映射,再通過映射找Service內部的方法。因為這種方式啟動的Service跟啟動它的Activity 進行了綁定,所以它會受到Activity的生命周期的影響,在Activity銷毀的時候,綁定的Service也會銷毀。注意Activity 銷毀的時候記得解除綁定,不然會報錯。
我們來看看不解除綁定的情況下打印出來的日志信息:

可以看出MainActivity可以正常的回調onDestroy方法,MyService也能回調onDestroy方法,但是會報錯。
錯誤信息如下:
E/ActivityThread: Activity com.example.servertest.MainActivity has leaked ServiceConnection com.example.servertest.MainActivity$1@b0ff6638 that was originally bound here
注意:
(1)無論使用那種方式啟動的Service,Service 都會執行一次完整的邏輯,它不能被stopService調用強制停止當前進行的操作。
(2)Service 跟線程沒有什麼必然的聯系,不要混淆。
(3)Service 默認是跟Activity在同一個進程裡(主線程),所以在Service裡執行耗時的操作需要另開新線程,避免ANR。
創建一個Service 是比較簡單的,我們需要繼承Service這個類,重寫裡面的一些方法完成我們需要的邏輯。
下面是一個例子:
public class MyService extends Service {
    public static final String TAG = "MyService";
    private MyBinder mBinder = new MyBinder();

    @Override
    public void onCreate() {
        super.onCreate();
        Log.d(TAG, "onCreate() executed");
        Log.d(TAG, "MyService thread id is " + Thread.currentThread().getId());
    }

    @Override
    public void onDestroy() {
        super.onDestroy();
        // 銷毀一些不再使用的資源
        Log.d(TAG, "onDestroy() executed");
    }

    @Override
    public int onStartCommand(Intent intent, int flags, int startId) {
        Log.d(TAG, "onStartCommand() executed");
        //因為當前服務跟Activity是在同一個進程裡,耗時操作應該另起線程處理,避免ANR
        new Thread(new Runnable() {
            @Override
            public void run() {
                Log.d(TAG, "startDownload() executed");
                Log.d(TAG, "Download thread id is " + Thread.currentThread().getId());
                // 執行具體的下載任務
            }
        }).start();

        return super.onStartCommand(intent, flags, startId);
    }

    @Override
    public IBinder onBind(Intent intent) {
        return mBinder;
    }

    class MyBinder extends Binder {

        public void startDownload() {
            new Thread(new Runnable() {
                @Override
                public void run() {
                    Log.d(TAG, "startDownload() executed");
                    Log.d(TAG, "Download thread id is " + Thread.currentThread().getId());
                    // 執行具體的下載任務
                }
            }).start();
        }

    }
}
Service裡面創建了一個Binder子類對象,該對象有個startDownload方法,將作為onBind 方法返回對象。onBind 方法只有使用bindService開啟服務的時候才會被調用,它返回的IBinder對象用於跟Service通訊用的。
(1) 使用startService開啟服務
Intent intent = new Intent(MainActivity.this,MyService.class);
startService(intent);
(2) 使用bindService 開啟服務
Intent intent = new Intent(MainActivity.this,MyService.class);
bindService(intent,serviceConnection,BIND_AUTO_CREATE);
bindService方法裡面的參數serviceConnection是一個實現 ServiceConnection接口的對象,我們可以這樣創建它:
serviceConnection = new ServiceConnection() {
            @Override
            public void onServiceConnected(ComponentName componentName, IBinder iBinder) {
                // 簡單服務
                myBinder = (MyService.MyBinder) iBinder;
                myBinder.startDownload();
            }

            @Override
            public void onServiceDisconnected(ComponentName componentName) {

            }
 };
上面例子我們創建的是本地服務,本地服務依附的是主進程,它並沒有運行在另外的進程,還有一種服務叫遠程服務,它是運行在獨立的進程。這裡為什麼要明確是運行在主進程還是獨立進程呢?,因為本地服務依附的是主進程,並不需要使用aidl跨進程通訊,操作起來相對簡單,而遠程服務需要使用aidl暴露自己的接口供客戶端調用。
為什麼要使用aidl呢?打個比方,有一台陌生的機器(遠程服務對你來說是陌生的,你不知道它提供了什麼給你),它會提供一些功能性的服務,而你對它並不了解不知怎樣讓它為你服務,這時候aidl就相當於是用戶手冊,它列舉了這台機器的所有功能的操作指引,你(客戶端)只需按照它的步驟(方法)就可以獲得相應的服務功能,而不需要知道機器是怎麼做的。
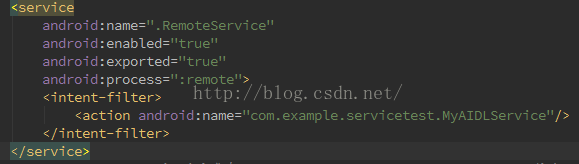
把本地服務轉成遠程服務可以在清單文件中為Service添加 android:process=":remote" 屬性,該服務就會運行在獨立進程裡。
下面來了解一下怎樣使用AIDL實現跨進程通訊
(1)先定義一個aidl文件,在裡面定義我們需要的功能聲明,有點類似定義接口的語法。
我使用的是Android studio,點擊工程的根目錄右鍵選擇 “NEW”--> “AIDL” --> “AIDL File”,編輯aidl文件的名稱,點擊“OK”,軟件自動幫你創建aidl文件,aidl文件放在跟java同級目錄下的aidl文件夾下,路徑跟工程的包名一致。
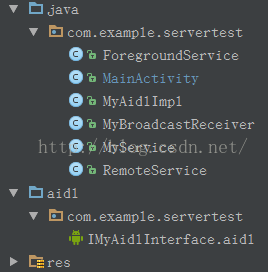
IMyAidlInterface.aidl 文件裡面的內容:
package com.example.servertest;

interface IMyAidlInterface {
    int plus(int a, int b);
    String toUpperCase(String str);
}
自己聲明了兩個方法,一個是加法操作,另一個是字符串字母轉大寫。
定義好aidl文件之後,點擊make,軟件會自動生成aidl對應的java接口文件,不用去修改它和編輯它。
(2)創建一個遠程服務 RemoteService,在服務裡面實現定義好的接口(就是由aidl文件自動生成的接口文件)
private IMyAidlInterface.Stub mBinder = new IMyAidlInterface.Stub() {
        @Override
        public int plus(int a, int b) throws RemoteException {
            return a+b;
        }

        @Override
        public String toUpperCase(String str) throws RemoteException {
            return str.toUpperCase();
        }
};
(3)Activity 綁定遠程服務
Intent intent = new Intent(MainActivity.this,RemoteService.class);
bindService(intent,serviceConnection,BIND_AUTO_CREATE);
創建實現 ServiceConnection 接口的對象
serviceConnection = new ServiceConnection() {
            @Override
            public void onServiceConnected(ComponentName componentName, IBinder iBinder) {
                //AIDL 跨進程通訊
                iMyAidlService = IMyAidlInterface.Stub.asInterface(iBinder);
                try {
                    int result = iMyAidlService.plus(3, 5);
                    String upperStr = iMyAidlService.toUpperCase("hello world");
                    Log.d("iMyAidlService", "result is " + result);
                    Log.d("iMyAidlService", "upperStr is " + upperStr);
                } catch (RemoteException e) {
                    e.printStackTrace();
                }
            }

            @Override
            public void onServiceDisconnected(ComponentName componentName) {

            }
        };
怎樣在另外一個應用裡調用這個服務呢?
在清單文件裡為服務添加 intent-filter 標簽,增加該服務可以處理的action,這裡自定義了一個action。
把aidl文件拷貝到另外一個應用程序裡,包括aidl所在的包目錄結構。
在另外的應用Activity裡使用隱式 Intent 綁定遠程服務
Intent intent = new Intent("com.example.servicetest.MyAIDLService");
bindService(intent, serviceConnection, BIND_AUTO_CREATE);
serviceConnection 創建跟上面一樣。
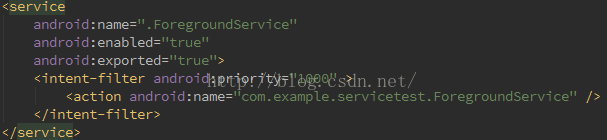
在AndroidManifest.xml文件中為 Service 的 intent-filter 添加android:priority = "1000"屬性,1000是最高值,如果數字越小則優先級越低,同時適用於廣播。
使用startForeground(int, Notification)方法來將service設置為前台服務
public class ForegroundService extends Service {
    public static final String TAG = "ForegroundService";

    @Override
    public void onCreate() {
        super.onCreate();

        // 設置了點擊通知後就打開MainActivity
        Intent notificationIntent = new Intent(ForegroundService.this, MainActivity.class);
        PendingIntent pendingIntent = PendingIntent.getActivity(this, 0, notificationIntent, 0);

        Notification notification = null;
//        // 低於 API 11 寫法
//        if (Build.VERSION.SDK_INT < Build.VERSION_CODES.HONEYCOMB) {
//            notification = new Notification(R.mipmap.ic_launcher, "有通知到來", System.currentTimeMillis());
//            notification.setLatestEventInfo(this, "這是通知的標題", "這是通知的內容", pendingIntent);
//        }
        if(Build.VERSION.SDK_INT >= Build.VERSION_CODES.HONEYCOMB && Build.VERSION.SDK_INT < Build.VERSION_CODES.JELLY_BEAN){
            // 高於 API 11 低於 API 16
            Notification.Builder builder = new Notification.Builder(this)
                        .setAutoCancel(true)
                        .setContentTitle("有通知到來")
                        .setContentText("describe")
                        .setContentIntent(pendingIntent)
                        .setSmallIcon(R.mipmap.ic_launcher)
                        .setWhen(System.currentTimeMillis())
                        .setOngoing(true);
            notification = builder.getNotification();
        } else if (Build.VERSION.SDK_INT >= Build.VERSION_CODES.JELLY_BEAN) {
            // 高於 API 16
            notification = new Notification.Builder(this)
                    .setAutoCancel(true)
                    .setContentTitle("有通知到來")
                    .setContentText("describe")
                    .setContentIntent(pendingIntent)
                    .setSmallIcon(R.mipmap.ic_launcher)
                    .setWhen(System.currentTimeMillis())
                    .setOngoing(true)
                    .build();
        }
        // 調用startForeground()方法就可以讓MyService變成一個前台Service
        startForeground(1, notification);
    }
......

}
public class ForegroundService extends Service {
 ...
 @Override
    public int onStartCommand(Intent intent, int flags, int startId) {
        Log.d(TAG, "onStartCommand() executed");
        flags = START_STICKY;
        return super.onStartCommand(intent, flags, startId);
    }
 ...
 }
onStartCommand 的標志有:
START_STICKY 如果service進程被kill掉,保留service的狀態為開始狀態,但不保留遞送的intent對象。隨後系統會嘗試重新創建service,由於服務狀態為開始狀態,所以創建服務後一定會調用onStartCommand(Intent,int,int)方法。如果在此期間沒有任何啟動命令被傳遞到service,那麼參數Intent將為null。 START_NOT_STICKY “非粘性的”。使用這個返回值時,如果在執行完onStartCommand後,服務被異常kill掉,系統不會自動重啟該服務。 START_REDELIVER_INTENT 重傳Intent。使用這個返回值時,如果在執行完onStartCommand後,服務被異常kill掉,系統會自動重啟該服務,並將Intent的值傳入。 START_STICKY_COMPATIBILITY START_STICKY的兼容版本,但不保證服務被kill後一定能重啟。
新建一個廣播接收器,接收各種廣播,接收到廣播之後檢查服務是否開啟,沒有開啟就開啟服務。
也可以在Service的onDestory 方法裡通過發送自定義廣播,由廣播接收器重新啟動服務或直接在onDestory方法裡啟動服務。
public class ForegroundService extends Service {
    ...
    @Override
    public void onDestroy() {
        super.onDestroy();
        // 銷毀一些不再使用的資源
        Log.d(TAG, "onDestroy() executed");
        // 注意在onDestroy裡還需要stopForeground(true);
        stopForeground(true);
        // 銷毀時發送廣播,重新啟動Server
        Intent intent = new Intent("com.ForegroundService.destroy");
        sendBroadcast(intent);
        super.onDestroy();
    }
    ...
}
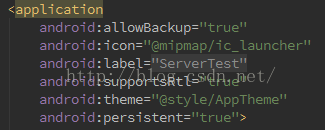
(5)清單文件的 Application 標簽添加 android:persistent="true" 屬性,在系統啟動之時,AMS的systemReady()會加載所有persistent為true的應用,並不是設置persistent 屬性為true就可以了,這種方式必須同時符合FLAG_SYSTEM(app需放在/system/app目錄,即系統目錄)及FLAG_PERSISTENT(android:persistent="true"),單設置該屬性無效。
源碼的地址放在我的Github地址上,裡面有詳細的解釋
例子源碼地址:
點擊打開鏈接
 Android studio使用grdle打包
1、gradle導入jar包的特點:(和libs文件夾導入jar包的區別)gradle導入jar包更方便,一行代碼即可搞定。不像後者那樣還要自己去官方下載。如果官方將ja
 android自定義進度值可拖動的seekbar
最近忙找實習,加上實驗室在推新項目,需要學習新知識。所以很長一段時間沒去整理了官博客了,github也蠻久沒更新,很慚愧。接下來還是要堅持寫。今天就簡單的寫一下我在項目中
 【Android 應用開發】 Application 使用分析
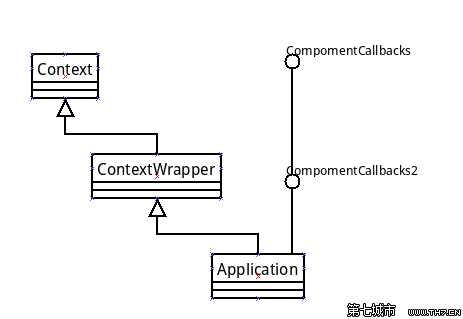
一. Application 分析1. Application 簡介(1) Application 概念Application 概念: Application 屬於組件范
 Android開發之網頁浏覽器(WebView的使用)
本實例主要介紹WebView的使用,WebView的詳解可參考Android開發之WebView詳解。 本實例主要實現了:浏覽器可以打開指定網頁,可以加載asse