編輯:關於Android編程
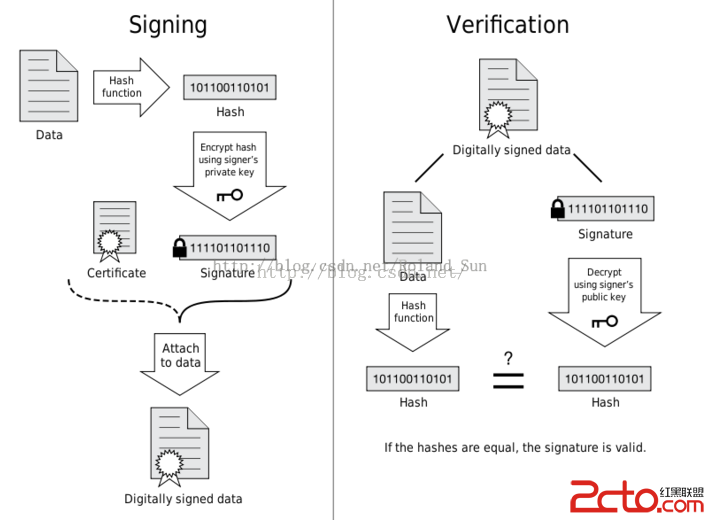
天天果園的App 開機Splash動畫有一個空心圓逐漸擴散的效果,仔細看天天果園的logo,在圓擴散期間還有一個漸變消失效果,建議大家使用surfaceView來實現這種對幀率由一定要求的動畫繪制,筆者也嘗試過重寫View的onDraw方法,結果在高分辨率Android手機上悲劇了。
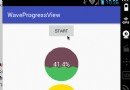
先來看看要實現的效果

SplashScreen繼承ReactContextBaseJavaModule,要求重寫getName()方法。
-
@Override

public String getName() {return "%JS調用類的名字%"; }
創建內部類MySurfaceView繼承SurfaceView
` class MySurfaceView extends SurfaceView implements SurfaceHolder.Callback, Runnable {

private Thread thread; // SurfaceView通常需要自己單獨的線程來播放動畫

private Canvas canvas;

private SurfaceHolder surfaceHolder;
public MySurfaceView(Context c) {
    super(c);
    this.surfaceHolder = this.getHolder();
    this.surfaceHolder.addCallback(this);


}


@Override
public void run() {

    if (!firstRun) {

        while (true) {
            if (radius > MaxRaduis) {
             if(splashDialog.isShowing()){
                    splashDialog.dismiss();
                }
                break;
            }

            canvas = this.surfaceHolder.lockCanvas(null);    //通過lockCanvas加鎖並得到該SurfaceView的畫布


            Paint paint = new Paint();
            paint.setXfermode(new PorterDuffXfermode(PorterDuff.Mode.CLEAR));
            if (canvas != null) {
                canvas.drawPaint(paint);
                canvas.clipRect(0, 0, ScreenWidth, ScreenHeight);
                int n = radius;
                Path mPath = new Path();
                mPath.addCircle(cX, cY, n, Path.Direction.CCW);
                canvas.clipPath(mPath, Region.Op.DIFFERENCE);
                canvas.drawColor(Color.GRAY);

            }

            radius += rate;
            if (canvas != null) {
                this.surfaceHolder.unlockCanvasAndPost(canvas); // 釋放鎖並提交畫布進行重繪
            }

        }

    } else {
        //第一次運行
        canvas = this.surfaceHolder.lockCanvas(null); // 通過lockCanvas加鎖並得到該SurfaceView的畫布

        if (canvas != null) {
            canvas.clipRect(0, 0, ScreenWidth, ScreenHeight);
            canvas.drawColor(Color.WHITE);
            canvas.drawBitmap(bmp, 0, 0, null);
            this.surfaceHolder.unlockCanvasAndPost(canvas);
        }
        firstRun = false;
    }
}

@Override
public void surfaceDestroyed(SurfaceHolder arg0) {
    Log.i("Test","surfaceDestroyed");
}

@Override
public void surfaceCreated(SurfaceHolder arg0) {
    Log.i("Test","surfaceCreated");
    doSufaceAnimation();
}

public void doSufaceAnimation() {
    this.thread = new Thread(MySurfaceView.this);

    this.thread.start();

}

@Override
public void surfaceChanged(SurfaceHolder arg0, int arg1, int arg2, int arg3) {
    // 這裡是SurfaceView發生變化的時候觸發的部分

}
SplashScreen構造方法,需要傳入上下文環境
   public SplashScreen(ReactApplicationContext reactContext,Activity activity) {
        super(reactContext);
        this.activity = activity;

    }
開機顯示畫面,初始化控件
private void showSplashScreen() {
        Log.i("Test", "showSplashScreen");
        final int drawableId = getSplashId();
        getActivity().runOnUiThread(new Runnable() {
            public void run() {
                // Get reference to display
//                rl = (ViewGroup) ((ViewGroup) activity.findViewById(android.R.id.content)).getChildAt(0);
                firstRun = true;
                Resources resources = activity.getResources();
                DisplayMetrics dm = resources.getDisplayMetrics();
                handler = new Handler();
                ScreenWidth = dm.widthPixels;
                ScreenHeight = dm.heightPixels;
                rate = 40;
                int a = ScreenWidth;
                int b = ScreenHeight;
                MaxRaduis = (int) Math.sqrt(a * a + b * b) / 2 + 100; // a*a+b*b開根

getBitmap(drawableId);//處理圖片
surfaceView = new MySurfaceView(activity.getApplicationContext());
ViewGroup.LayoutParams params =
                        new ViewGroup.LayoutParams(ViewGroup.LayoutParams.MATCH_PARENT,
                                ViewGroup.LayoutParams.MATCH_PARENT);
surfaceView.setLayoutParams(params);
                surfaceView.getLayoutParams().height=ScreenHeight - getStatusBarHeight();
                surfaceView.getLayoutParams().width=ScreenWidth;
surfaceView.setClickable(false);//動畫期間不能點擊,線程影響
surfaceView.setZOrderOnTop(true);//最上層surfaceView.getHolder().setFormat(PixelFormat.TRANSLUCENT);//設置畫布  背景透明
//必須在dialog內添加surfaceView,RN內
//RootView沒法添加SurfaceView
splashDialog = new Dialog(activity, android.R.style.Theme_Translucent_NoTitleBar);
                splashDialog.setContentView(surfaceView);
splashDialog.setCancelable(false);
splashDialog.show();

            }
        });


    }
處理圖片,適配屏幕,需要注意的是為了開機時候application加載圖片位置與之後顯示的圖片位置一致,這裡要計算狀態欄的高度。
    private void getBitmap(int drawableId) {
        radius = 12;

        cX = ScreenWidth / 2;
        cY = ScreenHeight / 2;//要加上狀態欄高度
        bitmap = BitmapFactory.decodeResource(activity.getResources(), drawableId);
        int width = bitmap.getWidth();
        int height = bitmap.getHeight();
        int oldwidth = bitmap.getWidth();
        int oldheight = bitmap.getHeight();
        int newWidth = ScreenWidth;
        int newHeight = ScreenHeight;
        float scaleWidth = ((float) newWidth) / width;
        float scaleHeight = ((float) newHeight) / height;
        Matrix matrix = new Matrix();
        matrix.postScale(scaleWidth, scaleHeight);


        resizedBitmap = Bitmap.createBitmap(bitmap, 0, 0, oldwidth,
                oldheight, matrix, true);

        bitmap.recycle();//回收內存


        int h = getStatusBarHeight();// 裁切後所取的區域左上角y坐標 ,狀態欄高度
        int w = 0;// 裁切後所取的區域左上角x坐標
        bmp = Bitmap.createBitmap(resizedBitmap, w, h, resizedBitmap.getWidth(),
                resizedBitmap.getHeight() - h, null, false);
        resizedBitmap.recycle();//回收內存

    }
獲取狀態欄高度
public int getStatusBarHeight() {
        int result = 0;
        int resourceId = activity.getResources().getIdentifier("status_bar_height", "dimen", "android");
        if (resourceId > 0) {
            result = activity.getResources().getDimensionPixelSize(resourceId);
        }
        return result;
    }
圖片是使用的android本地圖片資源
 private int getSplashId() {
        int drawableId = getActivity().getResources().getIdentifier("%圖片文件名稱%", "drawable", getActivity().getClass().getPackage().getName());
        if (drawableId == 0) {
            drawableId = getActivity().getResources().getIdentifier("%圖片文件名稱%", "drawable", getActivity().getPackageName());
        }
        return drawableId;
    }
提供JS調用的兩個方法,需要標注@ReactMethod
  @ReactMethod
    public void showSplash(){
        showSplashScreen();//開始遮擋主屏幕
    }

    /**
     * 提供js點用方法,圓形展開動畫開始
     */
    @ReactMethod
    public void doAnimation() {
        try {
            Thread.sleep(1000);
        } catch (InterruptedException e) {
            e.printStackTrace();
        }

        getActivity().runOnUiThread(new Runnable() {
            public void run() {
                if (splashDialog != null && splashDialog.isShowing()) {
                    handler = new Handler();
//                   rl = (ViewGroup) ((ViewGroup) activity.findViewById(android.R.id.content)).getChildAt(0);
                   rl = (ViewGroup) ((ViewGroup) splashDialog.getWindow().getDecorView()).getChildAt(0);
                    ViewGroup.LayoutParams params =
                            new ViewGroup.LayoutParams(ViewGroup.LayoutParams.MATCH_PARENT,
                                    ViewGroup.LayoutParams.MATCH_PARENT);

                    // 一個自定義的布局,作為顯示的內容
                    ImageView contentView = new ImageView(activity);

                    contentView.setLayoutParams(params);
                    contentView.setImageBitmap(bmp);
                    popupWindow = new PopupWindow(contentView,
                            ScreenWidth, ScreenHeight - getStatusBarHeight(), true);
                    popupWindow.setTouchable(false);
                    popupWindow.setBackgroundDrawable(null);
                    popupWindow.setAnimationStyle(R.style.PopupAnimation);
                    popupWindow.showAtLocation(rl, Gravity.CENTER_HORIZONTAL, cX, cY);


                    handler.postDelayed(new Runnable() {
                        @Override
                        public void run() {
                            surfaceView.doSufaceAnimation();
                        }
                    }, 144);//為了讓popwindow有足夠時間顯示圖片

                    handler.postDelayed(new Runnable() {
                        @Override
                        public void run() {
                            popupWindow.dismiss();

                        }
                    }, 500);//這裡執行的時間要與popwindow漸變消失的動畫時間一致,popwindow的動畫,就不詳述了,開始動畫也是可以做到漸變消失的,只要最後把popwindow移除久可以了


                }
            }
        });
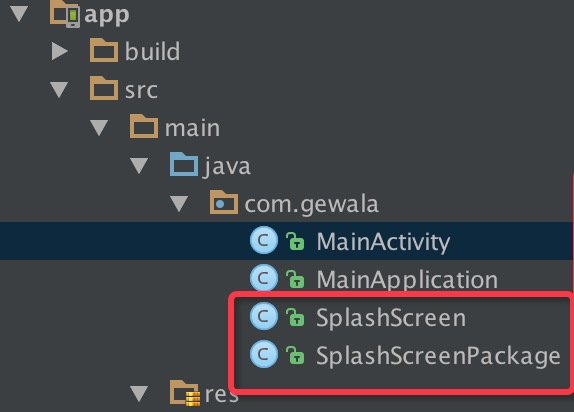
SplashScreenPackage需要實現ReactPackage接口
public class SplashScreenPackage implements ReactPackage {
    private ReactActivity activity;
    private SplashScreen mModuleInstance;


    public SplashScreenPackage(ReactActivity activity) {
        super();
     this.activity=activity;

    }


    @Override
    public List createNativeModules(ReactApplicationContext reactContext) {
        mModuleInstance = new SplashScreen(reactContext,activity);
        return Arrays.asList(
                mModuleInstance
        );
    }


    @Override
    public List> createJSModules() {
        return Collections.emptyList();
    }


    @Override
    public List createViewManagers(ReactApplicationContext reactContext) {
        return Arrays.asList();
    }
}
為了傳入上下文環境給SplashScreen,mainApplication與mainActivity需要部分修改
 //mainApplication中去掉了finally
 private ReactNativeHost mReactNativeHost = new ReactNativeHost(this) {
    @Override
    protected boolean getUseDeveloperSupport() {
      return BuildConfig.DEBUG;
    }

    @Override
    protected List getPackages() {
      return Arrays.asList(
          new MainReactPackage()


      );
    }

  };
//添加set方法
    public void setmReactNativeHost(ReactNativeHost mReactNativeHost) {
        this.mReactNativeHost = mReactNativeHost;
    }```

 - mainActivity中需要重寫ReactRootView,因為這個方法執行後就會根據ApplicationReactPackage構建控件
@Override

protected ReactRootView createRootView() {

ma=(MainApplication)this.getApplication();

ma.setmReactNativeHost( new ReactNativeHost(ma) {

@Override

protected boolean getUseDeveloperSupport() {

return BuildConfig.DEBUG;

}
        @Override
        protected List getPackages() {
            return Arrays.asList(
                    new MainReactPackage(),
                    new SplashScreenPackage(MainActivity.this)

            );
        }

    });

    return super.createRootView();
}```
最後還有一個問題,執行popwindow彈出時,可能會產生閃屏,建議使用透明背景的圖片顯示在popwindow中,這樣閃屏效果不明顯。
最後完成的效果,模擬器有點卡。。
 AndroidUI組件SlidingTabLayout實現ViewPager頁滑動效果
使用SlidingTabLayout需要准備2個類,分別是 SlidingTabLayout,與SlidingTabStrip,,放進項目中時只用修改下包名即可。 效果制
 Android官方開發文檔Training系列課程中文版:網絡操作之網絡管理
原文地址:http://android.xsoftlab.net/training/basics/network-ops/managing.html這節課將會學習如何對網
 最佳實踐之 Android代碼規范
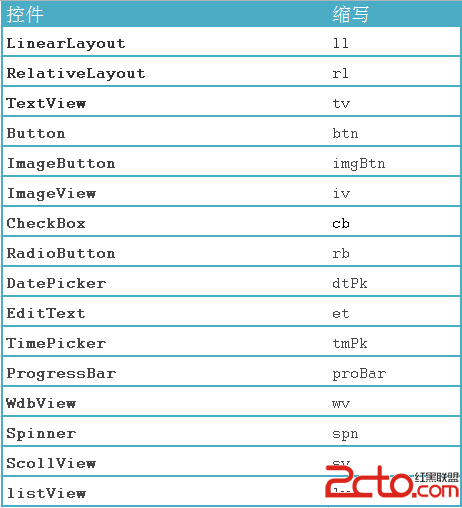
命名規范包命名規范采用反域名命名規則,包名全部小寫,連續的單詞只是簡單地連接起來,不使用下劃線,一級包名為com,二級包名為xxx(可以是公司域名或者個人命名),三級包名
 Android6.0來電號碼電話薄名稱匹配
本文將介紹系統接收到來電之後,如何在電話薄中進行匹配聯系人的流程。分析將從另外一篇文章(基於Android6.0的RIL框架層模塊分析)中提到的與本文內容相關的代碼開始。