編輯:關於Android編程
在Android系統中,多媒體文件通常在開機和SD卡掛載的時候進行掃描操作,目的是為了讓多媒體應用便捷地使用和管理多媒體文件。設想一下如果進入多媒體應用才開始掃描,應用的可用性就很差,所以Android系統將這些媒體相關的信息掃描出來保存在數據庫中,當打開應用的時候直接去數據庫讀取(或者所通過MediaProvider去從數據庫讀取)並展示給用戶,這樣用戶體驗會好很多。
下面是其具體的分析過程,分析了兩種不同掃描方式的具體實現,和如何使用多媒體掃描,最後對常見的問題講解。
多媒體掃描過程分為兩種方式,一種是接收廣播的方式,另一種是通過IPC方式。其中通過IPC的方式在底層實現的邏輯與前一種方式部分重合,所以不再重復介紹。
分析的代碼層次為:
(1)Java層
(2)JNI層
(3)Native層

根據層級,結合流程圖,逐漸深入底層進行分析,最終得出整套關於掃描過程的分析結論。
在掃描的具體實現中涉及到java層、JNI層和native層,其中MediaScanner.java對應java層,android_media_MediaScanner.cpp對應JNI層,MediaScanner.cpp對應Native層。下面進行逐層分析。


在清單文件中注冊的廣播:
MediaScannerReceiver
android.intent.action.BOOT_COMPLETED 開機廣播
android.intent.action.MEDIA_MOUNTED 外部存儲掛載
android.intent.action.MEDIA_UNMOUNTED 外部存儲卸載
android.intent.action.MEDIA_SCANNER_SCAN_FILE 掃描單獨的文件
接收開機廣播的操作:
// Scan both internal and external storage
scan(context, MediaProvider.INTERNAL_VOLUME);
scan(context, MediaProvider.EXTERNAL_VOLUME);
對其他廣播的操作。獲取外部存儲設備的路徑,監聽兩種廣播
一種是監聽外部存儲設備的掛載,另一種是接收指定文件的掃描。
// handle intents related to external storage
                String path = uri.getPath();
                //從log中的值為/storage/emulated/0
                String externalStoragePath =
                           Environment.getExternalStorageDirectory().getPath();
                //從log中的值為/sdcard
                String legacyPath =
                           Environment.getLegacyExternalStorageDirectory().getPath();
                try {
                // An absolute path is one that begins at the root of the file system.
                //A canonical path is an absolute path with symbolic links
                    path = new File(path).getCanonicalPath();
                } catch (IOException e) {
                    return;
                }
                if (path.startsWith(legacyPath)) {
                    path = externalStoragePath + path.substring(legacyPath.length());
                }
                //對其他廣播進行的處理
                if (Intent.ACTION_MEDIA_MOUNTED.equals(action)||
 ACTION_MEDIA_SCANNER_SCAN_ALL.equals(action)) {
                    //接收到外部存儲掛載的廣播之後掃描外部存儲
                    // scan whenever any volume is mounted
                    scan(context, MediaProvider.EXTERNAL_VOLUME);
                } else if (Intent.ACTION_MEDIA_SCANNER_SCAN_FILE.equals(action) &&
                        path != null && path.startsWith(externalStoragePath + "/")) {
                    //接收掃描單一文件的廣播,掃描單一文件
                    scanFile(context, path);
                }
在調用的scan方法去啟動MediaScannerService,並且裝填所對應的存儲卷
private void scan(Context context, String volume) {
        Bundle args = new Bundle();
        args.putString("volume", volume);
        context.startService(
                new Intent(context, MediaScannerService.class).putExtras(args));
    }
scanFile裝填的參數是對應要掃描的路徑
private void scanFile(Context context, String path) {
        Bundle args = new Bundle();
        args.putString("filepath", path);
        context.startService(
                new Intent(context, MediaScannerService.class).putExtras(args));
    }
至此,MediaScannerReceiver分析完畢,內容較少,其作用主要就是:
(1) 接收廣播
(2) 構造對應的掃描路徑
(3) 啟動MediaScannerService
分析Service首先分析其生命周期中所作的相關操作。先看onCreate函數中有哪些操作:
@Override
    public void onCreate(){
        PowerManager pm = (PowerManager)getSystemService(Context.POWER_SERVICE);
        //新建電源鎖,保證掃描過程中系統不會休眠
        mWakeLock = pm.newWakeLock(PowerManager.PARTIAL_WAKE_LOCK, TAG);
        StorageManager storageManager =
                (StorageManager)getSystemService(Context.STORAGE_SERVICE);
        //獲取外部存儲路徑
        mExternalStoragePaths = storageManager.getVolumePaths();

        // Start up the thread running the service.  Note that we create a
        // separate thread because the service normally runs in the process's
        // main thread, which we don't want to block.
        Thread thr = new Thread(null, this, "MediaScannerService");
        thr.start();
    }
... ...
public void run(){
        // reduce priority below other background threads to avoid interfering
        // with other services at boot time.
        Process.setThreadPriority(Process.THREAD_PRIORITY_BACKGROUND +
                Process.THREAD_PRIORITY_LESS_FAVORABLE);
        //開啟消息隊列
        Looper.prepare();
        mServiceLooper = Looper.myLooper();
        //創建Handler,在線程中處理相關操作
        mServiceHandler = new ServiceHandler();
        Looper.loop();
    }
在正常情況下,Android系統會讓程序和服務進入休眠狀態以節約電量使用或者降低CPU消耗,而掃描任務可能會耗時較長,為了不讓在掃描過程中出現系統休眠狀態,要保證此時CPU一直不會休眠。
WakeLock是一種鎖機制,只要有拿著這把鎖,系統就無法進入休眠階段。既然要保持應用程序一直在後台運行,那自然要獲得這把鎖才可以保證程序始終在後台運行。如果需要持有鎖,需要調用acquire()方法,在不需要的時候即使釋放,調用release()方法。
將工作線程的優先級降低是由於掃描過程中會很耗時,如果CPU一直被MediaScannerService占用就會影響其他的線程使用。
在onCreate中的操作有:
1. 獲取WakeLock鎖和外部存儲路徑
2. 新建工作線程
在service的生命周期中,onCreate只能調用一次,但是onStartCommand可以重復調用,也就是說每當啟動一次startService,就會調用一次onStartCommand,下面分析onStartCommand函數。
@Override
    public int onStartCommand(Intent intent, int flags, int startId){
        //確保mServiceHandler已經被啟動
        while (mServiceHandler == null) {
            synchronized (this) {
                try {
                    wait(100);
                } catch (InterruptedException e) {
                }
            }
        }
... ...
        Message msg = mServiceHandler.obtainMessage();
        msg.arg1 = startId;
        msg.obj = intent.getExtras();
        //向mServiceHandler發送消息
        mServiceHandler.sendMessage(msg);
        // Try again later if we are killed before we can finish scanning.
        return Service.START_REDELIVER_INTENT;
    }
在onStartCommand中主要的操作就是獲取啟動Intent的相關參數,並且發送給工作線程進行處理。
接下來分析mServiceHandler在接收消息之後是如何處理的:
public void handleMessage(Message msg) {
        Bundle arguments = (Bundle) msg.obj;
        String filePath = arguments.getString("filepath");
        try {
            if (filePath != null) {
                //處理掃描指定路徑的操作
                IBinder binder = arguments.getIBinder("listener");
                IMediaScannerListener listener =
                    (binder == null ? null : IMediaScannerListener.Stub.asInterface(binder));
                Uri uri = null;
                try {
                    uri = scanFile(filePath, arguments.getString("mimetype"));
                } catch (Exception e) {
                    Log.e(TAG, "Exception scanning file", e);
                }
                if (listener != null) {
                    listener.scanCompleted(filePath, uri);
                }
            } else {
                //如果沒有指定路徑,就直接掃描對應的存儲卷
                String volume = arguments.getString("volume");
                String[] directories = null;
                if (MediaProvider.INTERNAL_VOLUME.equals(volume)) {
                    // scan internal media storage
                    //分別獲取根目錄和OEM分區的media
                    directories = new String[] {
                            Environment.getRootDirectory() + "/media",
                            Environment.getOemDirectory() + "/media",
                    };
                    if (RegionalizationEnvironment.isSupported()) {
                        final List regionalizationDirs = RegionalizationEnvironment
                                .getAllPackageDirectories();
                        if (regionalizationDirs.size() > 0) {
                            String[] mediaDirs =
                                new String[directories.length + regionalizationDirs.size()];
                            for (int i = 0; i < directories.length; i++) {
                                mediaDirs[i] = directories[i];
                            }
                            int j = directories.length;
                            for (File f : regionalizationDirs) {
                                mediaDirs[j] = f.getAbsolutePath() + "/system/media";
                                j++;
                            }
                            directories = mediaDirs;
                        }
                    }
                }
                else if (MediaProvider.EXTERNAL_VOLUME.equals(volume)) {
                    // scan external storage volumes
                    directories = mExternalStoragePaths;
                }
                if (directories != null) {
                    //調用scan函數,開始掃描文件
                    scan(directories, volume);
                }
            }
        } catch (Exception e) {
            Log.e(TAG, "Exception in handleMessage", e);
        }
        //停止掉對應的service的id
        stopSelf(msg.arg1);
    }
handleMessage方法中主要的操作就是調用scan方法進行掃描。
private void scan(String[] directories, String volumeName) {
    Uri uri = Uri.parse("file://" + directories[0]);
    // don't sleep while scanning
    mWakeLock.acquire();
    try {
        ContentValues values = new ContentValues();
        values.put(MediaStore.MEDIA_SCANNER_VOLUME, volumeName);
        //從 getContentResolver獲得一個ContentResover,然後直接插入
        //根據AIDL,這個ContentResover的另一端是MediaProvider。作用是讓其做一些准備工作
        Uri scanUri = getContentResolver().insert(MediaStore.getMediaScannerUri(), values);
        //發送開始掃描的廣播
        sendBroadcast(new Intent(Intent.ACTION_MEDIA_SCANNER_STARTED, uri));
        try {
            if (volumeName.equals(MediaProvider.EXTERNAL_VOLUME)) {
                openDatabase(volumeName);
            }
            //創建MediaScanner對象並開啟掃描操作
            MediaScanner scanner = createMediaScanner();
            scanner.scanDirectories(directories, volumeName);
        } catch (Exception e) {
            Log.e(TAG, "exception in MediaScanner.scan()", e);
        }
        //通過特殊的Uri進行相關的清理工作
        getContentResolver().delete(scanUri, null, null);
    } finally {
        //發送掃描完成的廣播,釋放鎖
        sendBroadcast(new Intent(Intent.ACTION_MEDIA_SCANNER_FINISHED, uri));
        mWakeLock.release();
    }
}
... ...
private void openDatabase(String volumeName) {
    try {
        ContentValues values = new ContentValues();
        values.put("name", volumeName);
        //調用MediaProvider的insert方法,進行插值
        getContentResolver().insert(Uri.parse("content://media/"), values);
    } catch (IllegalArgumentException ex) {
        Log.w(TAG, "failed to open media database");
    }
}

private MediaScanner createMediaScanner() {
    MediaScanner scanner = new MediaScanner(this);
    //獲取語言信息,將文件轉化成此時的語言
    Locale locale = getResources().getConfiguration().locale;
    if (locale != null) {
        String language = locale.getLanguage();
        String country = locale.getCountry();
        String localeString = null;
        if (language != null) {
            if (country != null) {
                //設置語言
                scanner.setLocale(language + "_" + country);
            } else {
                scanner.setLocale(language);
            }
        }
    }
    return scanner;
}
在MediaScannerService中的onCreate和onStartCommand已經分析完成了,剩下的onDestory只是將Looper退出。
在上面的分析中,MediaScannerService的createMediaScanner方法實例化MediaScanner對象,並且配置語言的。下面先從MediaScanner的創建分析,並且介紹相關的具體方法。
對於MediaScanner的初始化過程,首先執行的是靜態代碼塊,然後是構造函數。
static {
    //加載libmedia_jni.so
    System.loadLibrary("media_jni");
    native_init();
}
public MediaScanner(Context c) {
    native_setup();
    mContext = c;
    mPackageName = c.getPackageName();
    mBitmapOptions.inSampleSize = 1;
    mBitmapOptions.inJustDecodeBounds = true;
    setDefaultRingtoneFileNames();
    mExternalStoragePath = Environment.getExternalStorageDirectory().getAbsolutePath();
    mExternalIsEmulated = Environment.isExternalStorageEmulated();
}
在初始化的過程中native_init();和native_setup();方法放在JNI層分析。
在MediaScannerService中調用了MediaScanner的scanDirectories方法,此方法是java層具體的掃描實現。
public void scanDirectories(String[] directories, String volumeName) {
    try {
        long start = System.currentTimeMillis();
        //掃描之前的初始化
        initialize(volumeName);
        //掃描之前的預處理
        prescan(null, true);
        long prescan = System.currentTimeMillis();
        if (ENABLE_BULK_INSERTS) {
            // create MediaInserter for bulk inserts
            //A MediaScanner helper class which enables us to do lazy insertion on the given provider.
            //參數500是每條Uri所占的buffer大小
            mMediaInserter = new MediaInserter(mMediaProvider, mPackageName, 500);
        }
        for (int i = 0; i < directories.length; i++) {
            //此方法是native方法,用來掃描文件,參數directories[i]是傳入的路徑數組
            //mClient是MyMediaScannerClient的實例,之後會繼續分析
            processDirectory(directories[i], mClient);
        }

        if (ENABLE_BULK_INSERTS) {
            // flush remaining inserts
            // Note that you should call flushAll() after using this class.
            mMediaInserter.flushAll();
            mMediaInserter = null;
        }
        long scan = System.currentTimeMillis();
        //處理掃描完成之後的操作
        postscan(directories);
        long end = System.currentTimeMillis();
    }//catch各種異常
    } finally {
        // release the DrmManagerClient resources
        releaseResources();
    }
}
private void initialize(String volumeName) {
    //獲取MediaProvider對象
    mMediaProvider = mContext.getContentResolver().acquireProvider("media");
    //初始化不同類型數據的Uri,供之後根據不同的表進行插值
    mAudioUri = Audio.Media.getContentUri(volumeName);
    mVideoUri = Video.Media.getContentUri(volumeName);
    mImagesUri = Images.Media.getContentUri(volumeName);
    mThumbsUri = Images.Thumbnails.getContentUri(volumeName);
    mFilesUri = Files.getContentUri(volumeName);
    mFilesUriNoNotify = mFilesUri.buildUpon().appendQueryParameter("nonotify", "1").build();
    //如果是外部存儲,則可以獲得播放列表的Uri
    if (!volumeName.equals("internal")) {
        // we only support playlists on external media
        mProcessPlaylists = true;
        mProcessGenres = true;
        mPlaylistsUri = Playlists.getContentUri(volumeName);
        mCaseInsensitivePaths = true;
    }
}
private void prescan(String filePath, boolean prescanFiles) throws RemoteException {
    Cursor c = null;
    String where = null;
    String[] selectionArgs = null;
    if (mPlayLists == null) {
        // mPlayLists的初始化
        mPlayLists = new ArrayList();
    } else {
        mPlayLists.clear();
    }
    if (filePath != null) {
        // query for only one file
        //拼接where語句
        where = MediaStore.Files.FileColumns._ID + ">?" +
            " AND " + Files.FileColumns.DATA + "=?";
        selectionArgs = new String[] { "", filePath };
    } else {
        where = MediaStore.Files.FileColumns._ID + ">?";
        selectionArgs = new String[] { "" };
    }
    // Tell the provider to not delete the file.
    // If the file is truly gone the delete is unnecessary, and we want to avoid
    // accidentally deleting files that are really there (this may happen if the
    // filesystem is mounted and unmounted while the scanner is running).
    Uri.Builder builder = mFilesUri.buildUpon();
    builder.appendQueryParameter(MediaStore.PARAM_DELETE_DATA, "false");
    MediaBulkDeleter deleter = new MediaBulkDeleter(mMediaProvider, mPackageName,
            builder.build());
    // Build the list of files from the content provider
    try {
        if (prescanFiles) {
            // First read existing files from the files table.
            // Because we'll be deleting entries for missing files as we go,
            // we need to query the database in small batches, to avoid problems
            // with CursorWindow positioning.
            long lastId = Long.MIN_VALUE;
            //指定查詢1000條數據
            Uri limitUri =
                   mFilesUri.buildUpon().appendQueryParameter("limit", "1000").build();
            mWasEmptyPriorToScan = true;
            while (true) {
                //拼裝where查詢的參數
                selectionArgs[0] = "" + lastId;
                if (c != null) {
                    c.close();
                    c = null;
                }
                //開始查詢
                c =
              mMediaProvider.query(mPackageName, limitUri, FILES_PRESCAN_PROJECTION,
                        where, selectionArgs, MediaStore.Files.FileColumns._ID, null);
                if (c == null) {
                    break;
                }
                int num = c.getCount();
                if (num == 0) {
                    break;
                }
                mWasEmptyPriorToScan = false;
                while (c.moveToNext()) {
                    //獲取查詢的數據
                    long rowId = c.getLong(FILES_PRESCAN_ID_COLUMN_INDEX);
                    String path = c.getString(FILES_PRESCAN_PATH_COLUMN_INDEX);
                    int format = c.getInt(FILES_PRESCAN_FORMAT_COLUMN_INDEX);
                    long lastModified =
                          c.getLong(FILES_PRESCAN_DATE_MODIFIED_COLUMN_INDEX);
                    lastId = rowId;
                    // Only consider entries with absolute path names.
                    // This allows storing URIs in the database without the
                    // media scanner removing them.
                    if (path != null && path.startsWith("/")) {
                        boolean exists = false;
                        try {
                            //獲取此路徑下是否有文件
                            exists = Os.access(path, android.system.OsConstants.F_OK);
                        } catch (ErrnoException e1) {
                        }
                        if (!exists && !MtpConstants.isAbstractObject(format)) {
                            // do not delete missing playlists, since they may have been
                            // modified by the user.
                            // The user can delete them in the media player instead.
                            // instead, clear the path and lastModified fields in the row
                            MediaFile.MediaFileType mediaFileType =
                                  MediaFile.getFileType(path);
                            int fileType = (mediaFileType == null ? 0 :
                                  mediaFileType.fileType);
                            if (!MediaFile.isPlayListFileType(fileType)) {
                                //刪除掉指定的數據
                                deleter.delete(rowId);
                               if (path.toLowerCase(Locale.US).endsWith("/.nomedia")) {
                                    deleter.flush();
                                    String parent = new File(path).getParent();
**
 * The method name used by the media scanner and mtp to tell the media provider to
 * rescan and reclassify that have become unhidden because of renaming folders or
 * removing nomedia files
 * @hide
 */
                                    mMediaProvider.call(mPackageName,
                                            MediaStore.UNHIDE_CALL,parent, null);
                                }
                            }
                        }
                    }
                }
            }
        }
    }
    finally {
        if (c != null) {
            c.close();
        }
        deleter.flush();
    }
    // compute original size of images
    mOriginalCount = 0;
    c = mMediaProvider.query(mPackageName, mImagesUri, ID_PROJECTION, null, null, null, null);
    if (c != null) {
        mOriginalCount = c.getCount();
        c.close();
    }
}

private void postscan(String[] directories) throws RemoteException {

    // handle playlists last, after we know what media files are on the storage.
    if (mProcessPlaylists) {
        processPlayLists();
    }
    //如果圖片的數目為0,並且是外部存儲,則清除掉無效的略縮圖文件
    if (mOriginalCount == 0 && mImagesUri.equals(Images.Media.getContentUri("external")))
        pruneDeadThumbnailFiles();
    // allow GC to clean up
    mPlayLists = null;
    mMediaProvider = null;
}
至此,關於java層的分析已經完成,剩下幾個比較重要的JNI函數需要分析,分別是native_init,native_setup和processDirectory。接下來就開始分析JNI層。
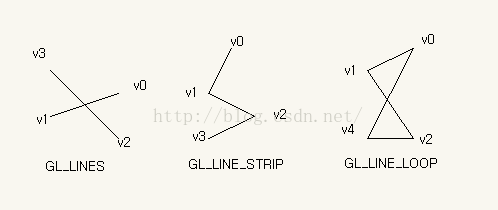 OpenglES2.0 for Android:來畫個矩形吧
上一節中我們繪制了一個三角形,我們在上一節的基礎上來完成矩形的繪制 。OK,開始動手做吧,首先在上一節的項目中的shape目錄下新建一個類——Sq
 Andorid Async-HttpClient解讀
Async-httpclient是一個用於Android應用程序開發的http訪問開源框架,開源在GitHub上,由於今天在GitHub上沒有看到下載地址,我這裡提供一個
 Android應用性能測試
對於Web網頁來說,頁面的訪問、加載速度對於用戶體驗來說是很重要的,而如果把Android中的每個Activity都看成是一個頁面的話,Activity的啟動速度憑主觀的
 android高仿微信拍照、多選、預覽、刪除(去除相片)相冊功能
先聲明授人與魚不如授人與漁,只能提供一個思路,當然需要源碼的同學可以私下有償問我要源碼:QQ:508181017 工作了將近三年時間了,一直沒正兒八