編輯:關於Android編程
藍牙運行原理:通過BluetoothAdapter 藍牙適配器處理任務,如果藍牙被啟動之後,系統會自動去搜索其它設備,如果匹配到附近的設備就發送一個廣播,BroadcastRecevier的onReceive被調用一次,我們只需要在onReceive中處理自己的操作即可。
藍牙是一種支持設備短距離傳輸數據的無線技術。android在2.0以後提供了這方面的支持。從查找藍牙設備到能夠相互通信要經過幾個基本步驟(本機做為服務器):
根據需要設置自己的權限:
<!--設備之間申請連接,交流等-->

<!--允許程序去搜索和配對藍牙設備。-->

<!--允許設備不經過用戶操作自動配對-->

<!--動態掃描的權限,android6.0需要設置此權限-->
       bluetoothAdapter = BluetoothAdapter.getDefaultAdapter();
//        if (bluetoothAdapter == null) {
//            Toast.makeText(context,"對不起,您的設備不支持藍牙,即將退出", Toast.LENGTH_SHORT).show();
//            finish();
//        } else if(!bluetoothAdapter.isEnabled()) {//藍牙未開啟
//            Intent intent = newIntent(BluetoothAdapter.ACTION_REQUEST_ENABLE);
//           startActivityForResult(intent, REQUEST_BLUETOOTH_OPEN);
//        }
    private void ensureBluetoothDiscoverable() {
        if(bluetoothAdapter.getScanMode() !=
                BluetoothAdapter.SCAN_MODE_CONNECTABLE_DISCOVERABLE){
            Intent intent = new Intent(BluetoothAdapter.ACTION_REQUEST_DISCOVERABLE);
            intent.putExtra(BluetoothAdapter.EXTRA_DISCOVERABLE_DURATION, 3);
            startActivity(intent);
        }
    }
public void setDiscoverableTimeout(int timeout) { BluetoothAdapter adapter=BluetoothAdapter.getDefaultAdapter(); try { Method setDiscoverableTimeout = BluetoothAdapter.class.getMethod("setDiscoverableTimeout", int.class); setDiscoverableTimeout.setAccessible(true); Method setScanMode =BluetoothAdapter.class.getMethod("setScanMode", int.class,int.class); setScanMode.setAccessible(true); setDiscoverableTimeout.invoke(adapter, timeout); setScanMode.invoke(adapter, BluetoothAdapter.SCAN_MODE_CONNECTABLE_DISCOVERABLE,timeout); } catch (Exception e) { e.printStackTrace(); } }
第一種方法,讓用戶看到自己開啟了藍牙的可見性,第二種直接從後台開啟藍牙可見,但會一直可見下去,直到藍牙關閉。我在小米miui + android6.0使用了第一種方法開啟了藍牙可見性,但並沒有想象中的到時間自動關閉,因為這時的小米已經去掉了藍牙可見性的計時關閉,只會一直開啟下去,所以我找了好久,才找到下面的方法關閉了藍牙可見性。
  private void closeBluetoothDiscoverable(){
        //嘗試關閉藍牙可見性
        try {
            Method setDiscoverableTimeout = BluetoothAdapter.class.getMethod("setDiscoverableTimeout", int.class);
            setDiscoverableTimeout.setAccessible(true);
            Method setScanMode =BluetoothAdapter.class.getMethod("setScanMode", int.class,int.class);
            setScanMode.setAccessible(true);

            setDiscoverableTimeout.invoke(bluetoothAdapter, 1);
            setScanMode.invoke(bluetoothAdapter, BluetoothAdapter.SCAN_MODE_CONNECTABLE,1);
        } catch (Exception e) {
            e.printStackTrace();
        }
    }
getAddress()獲取本地藍牙地址
getDefaultAdapter()獲取默認BluetoothAdapter,實際上,也只有這一種方法獲取BluetoothAdapter
getName()獲取本地藍牙名稱
getRemoteDevice(String address)根據藍牙地址獲取遠程藍牙設備
getState()獲取本地藍牙適配器當前狀態(感覺可能調試的時候更需要)
isDiscovering()判斷當前是否正在查找設備,是返回true
isEnabled()判斷藍牙是否打開,已打開返回true,否則,返回false
listenUsingRfcommWithServiceRecord(String name,UUID uuid)根據名稱,UUID創建並返回
BluetoothServerSocket,這是創建BluetoothSocket服務器端的第一步
startDiscovery()開始搜索,這是搜索的第一步
BluetoothAdapter裡的方法很多,常用的有以下幾個:
cancelDiscovery() 根據字面意思,是取消發現,也就是說當我們正在搜索設備的時候調用這個方法將不再繼續搜索
disable()關閉藍牙
enable()打開藍牙,這個方法打開藍牙不會彈出提示,更多的時候我們需要問下用戶是否打開,一下這兩行代碼同樣是打開藍牙,不過會提示用戶:
Android6.0藍牙搜索需要定位權限,具體博文請看Android6.0權限詳解, 藍牙搜索使用的權限申請方法如下:
    private void mayRequestLocation(){
        Log.d(TAG, "mayRequestLocation: androidSDK--" + Build.VERSION.SDK_INT);
        if(Build.VERSION.SDK_INT >= 23){
            //6.0以上設備
            int checkCallPhonePermission = checkSelfPermission(Manifest.permission.
                    ACCESS_COARSE_LOCATION);
            if(checkCallPhonePermission != PackageManager.PERMISSION_GRANTED) {
                Log.d(TAG, "mayRequestLocation: 請求粗略定位的權限");
                requestPermissions(new String[]{Manifest.permission.
                        ACCESS_COARSE_LOCATION}, REQUEST_PERMISSION_LOCATION);
                return;
            }
        }
藍牙搜索具體方法:
//查找配對過的設備
                        mayRequestLocation();
                        Set pairedDevices = bluetoothAdapter.getBondedDevices();
                        if (pairedDevices.size() > 0) {
                            for (BluetoothDevice device : pairedDevices) {
                                Log.d(TAG, "已配對設備:" + device.getName() + " address: " + device.getAddress());
                            }
                        } else {
                            Log.d(TAG, "onClick: 沒有找到配對的設備");
                        }

                        //嘗試搜索設備
                        BroadcastReceiver receiver = new BroadcastReceiver() {
                            @Override
                            public void onReceive(Context context, Intent intent) {
                                String action = intent.getAction();
                                switch (action) {
                                    case BluetoothAdapter.ACTION_DISCOVERY_FINISHED: {
                                        Log.d(TAG, "onReceive: 結束查找設備");
                                        break;
                                    }
                                    case BluetoothAdapter.ACTION_DISCOVERY_STARTED: {
                                        Log.d(TAG, "onReceive: 開始查找設備");
                                        break;
                                    }
                                    case BluetoothDevice.ACTION_FOUND: {
                                          /* 從intent中取得搜索結果數據 */
                                        Log.d(TAG, "onReceive: 查找到設備");
                                        BluetoothDevice device = intent
                                                .getParcelableExtra(BluetoothDevice.EXTRA_DEVICE);
                                        Log.d(TAG, "設備:" + device.getName() + " address: " + device.getAddress());
                                        break;
                                    }
                                }

                            }
                        };
                        IntentFilter filter = new IntentFilter(BluetoothAdapter.ACTION_DISCOVERY_STARTED);
                        registerReceiver(receiver, filter);
                        filter = new IntentFilter(BluetoothAdapter.ACTION_DISCOVERY_FINISHED);
                        registerReceiver(receiver, filter);
                        filter = new IntentFilter(BluetoothDevice.ACTION_FOUND);
                        registerReceiver(receiver, filter);
                        if (bluetoothAdapter.isDiscovering()) {//正在查找
                            Log.d(TAG, "onClick: 正在查找設備");
                        } else {
                            bluetoothAdapter.startDiscovery();
                        }
import java.io.IOException;

/**
 * 客戶端,用於連接服務端
 */
class ClientThread extends Thread {

    /**
     * 在創建客戶端的時候,創建bluetoothSocket
     */
    public ClientThread() {
        try {
            bluetoothSocket =bluetoothDevice.createRfcommSocketToServiceRecord(uuid);
        } catch (IOException e) {
            Log.e(TAG, "ClientThread:", e);
            e.printStackTrace();
        }
    }

    /**
     * 在線程內創建子線程,進行連接,我覺的這是由於多線程思想決定的
     * 在一個主線程中開辟子線程實現操作,從而可以實現並發,不會導致
     * 主線程的阻塞,導致IOException
     */
    @Override
    public void run() {
        new Thread(new Runnable() {
            @Override
            public void run() {
                if(bluetoothSocket == null){
                    return;
                }else{
                    try {
                       bluetoothSocket.connect();
                        /**
                         * 連接成功後,將連接完成的socket傳入已連接線程
                         */
                        connectedThread = new ConnectedThread(bluetoothSocket);
                        connectedThread.start();
                    } catch (IOException e) {
                        Log.e(TAG, "run: ", e);
                        e.printStackTrace();
                    }
                }
            }
        }).start();
    }
}

/**
 * 服務器線程,用於接受來自客戶端的訪問
 */
private class ServerThread extends Thread {
    /**
     * 藍牙通信,兩者需要使用同一個UUID
     */
    public ServerThread() {
        Log.d(TAG, "ServerThread: 構件服務端");
        try {
            bluetoothServerSocket =BluetoothAdapter.getDefaultAdapter().
                   listenUsingRfcommWithServiceRecord("test", uuid);
        } catch (IOException e) {
            Log.e(TAG, "ServerThread: construct", e);
            e.printStackTrace();
        }
    }

    /**
     * 服務端等待連接線程,從等級上講,比客戶端的連接線程高一個級別,應該是由於服務器端
     * 只需要等待一個連接請求,但並不考慮多線程,因為請求發出必有先後,而客戶端卻需要考
     * 慮線程,所以低了一個級別
     */
    @Override
    public void run() {
        while (bluetoothServerSocket != null) {
            try {
                Log.e(TAG, "run:serverThread  等待連接");
                bluetoothSocket1 =bluetoothServerSocket.accept();
                Message message = new Message();
                message.what = MSG_WAIT_CONNECT;
                handler.sendMessage(message);
            } catch (IOException e) {
                Log.e(TAG, "run:ServerThread", e);
                e.printStackTrace();
            }
            if (bluetoothSocket1 != null) {
                Log.d(TAG, "run: connectsuccess");
                connectedThread = new ConnectedThread(bluetoothSocket1);
                connectedThread.start();
                Message message = new Message();
                message.what = MSG_CONNECT_SUCCESS;
                handler.sendMessage(message);
            }
        }
    }
}

/**
 * 已連接的線程,用於通信
 */
private class ConnectedThread extends Thread{
    private BluetoothSocket bluetoothSocket;
    private OutputStream outputStream;
    private InputStream inputStream;
    byte [] bytes = new byte[1024];

    /**
     * 獲取輸入輸出流
     * @param bluetoothSocket
     */
    public ConnectedThread(BluetoothSocket bluetoothSocket) {
        this.bluetoothSocket = bluetoothSocket;
        try {
            outputStream = this.bluetoothSocket.getOutputStream();
            inputStream = this.bluetoothSocket.getInputStream();
        } catch (IOException e) {
            e.printStackTrace();
        }
    }


    /**
     * 讀取線程,一直工作
     */
    @Override
    public void run() {
        int i = 0;
        if(inputStream == null)
            return;
        do {
            try {
                i = inputStream.read(bytes);
                Message message = new Message();
                message.what = MSG_READ_STRING;
                String string = new String(bytes);
                message.obj = string;
                handler.sendMessage(message);
            } catch (IOException e) {
                e.printStackTrace();
            }

        }while (i != 0);
    }

    /**
     * 寫不需要線程,值得一提的是讀取和寫入都是用bytes串的形式傳輸的
     * @param string
     */
    public void write(String string){
        byte [] bytes;
        bytes = string.getBytes();
        try {
            outputStream.write(bytes);
            MessageForChat msg = new MessageForChat(true, string);
            messageList.add(msg);
            adapter.notifyDataSetChanged();
        } catch (IOException e) {
            e.printStackTrace();
        }
    }
}
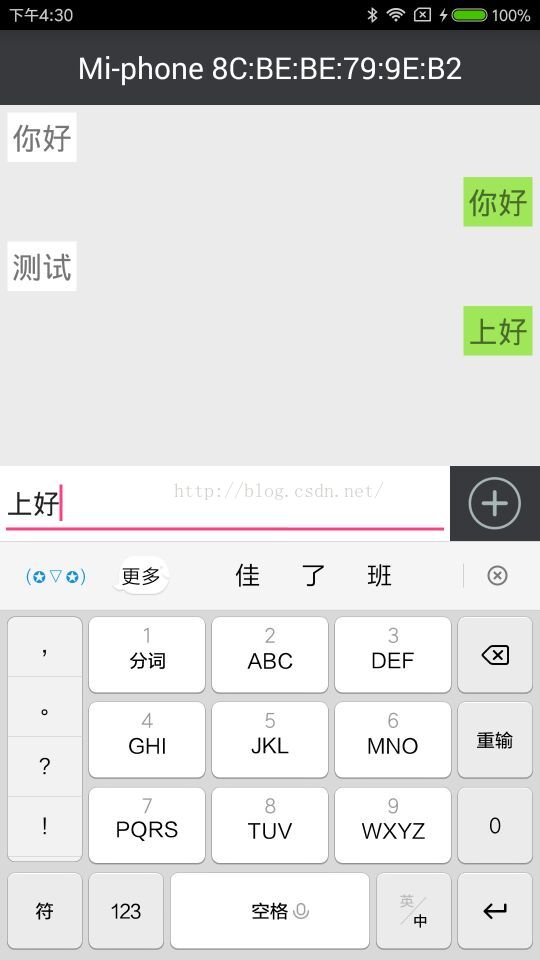
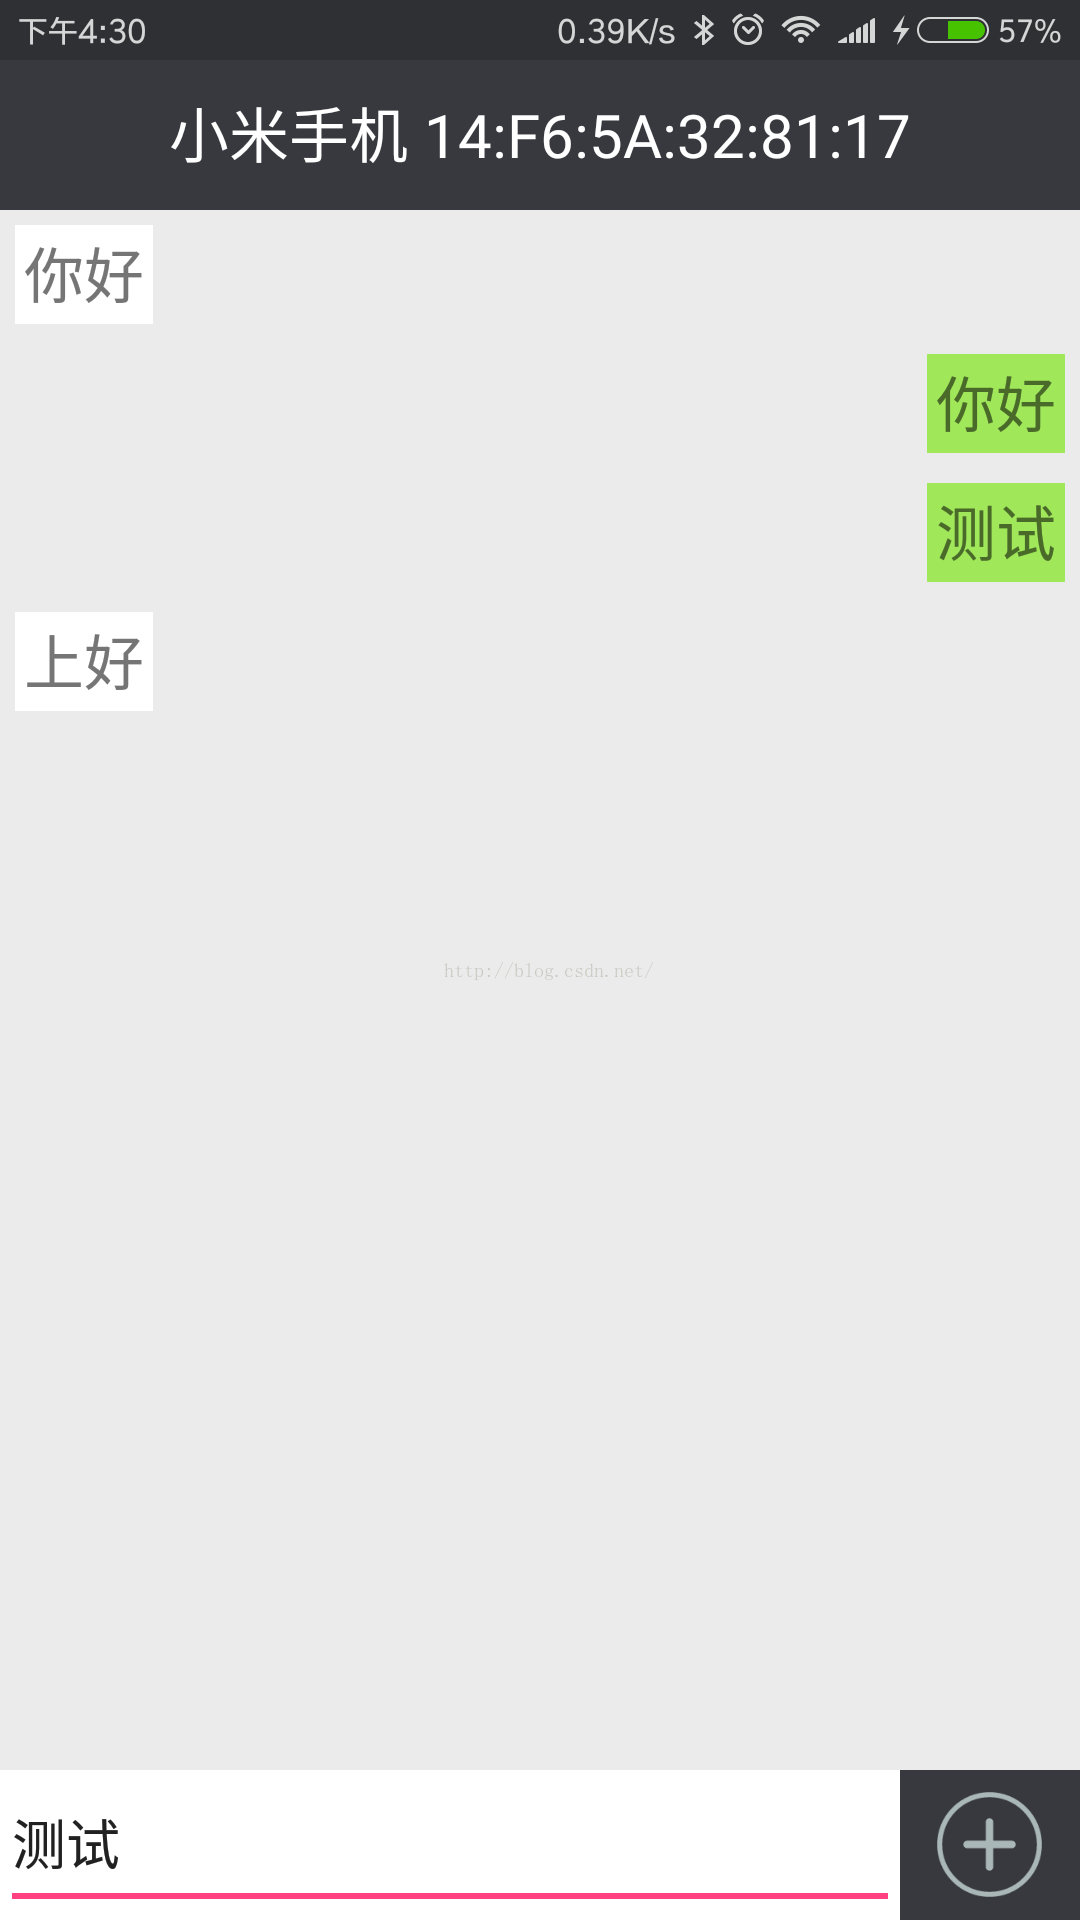
以下是做的一個藍牙聊天的Demo
頂上的文字區域用來顯示正在連接的藍牙設備的名字和地址,而聊天窗口模仿微信聊天窗口,如下圖:
 Demo的git地址是:https://github.com/No1clay/Android.git(裡邊的WeChat示例)
 【干貨分享】關於 Android N 的那些事兒
今年3月,Google 破天荒提前半年發布了 Android N 開發者預覽版。當然,作為一個不合格的谷粉並沒有第一時間體驗安裝,因為至今仍然能夠回憶起來去年今日此門中(
 Android 用Time和Calendar獲取系統當前時間源碼分享(年月日時分秒周幾)
概述用Time和Calendar獲取系統當前時間(年月日時分秒周幾)效果圖源碼:import android.app.Activity; import android.o
 Android開發之創建可點擊的Button實現方法
本文實例講述了Android創建可點擊的Button實現方法。分享給大家供大家參考,具體如下:感覺到自己有必要學習下手機開發方面的知識,不論是為了以後的工作需求還是目前的
 UI控件之ProgressBar(進度條)
(一)概述(二)常用屬性與基礎實例從官方的API我們可以看到這樣一個類的關系圖:常用屬性詳解 :對應在java我們可以調用下述方法:先看看系統給我們提供的進度條吧運行效果