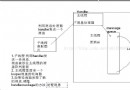
編輯:關於Android編程
activity基類:public abstract class BaseActivity extends Activity-------AppBaseActivity----具體的一個Activity
public abstract class AppBaseActivity extends BaseActivity {

}
net:網絡底層封裝
cache:緩存數據和圖片的相關處理
ui:存放自定義控件
utils:存放的是各種與業務無關的公共方法
第二步:將主項目中的類分門別類地進行劃分
activity
adapter:放適配器
entity:將所有的實體放在一起
db:SQLLite相關邏輯的封裝
engine:存放業務相關的類
ui:存放自定義的控件
utils:存放所有的共用方法
interfaces:真正意義上的接口,一I命名
listener:基於Listener的接口,命名以On作為開頭
2、為Activity定義新的生命周期
設計模式中有一條原則是:單一責任原則。單一責任的定義是:一個類或方法,只做一件事情。
用這條原則來觀察Activity中的onCreate方法,通常要干好多事:通過繼承實現接口的方式,重寫onCreate方法---
public abstract class BaseActivity extends Activity {

@Override
public void onCreate(Bundle savedInstanceState) {
super.onCreate(savedInstanceState);

initVariables();
initViews(savedInstanceState);
loadData();
}

//定義為抽象的方法,用於子類繼承用的
protected abstract void initVariables();
protected abstract void initViews(Bundle savedInstanceState);
protected abstract void loadData();
}
引用:
public class LoginNewActivity extends AppBaseActivity implements View.OnClickListener {
private int loginTimes;
private String strEmail;

private EditText etPassword;
private EditText etEmail;
private Button btnLogin;

@Override
protected void initVariables() {
loginTimes = -1;

Bundle bundle = getIntent().getExtras();
strEmail = bundle.getString(AppConstants.Email);
}

@Override
protected void initViews(Bundle savedInstanceState) {
setContentView(R.layout.activity_login);

etEmail = (EditText)findViewById(R.id.email);
etEmail.setText(strEmail);
etPassword = (EditText)findViewById(R.id.password);

//登錄事件
btnLogin = (Button)findViewById(R.id.sign_in_button);
btnLogin.setOnClickListener(this);
}

@Override
protected void loadData() {
//獲取2個MobileAPI,獲取天氣數據,獲取城市數據
loadWeatherData();
loadCityData();
}

@Override
public void onClick(View view) {
switch (view.getId()) {
case R.id.sign_in_button:
gotoLoginActivity();
}
}

private void gotoLoginActivity() {
Intent intent = new Intent(LoginNewActivity.this,
PersonCenterActivity.class);
startActivity(intent);
}

private void loadWeatherData() {
//發起網絡請求,代碼從略
}

private void loadCityData() {
//發起網絡請求,代碼從略
}
}
對Activity生命周期重新定義是借鑒了JavaScript的做法。JavaScript因為是腳本語言,所以必須要細化每個方法,才能保證結構清晰,不 至於寫錯變量和語法。 3、統一事件編程模型 常見做法是實現事件接口,重寫相應的事件方法如onClick,再在switch......case中R.id......篩選實現。根據面向對象編程的思想,就是initViews方法中實例化控件後,不希望再出現R.id...。就是在初始化控件的時候,就給控件添加相應的事件。
// 登錄事件
Button btnLogin = (Button) findViewById(
R.id.sign_in_button);
btnLogin.setOnClickListener(
new View.OnClickListener() {
@Override
public void onClick(View v) {
gotoLoginActivity();
}
});
有兩個優點:
1>直接在控件對象上增加點擊事件,是面向對象的寫法。
2>件onClick方面的實現,封裝成一個方法,減少代碼的臃腫度。
4、實體化編程
1>在網絡請求中使用實體
JSONObect和JSONArray都是不支持序列化的,在值傳遞的時候只好將這種對象封裝到一個全局變量中,在跳轉前設置,在跳轉後取出,
這並不是明智之舉。
// 第一種寫法,基於JSONObject
try {
JSONObject jsonResponse = new JSONObject(result);
JSONObject weatherinfo = jsonResponse
.getJSONObject("weatherinfo");
String city = weatherinfo.getString("city");
int cityId = weatherinfo.getInt("cityid");

tvCity.setText(city);
tvCityId.setText(String.valueOf(cityId));
} catch (JSONException e) {
e.printStackTrace();
}
如果通過傳統的字典鍵值取值法會存在問題: @1:根據key值取value,這是一個字典鍵值對,字典比實體更晦澀難懂,容易產生bug。 @2:每次都要手動從JSONObject或者JSONArray中取值,很繁瑣。 ====通過fastJSON和GSON實例化實體對象 首先得導入相應的.jar包。
public class WeatherInfo {
private String city;
private String cityid;
private String temp;
private String WD;
private String WS;
private String SD;
private String WSE;
private String time;
private String isRadar;
private String Radar;
private String njd;
private String qy;
........................................}
public class WeatherEntity {
private WeatherInfo weatherinfo;

public WeatherInfo getWeatherInfo() {
return weatherinfo;
}

public void setWeatherInfo(WeatherInfo weatherinfo) {
this.weatherinfo = weatherinfo;
}
}
fastJSON映射方式:
// 第2種寫法,基於fastJSON
WeatherEntity weatherEntity = JSON.parseObject(content,
WeatherEntity.class);
WeatherInfo weatherInfo = weatherEntity.getWeatherInfo();
if (weatherInfo != null) {
tvCity.setText(weatherInfo.getCity());
tvCityId.setText(weatherInfo.getCityid());
}
// 第3種寫法,基於GSON
Gson gson = new Gson();
WeatherEntity weatherEntity = gson.fromJson(content,
WeatherEntity.class);
WeatherInfo weatherInfo = weatherEntity.getWeatherInfo();
if (weatherInfo != null) {
tvCity.setText(weatherInfo.getCity());
tvCityId.setText(weatherInfo.getCityid());
}
====特殊注意 這裡說一件非常狗血的事情,就是在我們使用fastJSON後,App四處起火,主要表現為: 1) 加了符號Annotation的實體屬性,已使用就崩潰。 2)當有泛型屬性時,一使用就崩潰。 在調試的時候沒事,可是每次打簽名混淆包,就會出現上述問題。解決這個問題需要在混淆文件中添加兩行代碼: -keepattributes Signature //避免混淆泛型 -keepattributes *Annotation* //不混淆注解 2>實體生成器 Json Class Generator。可以生成Android和IOS以及WindowsPhone的實體。 工具地址如:http://www.xamasoft.com/json-class-generator/ 項目地址: http://files.cnblogs.com/Jax/EntityGenerator.zip。 說明:工具代碼為C# .NET代碼。 3>在頁面跳轉中使用實體 Activity之間的數據應該如何傳遞。 一種偷懶的方法是,設置一個全局變量,在來源頁設置全局變量,在目標頁接收全局變量。
CinemaBean cinema = new CinemaBean();
cinema.setCinemaId("1");
cinema.setCinemaName("星美");

//使用全局變量的方式傳遞參數
GlobalVariables.Cinema = cinema;
--接收全局變量的值:
// 使用全局變量的方式傳值
CinemaBean cinema = GlobalVariables.Cinema;
if (cinema != null) {
cinemaName = cinema.getCinemaName();
} else {
cinemaName = "";
}
這裡的GlobalVariables類是一個全局變量,定義如下:
public classGlobalVariables{
public static CinemaBean Cinema;
}
注意:不建議使用全局變量。 App一旦切換到後台,當手機內存不足的時候,就會回收這些全局變量,從而當App再次切換回前台時,再繼續使用全局變量,就會因為它 們為空而崩潰。 而必須使用全局變量,就一定要把它們序列化到本地。這樣即使全局變量為空,也能從本地文件中恢復。 ==著重研究使用Intent在頁面間來傳遞數據實體的機制:
public class AppConstants {
public final static String Email = "Email";
public final static String Cinema = "Cinema";
}
//傳遞對象來源
public void onClick(View v) {
Intent intent = new Intent(MainActivity.this,
LoginNewActivity.class);
intent.putExtra(AppConstants.Email, "[email protected]");

CinemaBean cinema = new CinemaBean();
cinema.setCinemaId("1");
cinema.setCinemaName("星美");

//使用intent上掛可序列化實體的方式傳遞參數
intent.putExtra(AppConstants.Cinema, cinema);

startActivity(intent);
}
//接收數據
Bundle bundle = getIntent().getExtras();
strEmail = bundle.getString(AppConstants.Email);

CinemaBean cinema = (CinemaBean)getIntent()
.getSerializableExtra(AppConstants.Cinema);
if (cinema != null) {
cinemaName = cinema.getCinemaName();
} else {
cinemaName = "";
}
//這裡的CinemaBean要實現Serializable接口,以支持序列化:
public class CinemaBean implements Serializable {
private static final long serialVersionUID = 1L;}
5>Adapter模板
//要求所有的Adapter都繼承自BaseAdapter,從構造函數注入List<自定義實體>這樣的數據集合,從而完成ListView的填充工作。
public class CinemaAdapter extends BaseAdapter {
private final ArrayList cinemaList;
private final AppBaseActivity context;

public CinemaAdapter(ArrayList cinemaList,
AppBaseActivity context) {
this.cinemaList = cinemaList;
this.context = context;
}

public int getCount() {
return cinemaList.size();
}

public CinemaBean getItem(final int position) {
return cinemaList.get(position);
}

public long getItemId(final int position) {

return position;
}

public View getView(final int position, View convertView,
final ViewGroup parent) {
final Holder holder;
if (convertView == null) {
holder = new Holder();
convertView = context.getLayoutInflater().inflate(
R.layout.item_cinemalist, null);
holder.tvCinemaName = (TextView) convertView
.findViewById(R.id.tvCinemaName);
holder.tvCinemaId = (TextView) convertView
.findViewById(R.id.tvCinemaId);
convertView.setTag(holder);
} else {
holder = (Holder) convertView.getTag();
}

CinemaBean cinema = cinemaList.get(position);
holder.tvCinemaName.setText(cinema.getCinemaName());
holder.tvCinemaId.setText(cinema.getCinemaId());
return convertView;
}

class Holder {
TextView tvCinemaName;
TextView tvCinemaId;
}
}
----對於每個自定義的Adapter,都要實現以下4個方法: getCount()、getItem()、getItemId()、getView() ----此外,還要內置一個Holder嵌套類,用於存放ListView中每一行中的控件。ViewHolder的存在,可以避免頻繁創建用一個列表項,從 而極大地節省內存。 ====那麼,在Activity中,在使用Adapter的地方,按照下面的方式把列表數據傳遞過去:
public class ListDemoActivity extends AppBaseActivity {
ListView lvCinemaList;
ArrayList cinemaList;

@Override
protected void initVariables() {
cinemaList = new ArrayList();
CinemaBean cinema1 = new CinemaBean();
cinema1.setCinemaId("1");
cinema1.setCinemaName("星美");
CinemaBean cinema2 = new CinemaBean();
cinema2.setCinemaId("2");
cinema2.setCinemaName("萬達");

cinemaList.add(cinema1);
cinemaList.add(cinema2);
}

@Override
protected void initViews(Bundle savedInstanceState) {
setContentView(R.layout.activity_listdemo);

lvCinemaList = (ListView) findViewById(R.id.lvCinemalist);

CinemaAdapter adapter = new CinemaAdapter(
cinemaList, ListDemoActivity.this);
lvCinemaList.setAdapter(adapter);
lvCinemaList.setOnItemClickListener(
new AdapterView.OnItemClickListener() {
@Override
public void onItemClick(AdapterViewparent, View view,
int position, long id) {
//do something
}
});
}

@Override
protected void loadData() {

}}
6、類型安全轉換函數 統計線上崩潰問題時,發現因為類型轉換不正確導致的崩潰占了很大的比例。主要集中在兩個地方:Object類型的對象、substring函數。 1)對於一個Object類型的對象,直接使用字符串操作函數toString,當其為null時就會崩潰。 解決方法:
public class Utils {
/**
*
* @Title: convertToInt
* @Description: 對象轉化為整數數字類型
* @param value
* @param defaultValue
* @return integer
* @throws
*/
public final static int convertToInt(Object value, int defaultValue) {
if (value == null || "".equals(value.toString().trim())) {
return defaultValue;
}
try {
return Integer.valueOf(value.toString());
} catch (Exception e) {
try {
return Double.valueOf(value.toString()).intValue();
} catch (Exception e1) {
return defaultValue;
}
}
}
}
再通過此種方式引用,就不會崩潰了: int result = Utils.converToInt(obj , 0); 2)如果長度不夠,那麼執行substring函數的時候,就會崩潰: Java的substring函數有2個參數:start和end。 --解決方法:
String cityName = "T";
String firstLetter = "";
if(cityName.length() > 1) {
firstLetter = cityName.substring(1, 2);
}
====總結: 以上兩類問題的根源,都來自MobileAPI返回的數據,由此而引出另一個很嚴肅的問題,對於從MobileAPI返回的數據,對待數據要分級別 對待: 1)對於那些不需要加工就能直接展示的數據,即使為空,只要在頁面不顯示就行,不會影響到邏輯。 2)對於那些很重要的數據,比如涉及到支付的金額不能為空時的邏輯,這是需要彈出提示框提示用戶當前服務不可用,並停止接下來的工 作。
 Android 之Handle的使用原理理解
Handle的使用,首先我們要明白一點,那就是Handle的用處,Handle是用來做什麼的,明白了這點,那麼我在來理解下面的內容。 一:接下來我來說明一下Handl
 Swift基礎之顯示波紋樣式
最近項目用到了藍牙連接,搜索設備的內容,其中需要搜索過程中出現波紋的動畫效果,在這裡將項目中OC語言編寫的這種動畫效果,轉換成Swift編寫,下面簡單介紹說明一下代碼。這
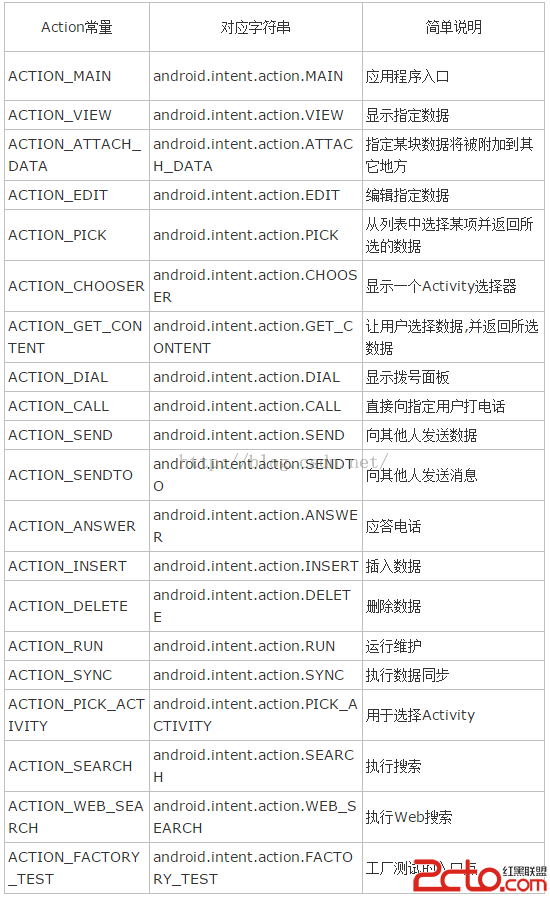 使用Android提供的大量標准Action,Category調用系統Activity
Android提供了大量的標准Action,Category:例子,查看並獲取聯系人電話用戶點擊按鈕值會顯示系統的聯系人列表,當用戶單擊聯系人之後,程序將會顯示該聯系人的
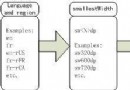 Android屏幕適配規則
要適配不同的屏幕,首要需要的是要能夠將不同的屏幕分辨出來,android提供了若干不同的維度來進行限定(qualifier,有的翻譯為限定詞)上圖所示為常用的一些維度,不