編輯:關於Android編程
下面給大家分享一個有趣的動畫:這裡比較適合一張圖片的翻轉,如果是多張圖片,可以參考APIDemo裡的例子,就是加個ArrayAdapter,還是簡單的,也可以自己發揮修改,實現自己想要的。這裡的代碼基本上可以直接運行項目了。
在main.xml裡加個ImageView,如
復制代碼 代碼如下:
<?xml version="1.0" encoding="utf-8"?>
<FrameLayout xmlns:android="http://schemas.android.com/apk/res/android"
android:id="@+id/container"
android:layout_width="fill_parent"
android:layout_height="fill_parent">
<ImageView
android:id="@+id/image"
android:layout_width="wrap_content"
android:layout_height="wrap_content"
android:text="Rotate"
android:textSize="50px"
android:layout_x="150px"
android:layout_y="30px"
android:src="@drawable/ro">
></ImageView>
</FrameLayout>
這個不需要解釋吧,都可以看懂的
最後,還需要一個activity類
如:
復制代碼 代碼如下:
public class TestRotate extends Activity implements OnClickListener{
private mageView imageview;
private ViewGroup mContainer;
/**
*這個變量設置的是圖片,如果是多張圖片,那麼可以用數組,如
*private static final int IMAGE = new int[]{
* R.drawable.ro,
* R.drawable.icon
*};
*有多少圖片就放多少,我這裡做的只是一張圖片的翻轉
*
*/
private static final int IMAGE = R.drawable.ro;
/** Called when the activity is first created. */
@Override
public void onCreate(Bundle savedInstanceState) {
super.onCreate(savedInstanceState);
setContentView(R.layout.main);
imageview = (ImageView) findViewById(R.id.image);
mContainer = (ViewGroup) findViewById(R.id.container);
/**
* 設置最新顯示的圖片
* 如果是數組,那麼可以寫成IMAGE[int]
*
*/
imageview.setImageResource(IMAGE);
/**
*
* 設置ImageView的OnClickListener
*
*/
imageview.setClickable(true);
imageview.setFocusable(true);
imageview.setOnClickListener(this);
}
private void applyRotation(int position, float start, float end) {
// Find the center of the container
final float centerX = mContainer.getWidth() / 2.0f;
final float centerY = mContainer.getHeight() / 2.0f;
final Rotate3d rotation =
new Rotate3d(start, end, centerX, centerY, 310.0f, true);
rotation.setDuration(500);
rotation.setFillAfter(true);
rotation.setInterpolator(new AccelerateInterpolator());
rotation.setAnimationListener(new DisplayNextView(position));
mContainer.startAnimation(rotation);
}
@Override
public void onClick(View v) {
// TODO Auto-generated method stub
/**
*
* 調用這個方法,就是翻轉圖片
* 參數很簡單,大家都應該看得懂
* 簡單說下,第一個是位置,第二是開始的角度,第三個是結束的角度
* 這裡需要說明的是,如果是要回到上一張
* 把第一個參數設置成-1就行了
*
*/
applyRotation(0,0,90);
}
private final class DisplayNextView implements Animation.AnimationListener {
private final int mPosition;
private DisplayNextView(int position) {
mPosition = position;
}
public void onAnimationStart(Animation animation) {
}
public void onAnimationEnd(Animation animation) {
mContainer.post(new SwapViews(mPosition));
}
public void onAnimationRepeat(Animation animation) {
}
}
/**
* This class is responsible for swapping the views and start the second
* half of the animation.
*/
private final class SwapViews implements Runnable {
private final int mPosition;
public SwapViews(int position) {
mPosition = position;
}
public void run() {
final float centerX = mContainer.getWidth() / 2.0f;
final float centerY = mContainer.getHeight() / 2.0f;
Rotate3d rotation;
if (mPosition > -1) {
imageview.setVisibility(View.VISIBLE);
imageview.requestFocus();
rotation = new Rotate3d(90, 180, centerX, centerY, 310.0f, false);
} else {
imageview.setVisibility(View.GONE);
rotation = new Rotate3d(90, 0, centerX, centerY, 310.0f, false);
}
rotation.setDuration(500);
rotation.setFillAfter(true);
rotation.setInterpolator(new DecelerateInterpolator());
mContainer.startAnimation(rotation);
}
}
}
 Android基礎之——MacOSX下elipse開發環境的配置
前不久換了台macbook,然後自己就把開發環境給配好了,本來這事就這麼過去了,今天有位博友留言讓我寫一篇關於配置的文章,考慮到這個東西確實以後可能還會用,那就寫下來,分
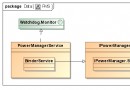 Android7.0 PowerManagerService(1) 啟動過程
PowerManagerService負責Android系統中電源管理方面的工作,為了簡便我們在下文中將其簡稱為PMS。我們先大致了解一下PMS在Android中的整體結
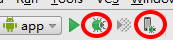 AndroidStudio的debug功能詳解
運行debug模式 1. 進入debug- 點擊圖中紅色圓圈圈起的左邊綠色按鈕,運行app的debug模式,快捷鍵Shift+F9- 點擊圖中紅色圓圈圈起的右邊按鈕,可以
 使用RoundedBitmapDrawable生成圓角圖片的方法
Bitmap src = BitmapFactory.decodeResource(getResources(), imageId); //獲取Bitmap圖片Round