編輯:關於Android編程
一般使用過UCWEB-Android版的人都應該對其特殊的menu有一定的印象,把menu做成Tab-Menu(支持分頁的Menu),可以容納比Android傳統的menu更豐富的內容(Android的menu超過6項則縮略在[更多]裡),本文參考網上的例子的基礎上對例子進行簡化以及封裝,使其作為一個復合控件融入自己的framework。
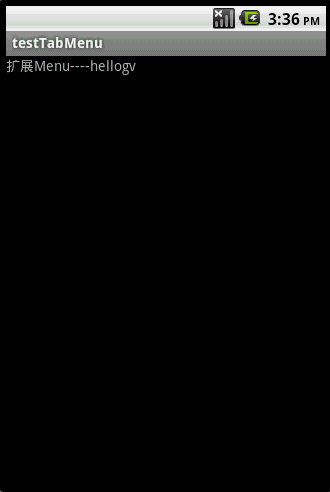
先來看看本文程序運行的效果如下圖所示:
TabMenu本身就是一個PopupWindow,PopupWindow上面放了兩個GridView,第一個GridView就是分頁標簽,位於PopupWindow的頂部,第二個GridView是菜單,位於PopupWindow的主體。為了實現PopupWindow的彈出/退出的動畫效果,本文使用了以下代碼:
在工程的res文件夾裡添加anim子目錄,再新建文件popup_enter.xml:
<?xml version="1.0" encoding="utf-8"?>
<set xmlns:android="http://schemas.android.com/apk/res/android">
 <translate android:fromYDelta="100%p" android:toYDelta="0" android:duration="1000" />
 <alpha android:fromAlpha="0.0" android:toAlpha="1.0" android:duration="1000" />
</set>
新建文件popup_exit.xml:
<?xml version="1.0" encoding="utf-8"?>
<set xmlns:android="http://schemas.android.com/apk/res/android">
 <translate android:fromYDelta="0" android:toYDelta="100%p" android:duration="1000" />
 <alpha android:fromAlpha="1.0" android:toAlpha="0.0" android:duration="1000" />
</set>
在工程的values文件夾裡新建文件popup_animation.xml:
<?xml version="1.0" encoding="utf-8"?>
<resources>
  <style name="PopupAnimation" parent="android:Animation">
    <item name="android:windowEnterAnimation">@anim/popup_enter</item>
    <item name="android:windowExitAnimation">@anim/popup_exit</item>
  </style>
</resources>
main.xml的源碼如下:
<?xml version="1.0" encoding="utf-8"?>
<LinearLayout android:id="@+id/LinearLayout01"
 android:layout_width="fill_parent" android:layout_height="fill_parent"
 xmlns:android="http://schemas.android.com/apk/res/android">
 <TextView android:id="@+id/TextView01" android:layout_height="wrap_content"
 android:layout_width="fill_parent" android:text="擴展Menu----hellogv"></TextView>
</LinearLayout>
TabMenu的封裝類TabMenu.java的源碼如下:
package com.testTabMenu;
import android.content.Context;
import android.graphics.Color;
import android.graphics.drawable.ColorDrawable;
import android.view.Gravity;
import android.view.View;
import android.view.ViewGroup;
import android.widget.BaseAdapter;
import android.widget.GridView;
import android.widget.ImageView;
import android.widget.LinearLayout;
import android.widget.PopupWindow;
import android.widget.TextView;
import android.widget.AdapterView.OnItemClickListener;
import android.widget.LinearLayout.LayoutParams;
public class TabMenu extends PopupWindow{
 private GridView gvBody, gvTitle;
 private LinearLayout mLayout;
 private MenuTitleAdapter titleAdapter;
 public TabMenu(Context context,OnItemClickListener titleClick,OnItemClickListener bodyClick,
 MenuTitleAdapter titleAdapter,int colorBgTabMenu,int aniTabMenu){
 super(context);
 mLayout = new LinearLayout(context);
 mLayout.setOrientation(LinearLayout.VERTICAL);
 //標題選項欄
 gvTitle = new GridView(context);
 gvTitle.setLayoutParams(new LayoutParams(LayoutParams.FILL_PARENT, LayoutParams.WRAP_CONTENT));
 gvTitle.setNumColumns(titleAdapter.getCount());
 gvTitle.setStretchMode(GridView.STRETCH_COLUMN_WIDTH);
 gvTitle.setVerticalSpacing(1);
 gvTitle.setHorizontalSpacing(1);
 gvTitle.setGravity(Gravity.CENTER);
 gvTitle.setOnItemClickListener(titleClick);
 gvTitle.setAdapter(titleAdapter);
 gvTitle.setSelector(new ColorDrawable(Color.TRANSPARENT));//選中的時候為透明色
 this.titleAdapter=titleAdapter;
 //子選項欄
 gvBody = new GridView(context);
 gvBody.setLayoutParams(new LayoutParams(LayoutParams.FILL_PARENT,LayoutParams.WRAP_CONTENT));
 gvBody.setSelector(new ColorDrawable(Color.TRANSPARENT));//選中的時候為透明色
 gvBody.setNumColumns(4);
 gvBody.setStretchMode(GridView.STRETCH_COLUMN_WIDTH);
 gvBody.setVerticalSpacing(10);
 gvBody.setHorizontalSpacing(10);
 gvBody.setPadding(10, 10, 10, 10);
 gvBody.setGravity(Gravity.CENTER);
 gvBody.setOnItemClickListener(bodyClick);
 mLayout.addView(gvTitle);
 mLayout.addView(gvBody);
 //設置默認項
 this.setContentView(mLayout);
 this.setWidth(LayoutParams.FILL_PARENT);
 this.setHeight(LayoutParams.WRAP_CONTENT);
 this.setBackgroundDrawable(new ColorDrawable(colorBgTabMenu));// 設置TabMenu菜單背景
 this.setAnimationStyle(aniTabMenu);
 this.setFocusable(true);// menu菜單獲得焦點 如果沒有獲得焦點menu菜單中的控件事件無法響應
 }
 public void SetTitleSelect(int index)
 {
 gvTitle.setSelection(index);
 this.titleAdapter.SetFocus(index);
 }
 public void SetBodySelect(int index,int colorSelBody)
 {
 int count=gvBody.getChildCount();
 for(int i=0;i<count;i++)
 {
  if(i!=index)
  ((LinearLayout)gvBody.getChildAt(i)).setBackgroundColor(Color.TRANSPARENT);
 }
 ((LinearLayout)gvBody.getChildAt(index)).setBackgroundColor(colorSelBody);
 }
 public void SetBodyAdapter(MenuBodyAdapter bodyAdapter)
 {
 gvBody.setAdapter(bodyAdapter);
 }
 /**
 * 自定義Adapter,TabMenu的每個分頁的主體
 *
 */
 static public class MenuBodyAdapter extends BaseAdapter {
 private Context mContext;
 private int fontColor,fontSize;
 private String[] texts;
 private int[] resID;
 /**
  * 設置TabMenu的分頁主體
  * @param context 調用方的上下文
  * @param texts 按鈕集合的字符串數組
  * @param resID 按鈕集合的圖標資源數組
  * @param fontSize 按鈕字體大小
  * @param color 按鈕字體顏色
  */
 public MenuBodyAdapter(Context context, String[] texts,int[] resID, int fontSize,int fontColor)
 {
  this.mContext = context;
  this.fontColor = fontColor;
  this.texts = texts;
  this.fontSize=fontSize;
  this.resID=resID;
 }
 public int getCount() {
  return texts.length;
 }
 public Object getItem(int position) {

  return makeMenyBody(position);
 }
 public long getItemId(int position) {
  return position;
 }
 private LinearLayout makeMenyBody(int position)
 {
  LinearLayout result=new LinearLayout(this.mContext);
  result.setOrientation(LinearLayout.VERTICAL);
  result.setGravity(Gravity.CENTER_HORIZONTAL|Gravity.CENTER_VERTICAL);
  result.setPadding(10, 10, 10, 10);

  TextView text = new TextView(this.mContext);
  text.setText(texts[position]);
  text.setTextSize(fontSize);
  text.setTextColor(fontColor);
  text.setGravity(Gravity.CENTER);
  text.setPadding(5, 5, 5, 5);
  ImageView img=new ImageView(this.mContext);
  img.setBackgroundResource(resID[position]);
  result.addView(img,new LinearLayout.LayoutParams(new LayoutParams(LayoutParams.WRAP_CONTENT,LayoutParams.WRAP_CONTENT)));
  result.addView(text);
  return result;
 }
 public View getView(int position, View convertView, ViewGroup parent) {
  return makeMenyBody(position);
 }
 }
 /**
 * 自定義Adapter,TabMenu的分頁標簽部分
 *
 */
 static public class MenuTitleAdapter extends BaseAdapter {
 private Context mContext;
    private int fontColor,unselcolor,selcolor;
    private TextView[] title;
    /**
     * 設置TabMenu的title
     * @param context 調用方的上下文
     * @param titles 分頁標簽的字符串數組
     * @param fontSize 字體大小
     * @param fontcolor 字體顏色
     * @param unselcolor 未選中項的背景色
     * @param selcolor 選中項的背景色
     */
    public MenuTitleAdapter(Context context, String[] titles, int fontSize,
        int fontcolor,int unselcolor,int selcolor) {
      this.mContext = context;
      this.fontColor = fontcolor;
      this.unselcolor = unselcolor;
      this.selcolor=selcolor;
      this.title = new TextView[titles.length];
      for (int i = 0; i < titles.length; i++) {
        title[i] = new TextView(mContext);
        title[i].setText(titles[i]);
        title[i].setTextSize(fontSize);
        title[i].setTextColor(fontColor);
        title[i].setGravity(Gravity.CENTER);
        title[i].setPadding(10, 10, 10, 10);
      }
    }
    public int getCount() {
      return title.length;
    }
    public Object getItem(int position) {
      return title[position];
    }
    public long getItemId(int position) {
      return title[position].getId();
    }
    /**
     * 設置選中的效果
     */
    private void SetFocus(int index)
    {
     for(int i=0;i<title.length;i++)
     {
     if(i!=index)
     {
      title[i].setBackgroundDrawable(new ColorDrawable(unselcolor));//設置沒選中的顏色
          title[i].setTextColor(fontColor);//設置沒選中項的字體顏色
     }
     }
     title[index].setBackgroundColor(0x00);//設置選中項的顏色
      title[index].setTextColor(selcolor);//設置選中項的字體顏色
    }
    public View getView(int position, View convertView, ViewGroup parent) {
      View v;
      if (convertView == null) {
        v = title[position];
      } else {
        v = convertView;
      }
      return v;
    }
 }
}
testTabMenu介紹了數據的定義以及TabMenu的使用,源碼如下:
package com.testTabMenu;
import android.app.Activity;
import android.graphics.Color;
import android.os.Bundle;
import android.view.Gravity;
import android.view.Menu;
import android.view.View;
import android.widget.AdapterView;
import android.widget.AdapterView.OnItemClickListener;
import android.widget.Toast;
public class testTabMenu extends Activity {
 TabMenu.MenuBodyAdapter []bodyAdapter=new TabMenu.MenuBodyAdapter[3];
 TabMenu.MenuTitleAdapter titleAdapter;
 TabMenu tabMenu;
 int selTitle=0;
 @Override
 public void onCreate(Bundle savedInstanceState) {
 super.onCreate(savedInstanceState);
 setContentView(R.layout.main);
 //設置分頁欄的標題
 titleAdapter = new TabMenu.MenuTitleAdapter(this, new String[] { "常用",
  "設置", "工具" }, 16, 0xFF222222,Color.LTGRAY,Color.WHITE);
 //定義每項分頁欄的內容
 bodyAdapter[0]=new TabMenu.MenuBodyAdapter(this,new String[] { "常用1", "常用2", },
   new int[] { R.drawable.menu_test,
  R.drawable.menu_bookmark},13, 0xFFFFFFFF);
 bodyAdapter[1]=new TabMenu.MenuBodyAdapter(this,new String[] { "設置1", "設置2",
   "設置3"}, new int[] { R.drawable.menu_edit,
   R.drawable.menu_delete, R.drawable.menu_fullscreen},13, 0xFFFFFFFF);
 bodyAdapter[2]=new TabMenu.MenuBodyAdapter(this,new String[] { "工具1", "工具2",
   "工具3", "工具4" }, new int[] { R.drawable.menu_copy,
   R.drawable.menu_cut, R.drawable.menu_normalmode,
   R.drawable.menu_quit },13, 0xFFFFFFFF);
 tabMenu=new TabMenu(this,
   new TitleClickEvent(),
   new BodyClickEvent(),
   titleAdapter,
   0x55123456,//TabMenu的背景顏色
   R.style.PopupAnimation);//出現與消失的動畫
  tabMenu.update();
  tabMenu.SetTitleSelect(0);
  tabMenu.SetBodyAdapter(bodyAdapter[0]);
 }
 class TitleClickEvent implements OnItemClickListener{
 @Override
 public void onItemClick(AdapterView<?> arg0, View arg1, int arg2,
  long arg3) {
  selTitle=arg2;
  tabMenu.SetTitleSelect(arg2);
  tabMenu.SetBodyAdapter(bodyAdapter[arg2]);
 }
 }
 class BodyClickEvent implements OnItemClickListener{
 @Override
 public void onItemClick(AdapterView<?> arg0, View arg1, int arg2,
  long arg3) {
  tabMenu.SetBodySelect(arg2,Color.GRAY);
  String str="第"+String.valueOf(selTitle)+"欄/n/r"
  +"第"+String.valueOf(arg2)+"項";
  Toast.makeText(testTabMenu.this, str, 500).show();
 }
 }
 @Override
 /**
 * 創建MENU
 */
 public boolean onCreateOptionsMenu(Menu menu) {
 menu.add("menu");// 必須創建一項
 return super.onCreateOptionsMenu(menu);
 }
 @Override
 /**
 * 攔截MENU
 */
 public boolean onMenuOpened(int featureId, Menu menu) {
 if (tabMenu != null) {
  if (tabMenu.isShowing())
  tabMenu.dismiss();
  else {
  tabMenu.showAtLocation(findViewById(R.id.LinearLayout01),
   Gravity.BOTTOM, 0, 0);
  }
 }
 return false;// 返回為true 則顯示系統menu
 }
}
感興趣的讀者可以自己動手測試一下本文所述實例,相信會對大家的Android程序開發有一定幫助。
 [Android][Android Studio] Gradle項目中添加JNI生成文件(.so文件)
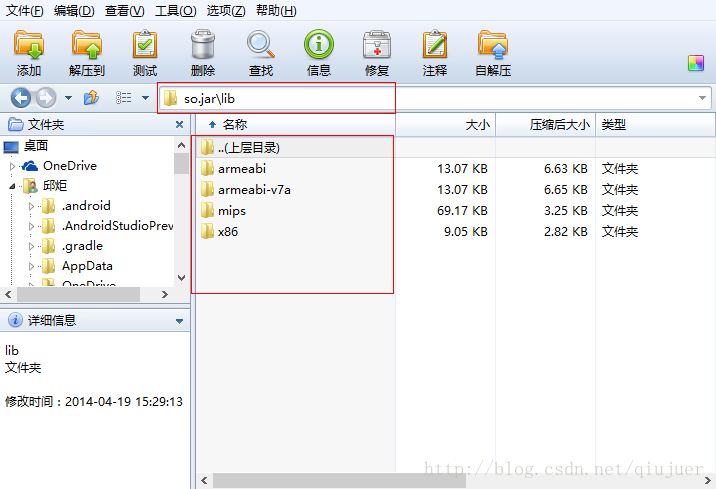
對於從Eclipse遷移項目到Android Studio中添加.jar文件和.so文件無疑是一件很重要也是很頭疼的問題!在最新版本中,默認是自動打包libs下面的所有.
 《第一行代碼》目錄
圖書目錄:第1章 開始啟程,你的第一行Android代碼 1.1 了解全貌,Android王國簡介 1.1.1 Android系統架構 1.1.2 Andro
 由淺入深 細細體會Android的視圖滾動
其實對於接觸過Android開發的人來說,視圖的滑動並不陌生,因為這一功能特性可以說是隨處可見。常用的就例如ScrollView、HorizontalScrollView
 Android 手機無法連接mac解決辦法
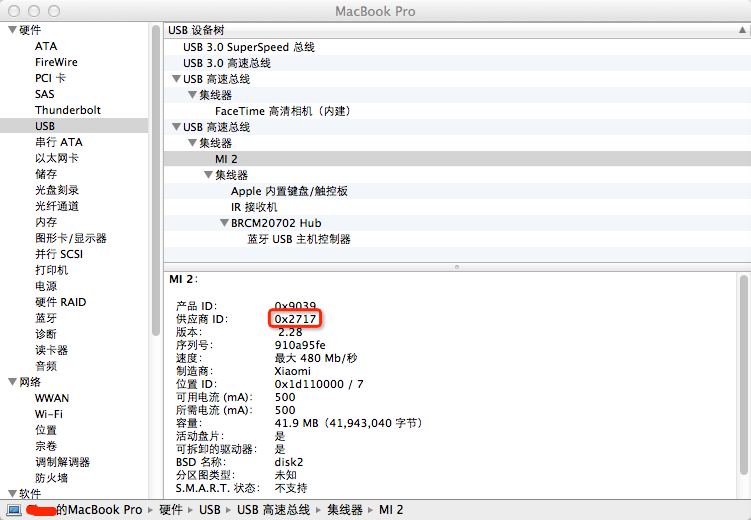
Android 手機無法連接mac解決辦法一般的android連接mac 很方便不用安裝驅動就可以啦,可是不知道為什麼二般情況下有的android手機(小米2,華為等)就