編輯:關於Android編程
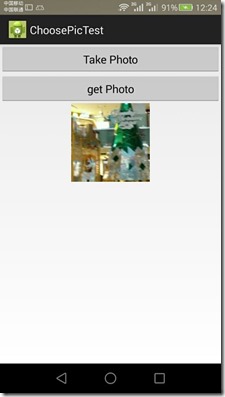
下面是效果圖,看看是不是親想要的效果圖,如果是,這段代碼你就可以參考下了,但是要靈活運用,根據需求做相應的改動。
<LinearLayout xmlns:android="http://schemas.android.com/apk/res/android"
 android:layout_width="match_parent"
 android:layout_height="match_parent"
 android:orientation="vertical" >
 <Button
  android:id="@+id/take_photo"
  android:layout_width="match_parent"
  android:layout_height="wrap_content"
  android:text="Take Photo" />
 <Button
  android:id="@+id/get_photo"
  android:layout_width="match_parent"
  android:layout_height="wrap_content"
  android:text="get Photo" />
 <ImageView
  android:id="@+id/picture"
  android:layout_width="wrap_content"
  android:layout_height="wrap_content"
  android:layout_gravity="center_horizontal" />
</LinearLayout>
package com.example.choosepictest;
import java.io.File;
import java.io.IOException;
import android.app.Activity;
import android.content.Intent;
import android.graphics.Bitmap;
import android.net.Uri;
import android.os.Bundle;
import android.os.Environment;
import android.provider.MediaStore;
import android.view.View;
import android.view.View.OnClickListener;
import android.widget.Button;
import android.widget.ImageView;
public class MainActivity extends Activity implements OnClickListener {
 public static final int TAKE_PHOTO = 1;
 public static final int CROP_PHOTO = 2;
 public static final int GET_PHOTO = 3;
 private Button takePhoto;
 private Button getPhoto;
 private ImageView picture;
 private Uri headImgUri;
 @Override
 protected void onCreate(Bundle savedInstanceState) {
  super.onCreate(savedInstanceState);
  setContentView(R.layout.activity_main);
  takePhoto = (Button) findViewById(R.id.take_photo);
  getPhoto = (Button) findViewById(R.id.get_photo);
  picture = (ImageView) findViewById(R.id.picture);
  takePhoto.setOnClickListener(this);
  getPhoto.setOnClickListener(this);
 }
 @Override
 public void onClick(View v) {
  switch (v.getId()) {
  case R.id.take_photo:
   takePhoto();
   break;
  case R.id.get_photo:
   getPhoto();
   break;
  default:
   break;
  }
 }
 // 拍照
 private void takePhoto() {
  File appDir = new File(Environment.getExternalStorageDirectory(),
    "/etoury/picCache");
  if (!appDir.exists()) {
   appDir.mkdir();
  }
  String fileName = "user_head" + ".jpg";
  File outputImage = new File(appDir, fileName);
  try {
   if (outputImage.exists()) {
    outputImage.delete();
   }
   outputImage.createNewFile();
  } catch (IOException e) {
   e.printStackTrace();
  }
  headImgUri = Uri.fromFile(outputImage);
  Intent intent = new Intent("android.media.action.IMAGE_CAPTURE");
  intent.putExtra(MediaStore.EXTRA_OUTPUT, headImgUri);
  startActivityForResult(intent, TAKE_PHOTO);
 }
 // 定向到圖片庫
 private void getPhoto() {
  Intent intent = new Intent(Intent.ACTION_PICK,
    android.provider.MediaStore.Images.Media.EXTERNAL_CONTENT_URI);
  startActivityForResult(intent, GET_PHOTO);
 }
 /**
  * 裁剪
  */
 private void crop(Uri uri) {
  // 裁剪圖片意圖
  Intent intent = new Intent("com.android.camera.action.CROP");
  intent.setDataAndType(uri, "image/*");
  // 下面這個crop=true是設置在開啟的Intent中設置顯示的VIEW可裁剪
  intent.putExtra("crop", "true");
  intent.putExtra("scale", true);// 去黑邊
  // 裁剪框的比例,1:1
  intent.putExtra("aspectX", 1);// 輸出是X方向的比例
  intent.putExtra("aspectY", 1);
  // 裁剪後輸出圖片的尺寸大小,不能太大500程序崩潰
  intent.putExtra("outputX", 256);
  intent.putExtra("outputY", 256);
  // 圖片格式
  /* intent.putExtra("outputFormat", "JPEG"); */
  intent.putExtra("outputFormat", Bitmap.CompressFormat.JPEG.toString());
  // intent.putExtra("noFaceDetection", true);// 取消人臉識別
  intent.putExtra("return-data", true);// true:返回uri,false:不返回uri
  // 同一個地址下 裁剪的圖片覆蓋拍照的圖片
  intent.putExtra(MediaStore.EXTRA_OUTPUT, headImgUri);
  startActivityForResult(intent, CROP_PHOTO);
 }
 @Override
 protected void onActivityResult(int requestCode, int resultCode, Intent data) {
  switch (requestCode) {
  case GET_PHOTO:
   if (resultCode == RESULT_OK) {
    crop(data.getData());
   }
   break;
  case TAKE_PHOTO:
   if (resultCode == RESULT_OK) {
    crop(headImgUri);
   }
   break;
  case CROP_PHOTO:
   if (resultCode == RESULT_OK) {
    Bitmap cropbitmap = data.getParcelableExtra("data");
    picture.setImageBitmap(cropbitmap);
   }
   break;
  default:
   break;
  }
 }
}
總結:
1. 拍照返回一張圖片,可以是全尺寸的圖片
2. 拍照返回圖片的地址問題,一個目錄下的一個文件
3. 裁剪的圖片的地址, 覆蓋了全尺寸圖片的地址
4. 相冊intent 返回的是一個uir , 不是string
5. 裁剪的圖片,不能覆蓋相冊返回的uri(一定注意)
 android開發之自定義AutoCompleteTextView
AutoCompleteTextView,很多人都用過,有些情況下使用Google提供的ArrayAdapter作為適配器就可以完成需求,但是在實際開發中,我們經常需要開
 Android debuggerd 源碼分析
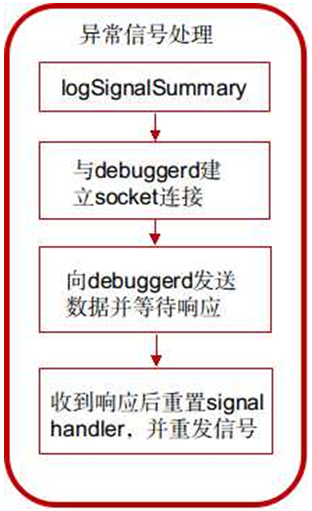
debuggerd 簡介 Android系統自帶一個實用的程序異常退出的診斷daemon debuggerd。此進程可以偵測到程序崩潰,並將崩潰時的進程狀態信息輸出到文件
 實例講解Android中SQLiteDatabase使用方法
SQLite數據庫是android系統內嵌的數據庫,小巧強大,能夠滿足大多數SQL語句的處理工作,而SQLite數據庫僅僅是個文件而已。雖然SQLite的有點很多,但並不
 安卓(Android)聊天機器人實現代碼分享
今天看到一個ios寫的圖靈機器人,直接去官網(http://www.tuling123.com/openapi/)看了下API接入,太簡單了,就一個get請求~於是乎,寫