編輯:關於Android編程
廢話不多說了,直接給大家貼代碼了。
布局文件xml:
<LinearLayout xmlns:android="http://schemas.android.com/apk/res/android"
xmlns:tools="http://schemas.android.com/tools"
android:layout_width="match_parent"
android:layout_height="match_parent"
android:orientation="vertical"
android:paddingBottom="@dimen/activity_vertical_margin"
android:paddingLeft="@dimen/activity_horizontal_margin"
android:paddingRight="@dimen/activity_horizontal_margin"
android:paddingTop="@dimen/activity_vertical_margin"
tools:context=".DialogActivity" >
<Button
android:id="@+id/plainDialog"
android:layout_width="match_parent"
android:layout_height="wrap_content"
android:text="普通Dialog" />
<Button
android:id="@+id/plainDialogEvent"
android:layout_width="match_parent"
android:layout_height="wrap_content"
android:text="Dialog按鈕事件集中處理" />
<Button
android:id="@+id/inputDialog"
android:layout_width="match_parent"
android:layout_height="wrap_content"
android:text="請輸入框" />
<Button
android:id="@+id/listDialog"
android:layout_width="match_parent"
android:layout_height="wrap_content"
android:text="列表對話框" />
<Button
android:id="@+id/radioDialog"
android:layout_width="match_parent"
android:layout_height="wrap_content"
android:text="單選對話框" />
<Button
android:id="@+id/checkboxDialog"
android:layout_width="match_parent"
android:layout_height="wrap_content"
android:text="多選對話框" />
<Button
android:id="@+id/diyDialog"
android:layout_width="match_parent"
android:layout_height="wrap_content"
android:text="自定義布局對話框" />
</LinearLayout>
Activity文件:
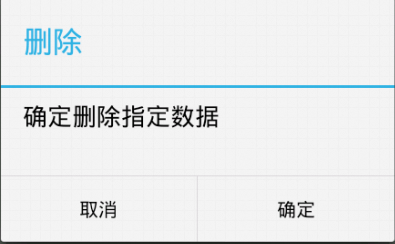
普通的dialog:
private void plainDialogDemo() {
Button plainBtn = (Button) findViewById(R.id.plainDialog);
plainBtn.setOnClickListener(new OnClickListener() {
public void onClick(View v) {
new AlertDialog.Builder(DialogActivity.this)
.setTitle("刪除")
.setMessage("確定刪除指定數據")
.setPositiveButton("確定",
new DialogInterface.OnClickListener() {
@Override
public void onClick(DialogInterface dialog,
int which) {
Toast.makeText(getApplicationContext(),
"確定了", Toast.LENGTH_SHORT)
.show();
}
})
.setNegativeButton("取消",
new DialogInterface.OnClickListener() {
@Override
public void onClick(DialogInterface dialog,
int which) {
}
}).setCancelable(false).show();
}
});
}
效果如下:
輸入文本框的dialog:
private void inputDialog() {
Button inputBtn = (Button) findViewById(R.id.inputDialog);
inputBtn.setOnClickListener(new OnClickListener() {
@Override
public void onClick(View v) {
// TODO Auto-generated method stub
final EditText et = new EditText(DialogActivity.this);
new AlertDialog.Builder(DialogActivity.this)
.setTitle("請輸入數字")
.setView(et)
.setPositiveButton("確定",
new DialogInterface.OnClickListener() {
@Override
public void onClick(DialogInterface dialog,
int which) {
// TODO Auto-generated method stub
Toast.makeText(getApplicationContext(),
et.getText(),
Toast.LENGTH_SHORT).show();
}
}).setNegativeButton("取消", null)
.setCancelable(false).show();
}
});
}
效果如下:

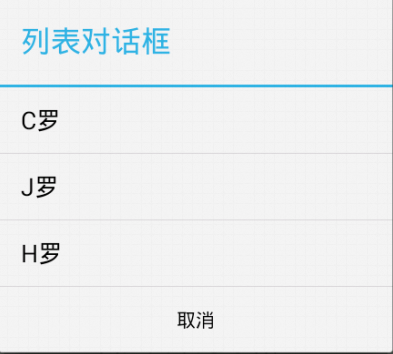
列表dialog:
private void listDialogDemo() {
Button listBtn = (Button) findViewById(R.id.listDialog);
listBtn.setOnClickListener(new OnClickListener() {
@Override
public void onClick(View v) {
final String[] names = { "C羅", "J羅", "H羅" };
new AlertDialog.Builder(DialogActivity.this).setTitle("列表對話框")
.setItems(names, new DialogInterface.OnClickListener() {
@Override
public void onClick(DialogInterface dialog,
int which) {
Toast.makeText(DialogActivity.this,
names[which], Toast.LENGTH_SHORT)
.show();
}
}).setNegativeButton("取消", null).show();
}
});
}
效果如下:
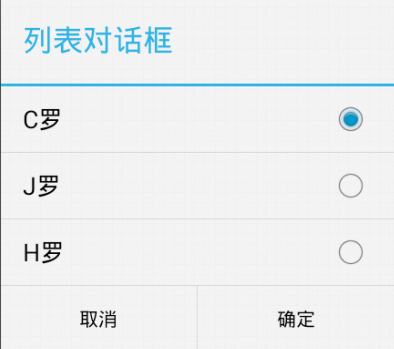
單選dialog:
private void radioDialogDemo() {
Button radioButton = (Button) findViewById(R.id.radioDialog);
radioButton.setOnClickListener(new OnClickListener() {
@Override
public void onClick(View v) {
final String[] names = { "C羅", "J羅", "H羅" };
new AlertDialog.Builder(DialogActivity.this)
.setTitle("列表對話框")
.setSingleChoiceItems(names, ,
new DialogInterface.OnClickListener() {
@Override
public void onClick(DialogInterface dialog,
int which) {
selecteName = names[which];
}
})
.setPositiveButton("確定",
new DialogInterface.OnClickListener() {
@Override
public void onClick(DialogInterface dialog,
int which) {
Toast.makeText(DialogActivity.this,
selecteName, Toast.LENGTH_SHORT)
.show();
}
}).setNegativeButton("取消", null).show();
}
});
}
效果如下:
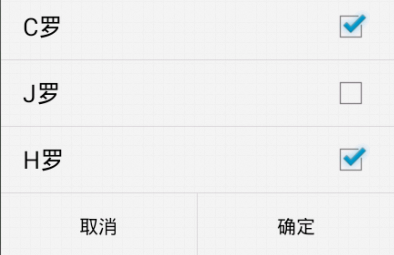
多選dialog:
private void checkDialogDemo() {
Button checkBtn = (Button) findViewById(R.id.checkboxDialog);
checkBtn.setOnClickListener(new OnClickListener() {
@Override
public void onClick(View v) {
final String[] names = { "C羅", "J羅", "H羅" };
final boolean[] selected = new boolean[] { true, false, true };
new AlertDialog.Builder(DialogActivity.this)
.setMultiChoiceItems(
names,
selected,
new DialogInterface.OnMultiChoiceClickListener() {
@Override
public void onClick(DialogInterface dialog,
int which, boolean isChecked) {
}
})
.setPositiveButton("確定",
new DialogInterface.OnClickListener() {
@Override
public void onClick(DialogInterface dialog,
int which) {
StringBuilder sb = new StringBuilder(
"你選擇了:");
for (int i = ; i < names.length; i++) {
if (selected[i]) {
sb.append(names[i]);
}
}
Toast.makeText(DialogActivity.this,
sb.toString(), ).show();
}
}).setNegativeButton("取消", null).show();
}
});
}
效果如下:
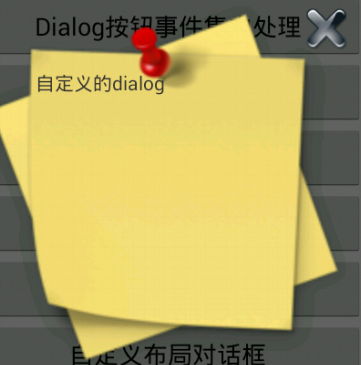
自定義dialog:
private void customDialogDemo() {
final AlertDialog dlg = new AlertDialog.Builder(this).create();
dlg.show();
Window window = dlg.getWindow();
window.setContentView(R.layout.diylayout);
ImageButton ok = (ImageButton) window.findViewById(R.id.btnok);
ok.setOnClickListener(new View.OnClickListener() {
@Override
public void onClick(View v) {
Toast.makeText(getApplicationContext(), "關閉了",
Toast.LENGTH_SHORT).show();
dlg.dismiss();
}
});
}
自定義布局:
<?xml version="." encoding="utf-"?>
<RelativeLayout xmlns:android="http://schemas.android.com/apk/res/android"
android:layout_width="match_parent"
android:layout_height="match_parent" >
<ImageView
android:id="@+id/dialogimg"
android:layout_width="wrap_content"
android:layout_height="wrap_content"
android:layout_centerInParent="true"
android:src="@drawable/dialog_bg" />
<TextView
android:layout_width="wrap_content"
android:layout_height="wrap_content"
android:layout_alignLeft="@id/dialogimg"
android:layout_alignTop="@id/dialogimg"
android:layout_marginLeft="dp"
android:layout_marginTop="dp"
android:text="自定義的dialog" />
<ImageButton
android:id="@+id/btnok"
android:layout_width="dp"
android:layout_height="dp"
android:layout_alignRight="@id/dialogimg"
android:layout_alignTop="@id/dialogimg"
android:layout_marginRight="dp"
android:layout_marginTop="dp"
android:background="@drawable/close_dialog" />
</RelativeLayout>
效果如:
有關Android Dialog對話框詳解小編就給大家介紹這麼多,希望對大家有所幫助!
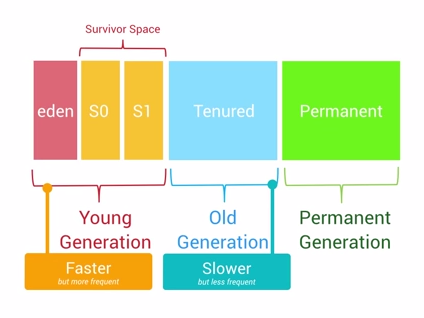 Android內存優化之OOM
Android的內存優化是性能優化中很重要的一部分,而避免OOM又是內存優化中比較核心的一點,這是一篇關於內存優化中如何避免OOM的總結性概要文章,內容大多都是和OOM有
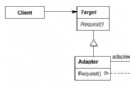 《Android源碼設計模式解析與實戰》讀書筆記(二十)
第二十章、適配器模式 適配器模式是結構型設計模式之一,它在我們的開發中使用率極高,比如ListView、GridView以及RecyclerView都需要使用Adapte
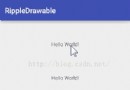 聊聊Android5.0中的水波紋效果
水波紋效果已經不是什麼稀罕的東西了,用過5.0新控件的小伙伴都知道這個效果,可是如果使用一個TextView或者Button或者其它普通控件的話,你是否知道如何給它設置水
 Android+SSH開發商城App(1)數據庫的創建和環境的搭建
項目簡介 該項目主要是使用SSH開發Android後端服務器程序和前端App代碼的實現,主要技術包含: Android AsyncTask 、常見自定義控件、客戶端高層類