編輯:關於Android編程
本文實例講述了Android創建可點擊的Button實現方法。分享給大家供大家參考,具體如下:
感覺到自己有必要學習下手機開發方面的知識,不論是為了以後的工作需求還是目前的公司項目。
當然,任何新東西的開始,必然伴隨著第一個HelloWorld,Android學習也不例外。既然才開始,我就不做過多的描述了。
對於Android開發的IDE:ADT來說,打開的第一眼有點迷糊,不過看了網上各種目錄結構的介紹,慢慢的就明白了,做這個實例,我們尤其需要關注兩個地方,一個是src目錄,一個就是res目錄下的layout目錄。src目錄放置的是code-behind源碼,而layout目錄放置的則是xml前台配置文件。
既然我們要實現的功能是點擊按鈕,然後EditText中顯示“Hello World!”。讓我們先打開layout文件,拖放一個Button上去,然後拖放一個EditText上去,最後的xml文件結構如下:
<RelativeLayout xmlns:android="http://schemas.android.com/apk/res/android"
  xmlns:tools="http://schemas.android.com/tools"
  android:layout_width="match_parent"
  android:layout_height="match_parent"
  android:paddingBottom="@dimen/activity_vertical_margin"
  android:paddingLeft="@dimen/activity_horizontal_margin"
  android:paddingRight="@dimen/activity_horizontal_margin"
  android:paddingTop="@dimen/activity_vertical_margin"
  tools:context=".MainActivity" >
  <Button
    android:id="@+id/button1"
    android:layout_width="wrap_content"
    android:layout_height="wrap_content"
    android:clickable="true"
    android:text="Button" />
  <EditText
    android:id="@+id/editText1"
    android:layout_width="wrap_content"
    android:layout_height="wrap_content"
    android:layout_alignBaseline="@+id/button1"
    android:layout_alignBottom="@+id/button1"
    android:layout_toRightOf="@+id/button1"
    android:text="EditText" />
</RelativeLayout>
然後在後台代碼文件中,我們需要引入兩個命名空間:
import android.widget.Button;
import android.widget.EditText;
全部代碼如下:
package com.example.helloworld;
import android.os.Bundle;
import android.app.Activity;
import android.view.Menu;
import android.view.View;
import android.widget.Button;
import android.widget.EditText;
public class MainActivity extends Activity {
  private Button myButton;
  private EditText myText;
  @Override
  protected void onCreate(Bundle savedInstanceState) {
    super.onCreate(savedInstanceState);
    setContentView(R.layout.activity_main);
    myButton = (Button)findViewById(R.id.button1);
    myText = (EditText)findViewById(R.id.editText1);
    myButton.setOnClickListener(new View.OnClickListener() {
      @Override
      public void onClick(View v) {
        // TODO Auto-generated method stub
        myText.setText("Hello World!");
      }
    });
  }
  @Override
  public boolean onCreateOptionsMenu(Menu menu) {
    // Inflate the menu; this adds items to the action bar if it is present.
    getMenuInflater().inflate(R.menu.main, menu);
    return true;
  }
}
然後點擊運行按鈕,在虛擬機界面中點擊按鈕,得到的結果如下圖:

這節就到這裡了,後面我們會繼續探秘。
更多關於Android相關內容感興趣的讀者可查看本站專題:《Android調試技巧與常見問題解決方法匯總》、《Android開發入門與進階教程》、《Android多媒體操作技巧匯總(音頻,視頻,錄音等)》、《Android基本組件用法總結》、《Android視圖View技巧總結》、《Android布局layout技巧總結》及《Android控件用法總結》
希望本文所述對大家Android程序設計有所幫助。
 Android View系統解析(上)
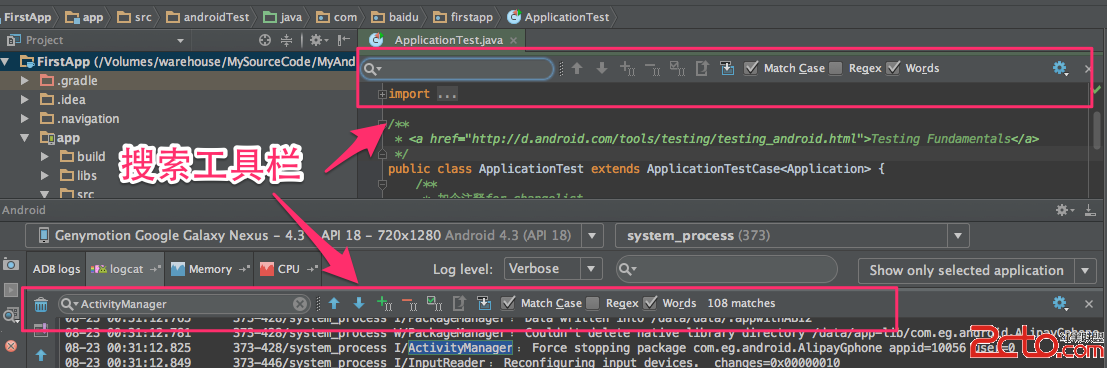 《Android Studio實用指南》12.18 文本搜索工具
Android Studio中提供了非常方便的搜索工具,可以在編輯器的文件中使用,也可以在android輸出的日志中使用,用法都是一樣的.打開搜索工具欄一. 在當前編輯的
 Unity —— protobuf 導excel表格數據
前言:之前使用NPOI插件編寫的導表工具,其實就是直接將數據進行序列化,解析時還需要進行反序列化,步驟比較繁復,最近看到Google的一個開源的項目protobuf,不僅
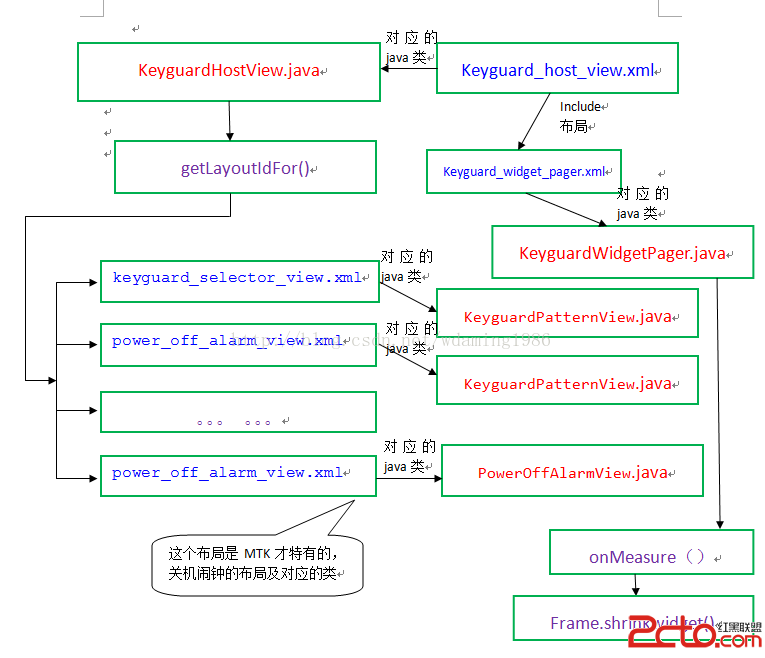
 使用Android Studio導入源碼
1 背景上路了,准備開始重操那兩年的舊業,後悔之前在上家公司做Amlogic和Realtak方案盒子時沒有養成寫博客的習慣,這算是開篇之作吧,順帶也算是給一個網友的答疑吧