編輯:關於Android編程
1、 題外話
相信大家對LayoutInflate都不陌生,特別在ListView的Adapter的getView方法中基本都會出現,使用inflate方法去加載一個布局,用於ListView的每個Item的布局。Inflate有三個參數,我在初學Android的時候這麼理解的:
(1)對於Inflate的三個參數(int resource, ViewGroup root, boolean attachToRoot);
(2)如果inflate(layoutId, null )則layoutId的最外層的控件的寬高是沒有效果的;
(3)如果inflate(layoutId, root, false ) 則認為和上面效果是一樣的;
(4)如果inflate(layoutId, root, true ) 則認為這樣的話layoutId的最外層控件的寬高才能正常顯示;
如果你也這麼認為,那麼你有就必要好好閱讀這篇文章,因為這篇文章首先會驗證上面的理解是錯誤的,然後從源碼角度去解釋,最後會從ViewGroup與View的角度去解釋。
2、 實踐是驗證真理的唯一標准
下面我寫一個特別常見的例子來驗證上面的理解是錯誤的,一個特別簡單的ListView,每個Item中放一個按鈕:
Activity的布局文件:
<ListView xmlns:android="http://schemas.android.com/apk/res/android"
xmlns:tools="http://schemas.android.com/tools"
android:id="@+id/id_listview"
android:layout_width="fill_parent"
android:layout_height="wrap_content" >
</ListView>
ListView的Item的布局文件:
<Button xmlns:android="http://schemas.android.com/apk/res/android"
  xmlns:tools="http://schemas.android.com/tools"
  android:id="@+id/id_btn"
  android:layout_width="120dp"
  android:layout_height="120dp" >

</Button>
ListView的適配器:
package com.example.zhy_layoutinflater;

import java.util.List;

import android.content.Context;
import android.view.LayoutInflater;
import android.view.View;
import android.view.ViewGroup;
import android.widget.BaseAdapter;
import android.widget.Button;

public class MyAdapter extends BaseAdapter
{

  private LayoutInflater mInflater;
  private List<String> mDatas;

  public MyAdapter(Context context, List<String> datas)
  {
    mInflater = LayoutInflater.from(context);
    mDatas = datas;
  }

  @Override
  public int getCount()
  {
    return mDatas.size();
  }

  @Override
  public Object getItem(int position)
  {
    return mDatas.get(position);
  }

  @Override
  public long getItemId(int position)
  {
    return position;
  }

  @Override
  public View getView(int position, View convertView, ViewGroup parent)
  {

    ViewHolder holder = null;
    if (convertView == null)
    {
      holder = new ViewHolder();
      convertView = mInflater.inflate(R.layout.item, null);
//     convertView = mInflater.inflate(R.layout.item, parent ,false);
//     convertView = mInflater.inflate(R.layout.item, parent ,true);
      holder.mBtn = (Button) convertView.findViewById(R.id.id_btn);
      convertView.setTag(holder);
    } else
    {
      holder = (ViewHolder) convertView.getTag();
    }

    holder.mBtn.setText(mDatas.get(position));

    return convertView;
  }

  private final class ViewHolder
  {
    Button mBtn;
  }
}
主Activity:
package com.example.zhy_layoutinflater;

import java.util.Arrays;
import java.util.List;

import android.app.Activity;
import android.os.Bundle;
import android.widget.ListView;

public class MainActivity extends Activity
{

  private ListView mListView;
  private MyAdapter mAdapter;
  private List<String> mDatas = Arrays.asList("Hello", "Java", "Android");

  @Override
  protected void onCreate(Bundle savedInstanceState)
  {
    super.onCreate(savedInstanceState);
    setContentView(R.layout.activity_main);

    mListView = (ListView) findViewById(R.id.id_listview);
    mAdapter = new MyAdapter(this, mDatas);
    mListView.setAdapter(mAdapter);


  }

}
好了,相信大家對這個例子都再熟悉不過了,沒啥好說的,我們主要關注getView裡面的inflate那行代碼:下面我依次把getView裡的寫成:
(1)convertView = mInflater.inflate(R.layout.item, null);
(2)convertView = mInflater.inflate(R.layout.item, parent ,false);
(3)convertView = mInflater.inflate(R.layout.item, parent ,true);
分別看效果圖:
圖1:
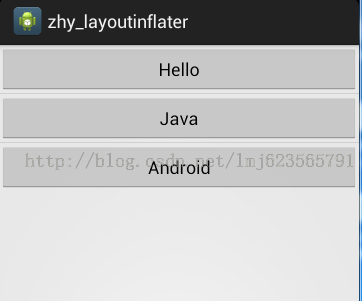
圖2:
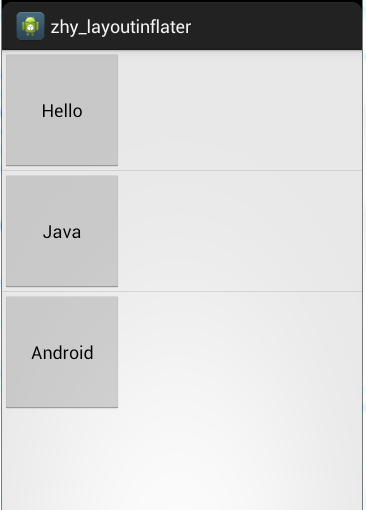
圖3:
FATAL EXCEPTION: main
java.lang.UnsupportedOperationException:
addView(View, LayoutParams) is not supported in AdapterView
嗯,沒錯沒有圖3,第三種寫法會報錯。
由上面三行代碼的變化,產生3個不同的結果,可以看到
inflater(resId, null )的確不能正確處理寬高的值,但是inflater(resId,parent,false)並非和inflater(resId, null )效果一致,它可以看出完美的顯示了寬和高。
而inflater(resId,parent,true)報錯了(錯誤的原因在解析源碼的時候說)。
由此可見:文章開始提出的理解是絕對錯誤的。
3、源碼解析
下面我通過源碼來解釋,這三種寫法真正的差異
這三個方法,最終都會執行下面的代碼:
public View inflate(XmlPullParser parser, ViewGroup root, boolean attachToRoot) {
    synchronized (mConstructorArgs) {
      final AttributeSet attrs = Xml.asAttributeSet(parser);
      Context lastContext = (Context)mConstructorArgs[0];
      mConstructorArgs[0] = mContext;
      View result = root;

      try {
        // Look for the root node.
        int type;
        while ((type = parser.next()) != XmlPullParser.START_TAG &&
            type != XmlPullParser.END_DOCUMENT) {
          // Empty
        }

        if (type != XmlPullParser.START_TAG) {
          throw new InflateException(parser.getPositionDescription()
              + ": No start tag found!");
        }

        final String name = parser.getName();

        if (DEBUG) {
          System.out.println("**************************");
          System.out.println("Creating root view: "
              + name);
          System.out.println("**************************");
        }

        if (TAG_MERGE.equals(name)) {
          if (root == null || !attachToRoot) {
            throw new InflateException("<merge /> can be used only with a valid "
                + "ViewGroup root and attachToRoot=true");
          }

          rInflate(parser, root, attrs, false);
        } else {
          // Temp is the root view that was found in the xml
          View temp;
          if (TAG_1995.equals(name)) {
            temp = new BlinkLayout(mContext, attrs);
          } else {
            temp = createViewFromTag(root, name, attrs);
          }

          ViewGroup.LayoutParams params = null;

          if (root != null) {
            if (DEBUG) {
              System.out.println("Creating params from root: " +
                  root);
            }
            // Create layout params that match root, if supplied
            params = root.generateLayoutParams(attrs);
            if (!attachToRoot) {
              // Set the layout params for temp if we are not
              // attaching. (If we are, we use addView, below)
              temp.setLayoutParams(params);
            }
          }

          if (DEBUG) {
            System.out.println("-----> start inflating children");
          }
          // Inflate all children under temp
          rInflate(parser, temp, attrs, true);
          if (DEBUG) {
            System.out.println("-----> done inflating children");
          }

          // We are supposed to attach all the views we found (int temp)
          // to root. Do that now.
          if (root != null && attachToRoot) {
            root.addView(temp, params);
          }

          // Decide whether to return the root that was passed in or the
          // top view found in xml.
          if (root == null || !attachToRoot) {
            result = temp;
          }
        }

      } catch (XmlPullParserException e) {
        InflateException ex = new InflateException(e.getMessage());
        ex.initCause(e);
        throw ex;
      } catch (IOException e) {
        InflateException ex = new InflateException(
            parser.getPositionDescription()
            + ": " + e.getMessage());
        ex.initCause(e);
        throw ex;
      } finally {
        // Don't retain static reference on context.
        mConstructorArgs[0] = lastContext;
        mConstructorArgs[1] = null;
      }

      return result;
    }
  }
第6行:首先聲明了View result = root ;//最終返回值為result
第43行執行了:temp = createViewFromTag(root, name, attrs);創建了View
然後直接看48-59:
if(root!=null)
{
 params = root.generateLayoutParams(attrs);
    if (!attachToRoot)
 {
  temp.setLayoutParams(params);
 }
}
可以看到,當root不為null,attachToRoot為false時,為temp設置了LayoutParams.
繼續往下,看73-75行:
if (root != null && attachToRoot)
{
root.addView(temp, params);
}
當root不為null,attachToRoot為true時,將tmp按照params添加到root中。
然後78-81行:
if (root == null || !attachToRoot) {
result = temp;
}
如果root為null,或者attachToRoot為false則,將temp賦值給result。
最後返回result。
從上面的分析已經可以看出:
(1)Inflate(resId , null ) 只創建temp ,返回temp
(2)Inflate(resId , parent, false )創建temp,然後執行temp.setLayoutParams(params);返回temp
(3)Inflate(resId , parent, true ) 創建temp,然後執行root.addView(temp, params);最後返回root
由上面已經能夠解釋:
(1)Inflate(resId , null )不能正確處理寬和高是因為:layout_width,layout_height是相對了父級設置的,必須與父級的LayoutParams一致。而此temp的getLayoutParams為null
Inflate(resId , parent,false ) 可以正確處理,因為temp.setLayoutParams(params);這個params正是root.generateLayoutParams(attrs);得到的。
(2)Inflate(resId , parent,true )不僅能夠正確的處理,而且已經把resId這個view加入到了parent,並且返回的是parent,和以上兩者返回值有絕對的區別,還記得文章前面的例子上,MyAdapter裡面的getView報的錯誤:
[html] view plain copy 在CODE上查看代碼片派生到我的代碼片
java.lang.UnsupportedOperationException:
addView(View, LayoutParams) is not supported in AdapterView
這是因為源碼中調用了root.addView(temp, params);而此時的root是我們的ListView,ListView為AdapterView的子類:
直接看AdapterView的源碼:
@Override
 public void addView(View child) {
    throw new UnsupportedOperationException("addView(View) is not supported in AdapterView");
 }
可以看到這個錯誤為啥產生了。
4、 進一步的解析
上面我根據源碼得出的結論可能大家還是有一絲的迷惑,我再寫個例子論證我們上面得出的結論:
主布局文件:
<Button xmlns:android="http://schemas.android.com/apk/res/android"
  xmlns:tools="http://schemas.android.com/tools"
  android:id="@+id/id_btn"
  android:layout_width="120dp"
  android:layout_height="120dp"
  android:text="Button" >
</Button>
主Activity:
package com.example.zhy_layoutinflater;

import android.app.ListActivity;
import android.os.Bundle;
import android.util.Log;
import android.view.LayoutInflater;
import android.view.View;
import android.view.ViewGroup;

public class MainActivity extends ListActivity
{


  private LayoutInflater mInflater;

  @Override
  protected void onCreate(Bundle savedInstanceState)
  {
    super.onCreate(savedInstanceState);

    mInflater = LayoutInflater.from(this);

    View view1 = mInflater.inflate(R.layout.activity_main, null);
    View view2 = mInflater.inflate(R.layout.activity_main,
        (ViewGroup)findViewById(android.R.id.content), false);
    View view3 = mInflater.inflate(R.layout.activity_main,
        (ViewGroup)findViewById(android.R.id.content), true);

    Log.e("TAG", "view1 = " + view1 +" , view1.layoutParams = " + view1.getLayoutParams());
    Log.e("TAG", "view2 = " + view2 +" , view2.layoutParams = " + view2.getLayoutParams());
    Log.e("TAG", "view3 = " + view3 );

  }

}
可以看到我們的主Activity並沒有執行setContentView,僅僅執行了LayoutInflater的3個方法。
注:parent我們用的是Activity的內容區域:即android.R.id.content,是一個FrameLayout,我們在setContentView(resId)時,其實系統會自動為了包上一層FrameLayout(id=content)。
按照我們上面的說法:
(1)view1的layoutParams 應該為null
(2)view2的layoutParams 應該不為null,且為FrameLayout.LayoutParams
(3)view3為FrameLayout,且將這個button添加到Activity的內容區域了(因為R.id.content代表Actvity內容區域)
下面看一下輸出結果,和Activity的展示:
07-27 14:17:36.703: E/TAG(2911): view1 = android.widget.Button@429d1660 , view1.layoutParams = null
07-27 14:17:36.703: E/TAG(2911): view2 = android.widget.Button@42a0e120 , view2.layoutParams = android.widget.FrameLayout$LayoutParams@42a0e9a0
07-27 14:17:36.703: E/TAG(2911): view3 = android.widget.FrameLayout@42a0a240
效果圖:
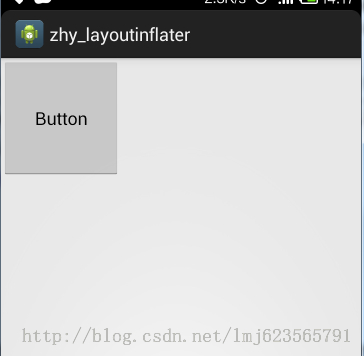
可見,雖然我們沒有執行setContentView,但是依然可以看到繪制的控件,是因為
復制代碼 代碼如下:
View view3 = mInflater.inflate(R.layout.activity_main,(ViewGroup)findViewById(android.R.id.content), true);
也可以看出:和我們的推測完全一致,到此已經完全說明了inflate3個重載的方法的區別。相信大家以後在使用時也能選擇出最好的方式。不過下面准備從ViewGroup和View的角度來說一下,為啥layoutParams為null,就不能這確的處理。
5、從ViewGroup和View的角度來解析
如果大家對自定義ViewGroup和自定義View有一定的掌握,肯定不會對onMeasure方法陌生:
ViewGroup的onMeasure方法所做的是:
為childView設置測量模式和測量出來的值。
如何設置呢?就是根據LayoutParams。
(1)如果childView的寬為:LayoutParams. MATCH_PARENT,則設置模式為MeasureSpec.EXACTLY,且為childView計算寬度。
(2)如果childView的寬為:固定值(即大於0),則設置模式為MeasureSpec.EXACTLY,且將lp.width直接作為childView的寬度。
(3)如果childView的寬為:LayoutParams. WRAP_CONTENT,則設置模式為:MeasureSpec.AT_MOST
高度與寬度類似。
View的onMeasure方法:
主要做的就是根據ViewGroup傳入的測量模式和測量值,計算自己應該的寬和高:
一般是這樣的流程:
(1)如果寬的模式是AT_MOST:則自己計算寬的值。
(2)如果寬的模式是EXACTLY:則直接使用MeasureSpec.getSize(widthMeasureSpec);
(3)對於最後一塊,如果不清楚,不要緊,以後我會在自定義ViewGroup和自定義View時詳細講解的。
大概就是這樣的流程,真正的繪制過程肯定比這個要復雜,就是為了說明如果View的寬和高如果設置為准確值,則一定依賴於LayoutParams,所以我們的inflate(resId,null)才沒能正確處理寬和高。
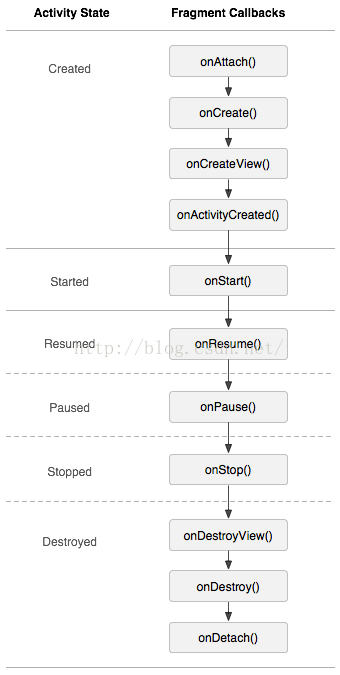 Fragment
為了讓界面可以在平板上更好地展示,Android在3.0版本引入了Fragment(碎片)功能。首先需要注意,Fragment是在3.0版本引入的,如果你使用的是3.0之
 Android基礎筆記- 圖形、解決大圖OOM、繪畫工具的使用和練習
計算機圖形表示的原理 加載大圖出現OOM 縮放加載大的圖片資源 創建一個原圖的副本 圖形處理的常用的API 傻瓜版美圖秀秀 畫畫版計算機圖形表示的原理首先要明確的一點是,
 Android 仿微信朋友圈點贊和評論彈出框功能
貢獻/下載源碼:https://github.com/mmlovesyy/PopupWindowDemo本文簡單模仿微信朋友圈的點贊和評論彈出框,布局等細節請忽略,著重實
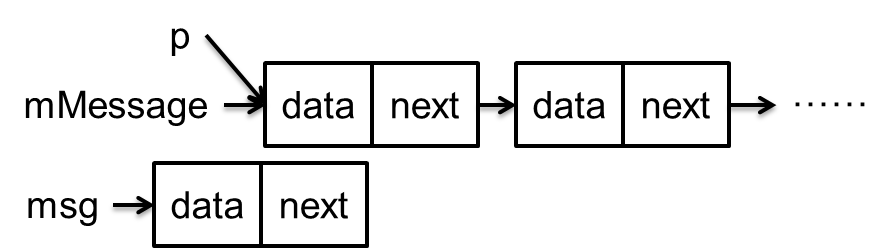 Handler消息機制完全解析(二)MessageQueue的隊列管理
關於這個隊列先說明一點,該隊列的實現既非Collection的子類,亦非Map的子類,而是Message本身。因為Message本身就是鏈表節點。隊列中的Message