編輯:關於Android編程
先看看效果圖:
知識點分析
效果圖來看不復雜內容並沒多少,值得介紹一下的知識點也就下面幾個吧
- 列表標題懸停
- 左右列表滑動時聯動
- 添加商品時的拋物線動畫
- 底部彈出購物車清單
- 數據的同步
另外就是實現效果的時候可能會遇到的幾個坑。。。
布局很簡單直接進入代碼
1:列表標題懸停
現在做項目列表什麼的基本拋棄了ListView改用RecyclerView,上篇博客中的標題懸停也是使用了一個RecyclerView的開源項目sticky-headers-recyclerview,不過寫這個demo的時候遇到了兩個坑
1)、sticky-headers-recyclerview做懸停標題的時候scrollToPosition(int position)方法滾動的位置不准確。
2)、當布局復雜點的時候 如果RecyclerView的寬度自適應或者使用權重百分比之類可能會導致header顯示空白。
並且該開源項目作者已經停止維護,所以這次又換回了StickyListHeadersListView。
需要購物車Demo的很多都是新手,這裡簡單介紹下StickyListHeadersListView的使用
1)、AS引用 gradle文件dependencies內添加
compile 'se.emilsjolander:stickylistheaders:2.7.0'
2)、xml文件中使用StickyListHeadersListView代替ListView
 <se.emilsjolander.stickylistheaders.StickyListHeadersListView
  android:layout_width="match_parent"
  android:background="#fff"
  android:id="@+id/itemListView"
  android:layout_height="match_parent">
 </se.emilsjolander.stickylistheaders.StickyListHeadersListView>
3)、Adapter繼承BaseAdapter和接口StickyListHeadersAdapter
StickyListHeadersAdapter接口包括兩個方法
 View getHeaderView(int position, View convertView, ViewGroup parent);

 long getHeaderId(int position);
代碼中使用和ListView一樣,下面是幾個特有的方法,看方法名也很容易理解用途
public void setAreHeadersSticky(boolean areHeadersSticky);
public boolean areHeadersSticky();

public void setOnHeaderClickListener(OnHeaderClickListener listener);

public interface OnHeaderClickListener {
 public void onHeaderClick(StickyListHeadersListView l, View header, int itemPosition, long headerId, boolean currentlySticky);
}

public void setOnStickyHeaderChangedListener(OnStickyHeaderChangedListener listener);

public interface OnStickyHeaderChangedListener {
 void onStickyHeaderChanged(StickyListHeadersListView l, View header, int itemPosition, long headerId);
}

public View getListChildAt(int index);
public int getListChildCount();
2:左右列表聯動
聯動主要有兩個效果
- 左側列表點擊選擇分類,右側列表滑動到對應分類
- 右側列表滑動過程中左側列表高亮的分類跟隨變化
第一個效果簡單,左側列表item添加點擊事件,事件中調用右側列表的setSelection(int positon) 方法。
第二個效果要給右側列表添加ScrollListener,根據列表中顯示的第一條數據設置左側選中的分類
 listView.setOnScrollListener(new AbsListView.OnScrollListener() {
   @Override
   public void onScrollStateChanged(AbsListView view, int scrollState) {

   }

   @Override
   public void onScroll(AbsListView view, int firstVisibleItem, int visibleItemCount, int totalItemCount) {
   //根據firstVisibleItem獲取分類ID,根據分類id獲取左側要選中的位置
    GoodsItem item = dataList.get(firstVisibleItem);
    if(typeAdapter.selectTypeId != item.typeId) {
     typeAdapter.selectTypeId = item.typeId;
     typeAdapter.notifyDataSetChanged();
     //左側列表是個RecyclerView 所以使用smoothScrollToPosition(int position) 使當對應position的item可以滾動顯示出來
     rvType.smoothScrollToPosition(int position)(getSelectedGroupPosition(item.typeId));
    }
   }
  });
3:添加商品的動畫
添加商品一共有三個動畫
- 當商品從0到1 旋轉左移顯示出減號按鈕
- 當商品從1到0 減號按鈕旋轉右移消失
- 添加商品時拋物線動畫添加到購物車圖標
前兩個動畫很簡單可以分解成三個補間動畫 旋轉、平移、透明度。
可以用xml完成,也可以代碼設置,不過有個小坑要注意一下 旋轉動畫一定要在平移動畫前面,否則就不是滾動平移了,而是亂跳。。。
這裡貼一下動畫的代碼設置方法
 //顯示減號的動畫
 private Animation getShowAnimation(){
  AnimationSet set = new AnimationSet(true);
  RotateAnimation rotate = new RotateAnimation(0,720,RotateAnimation.RELATIVE_TO_SELF,0.5f,RotateAnimation.RELATIVE_TO_SELF,0.5f);
  set.addAnimation(rotate);
  TranslateAnimation translate = new TranslateAnimation(
    TranslateAnimation.RELATIVE_TO_SELF,2f
    ,TranslateAnimation.RELATIVE_TO_SELF,0
    ,TranslateAnimation.RELATIVE_TO_SELF,0
    ,TranslateAnimation.RELATIVE_TO_SELF,0);
  set.addAnimation(translate);
  AlphaAnimation alpha = new AlphaAnimation(0,1);
  set.addAnimation(alpha);
  set.setDuration(500);
  return set;
 }
 //隱藏減號的動畫
 private Animation getHiddenAnimation(){
  AnimationSet set = new AnimationSet(true);
  RotateAnimation rotate = new RotateAnimation(0,720,RotateAnimation.RELATIVE_TO_SELF,0.5f,RotateAnimation.RELATIVE_TO_SELF,0.5f);
  set.addAnimation(rotate);
  TranslateAnimation translate = new TranslateAnimation(
    TranslateAnimation.RELATIVE_TO_SELF,0
    ,TranslateAnimation.RELATIVE_TO_SELF,2f
    ,TranslateAnimation.RELATIVE_TO_SELF,0
    ,TranslateAnimation.RELATIVE_TO_SELF,0);
  set.addAnimation(translate);
  AlphaAnimation alpha = new AlphaAnimation(1,0);
  set.addAnimation(alpha);
  set.setDuration(500);
  return set;
 }

 //執行動畫 只需給對應控件setAnimation然後調用setVisibility方法即可
 {
  ....
  tvMinus.setAnimation(getHiddenAnimation());
  tvMinus.setVisibility(View.GONE);
 }
拋物線動畫和上面的差不多可以分解成兩個平移動畫,不過兩個平移動畫的差值器一個線性一個加速而已,因為動畫界面跨度比較大所以需要在根部局內寫,不能寫在列表的item中(這樣會顯示不全)。
代碼中的anim_mask_layout 即為整個布局文件的根布局,這裡是一個RelativeLayout
實現過程:
1、首先點擊加號圖標,拿到控件在屏幕上的絕對坐標,回調activity顯示動畫
 int[] loc = new int[2];
 v.getLocationInWindow(loc);
 activity.playAnimation(loc);
2、創建動畫的控件並添加到根部局並在動畫結束後移除動畫view
 public void playAnimation(int[] start_location){
  ImageView img = new ImageView(this);
  img.setImageResource(R.drawable.button_add);
  setAnim(img,start_location);
 }
 //創建動畫 平移動畫直接傳遞偏移量
 private Animation createAnim(int startX,int startY){
  int[] des = new int[2];
  imgCart.getLocationInWindow(des);

  AnimationSet set = new AnimationSet(false);

  Animation translationX = new TranslateAnimation(0, des[0]-startX, 0, 0);
  //線性插值器 默認就是線性
  translationX.setInterpolator(new LinearInterpolator());
  Animation translationY = new TranslateAnimation(0, 0, 0, des[1]-startY);
  //設置加速插值器
  translationY.setInterpolator(new AccelerateInterpolator());
  Animation alpha = new AlphaAnimation(1,0.5f);
  set.addAnimation(translationX);
  set.addAnimation(translationY);
  set.addAnimation(alpha);
  set.setDuration(500);

  return set;
 }
 //計算動畫view在根部局中的坐標 添加到根部局中
 private void addViewToAnimLayout(final ViewGroup vg, final View view,
          int[] location) {

  int x = location[0];
  int y = location[1];
  int[] loc = new int[2];
  vg.getLocationInWindow(loc);
  view.setX(x);
  view.setY(y-loc[1]);
  vg.addView(view);
 }
 //設置動畫結束移除動畫view
 private void setAnim(final View v, int[] start_location) {

  addViewToAnimLayout(anim_mask_layout, v, start_location);
  Animation set = createAnim(start_location[0],start_location[1]);
  set.setAnimationListener(new Animation.AnimationListener() {
   @Override
   public void onAnimationStart(Animation animation) {

   }

   @Override
   public void onAnimationEnd(final Animation animation) {
    //直接remove可能會因為界面仍在繪制中成而報錯
    mHanlder.postDelayed(new Runnable() {
     @Override
     public void run() {
      anim_mask_layout.removeView(v);
     }
    },100);
   }

   @Override
   public void onAnimationRepeat(Animation animation) {

   }
  });
  v.startAnimation(set);
 }
4:底部彈出購物車清單
底部彈出的效果大家一定都很熟悉了,幾回每個項目中都會用的到,官方沒有提供簡單的控件實現,一般都需要自己寫,不過要做到簡單流暢,便於移植推薦使用第三方庫,這裡向大家推薦一個
bottomsheet
集成簡單,效果多樣這裡簡單介紹一下使用方法
集成
compile 'com.flipboard:bottomsheet-core:1.5.1'
使用
xml中使用BottomSheetLayout包裹彈出view時候的背景布局,BottomSheetLayout繼承自幀布局:
<com.flipboard.bottomsheet.BottomSheetLayout
 xmlns:android="http://schemas.android.com/apk/res/android"
 android:id="@+id/bottomSheetLayout"
 android:layout_width="match_parent"
 android:layout_height="match_parent">
 <LinearLayout
  android:orientation="horizontal"
  android:layout_width="match_parent"
  android:layout_height="match_parent">

  <android.support.v7.widget.RecyclerView
   android:layout_width="100dp"
   android:id="@+id/typeRecyclerView"
   android:layout_height="match_parent">
  </android.support.v7.widget.RecyclerView>

  <se.emilsjolander.stickylistheaders.StickyListHeadersListView
   android:layout_width="match_parent"
   android:background="#fff"
   android:id="@+id/itemListView"
   android:layout_height="match_parent">
  </se.emilsjolander.stickylistheaders.StickyListHeadersListView>
 </LinearLayout>
</com.flipboard.bottomsheet.BottomSheetLayout>
代碼中使用很簡單
 //彈出View bottomSheet即是要彈出的view
 bottomSheetLayout.showWithSheetView(bottomSheet);

 //代碼隱藏view (點擊彈出view以外的地方可以隱藏彈出的view,向下滑動也可以)
 bottomSheetLayout.dismissSheet();
5:數據的同步
同步數據,控制界面刷新應該是新手最容易繞彎的地方了,其實只要仔細一點也不難,這裡簡單提供一種思路(並不一定適合你的項目).
 //商品列表
 private ArrayList<GoodsItem> dataList;
 //分類列表
 private ArrayList<GoodsItem> typeList;
 //已選擇的商品
 private SparseArray<GoodsItem> selectedList;
 //用於記錄每個分組選擇的數目
 private SparseIntArray groupSelect;
SparseArray這個類其實就是 HashMap< Integer,Object >
不過SparseArray既可以根據key查找Value,也可以根據位置查找value,性能比HashMap高,是官方推薦的替代類,
同樣SparseIntArray 其實是HashMap< Integer,Integer> 的替代者。
Activity裡實現了下面幾個方法,用於數據統一管理
列表中顯示的商品購買數量統一從activity獲取,商品的加減統一調用Activity的方法然後notifiDatasetChanged,由於代碼不少具體的還是看源碼吧
 /**
  * Item代表商品的購買數量加一
  * @param item
  * @param refreshGoodList 是否刷新商品list
  */
 public void add(GoodsItem item,boolean refreshGoodList){

  int groupCount = groupSelect.get(item.typeId);
  if(groupCount==0){
   groupSelect.append(item.typeId,1);
  }else{
   groupSelect.append(item.typeId,++groupCount);
  }

  GoodsItem temp = selectedList.get(item.id);
  if(temp==null){
   item.count=1;
   selectedList.append(item.id,item);
  }else{
   temp.count++;
  }
  update(refreshGoodList);
 }
 /**
  * Item商品的購買數量減一
  * @param item
  * @param refreshGoodList 是否刷新商品list
  */
 public void remove(GoodsItem item,boolean refreshGoodList){

  int groupCount = groupSelect.get(item.typeId);
  if(groupCount==1){
   groupSelect.delete(item.typeId);
  }else if(groupCount>1){
   groupSelect.append(item.typeId,--groupCount);
  }

  GoodsItem temp = selectedList.get(item.id);
  if(temp!=null){
   if(temp.count<2){
    selectedList.remove(item.id);
   }else{
    item.count--;
   }
  }
  update(refreshGoodList);
 }

 /**
  * 刷新界面 總價、購買數量等
  * @param refreshGoodList 是否刷新商品list
  */
 private void update(boolean refreshGoodList){
  ...
 }

 //根據商品id獲取當前商品的采購數量
 public int getSelectedItemCountById(int id){
  GoodsItem temp = selectedList.get(id);
  if(temp==null){
   return 0;
  }
  return temp.count;
 }
 //根據類別Id獲取屬於當前類別的數量
 public int getSelectedGroupCountByTypeId(int typeId){
  return groupSelect.get(typeId);
 }
具體邏輯還是看代碼吧,也許有更簡單的實現。。。
Demo下載地址,下載到的文件是個AS module,你可以在自己新建的工程中Import Module.
源碼下載:Android仿外賣購物車功能
以上就是本文的全部內容,希望對大家的學習有所幫助,也希望大家多多支持本站。
 Android6.0新的授權方式和PermissionM的使用
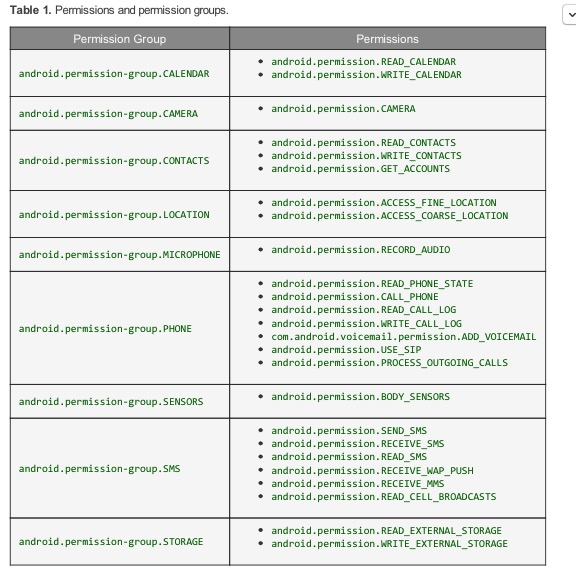
關於Android M(6.0)新的授權方式只有我們設置app的targetSdkVersion為23,並且app運行在6.0之後的設備才使用新的權限系統。在Androi
 android應用程序優化之布局優化
在我們開發APP時不僅要在代碼實現上,做到對App的優化,而在我們的界面布局也有許多要優化的地方,如果布局寫的很low的話,系統加載布局的速度會十分的慢,使得用戶的體驗非
 安卓技巧三星Galaxy SIII I9300使用必看玩機技巧
I9300相信已經有很多人入手了,不知道大家知道多少I9300的使用技巧在這裡總結了一下,希望對大家有幫助。如果還有什麼不全的地方,歡迎在下方留言。1. 鎖
 Android使用Custom debug keystore
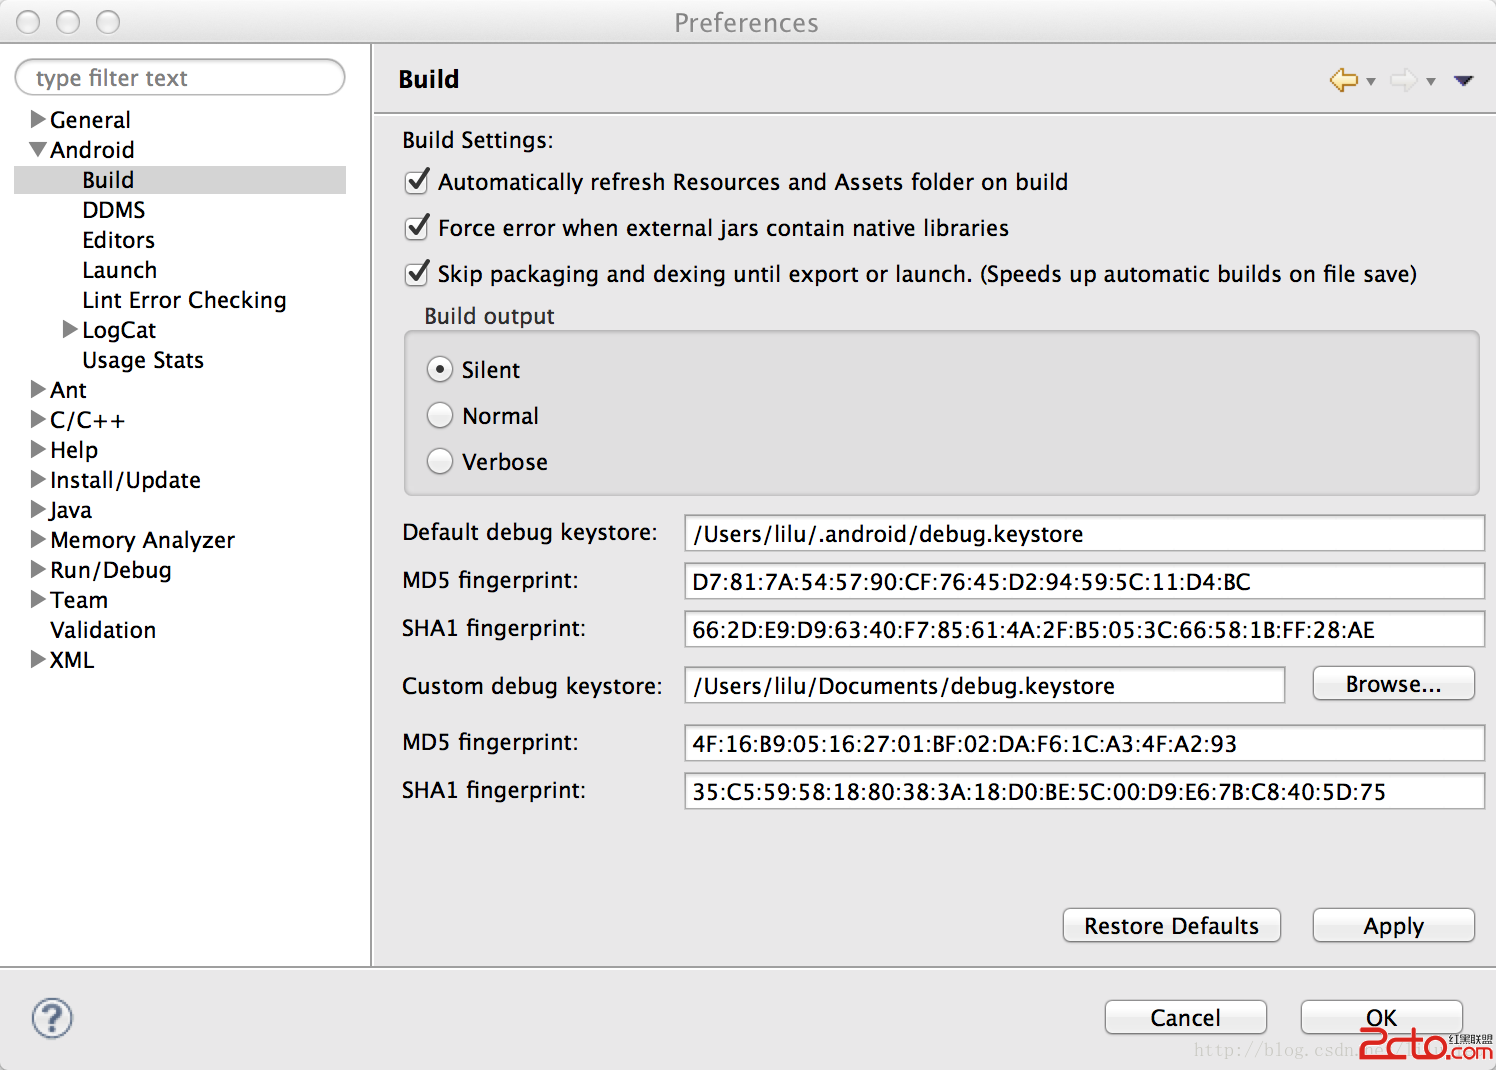
有時候需要用到第三方API的時候,需要一個key store 的SH1值,例如使用百度地圖API,如果是協同開發,就需要所有Eclipse使用同一keystore。