編輯:關於Android編程
自定義view的第三篇,模仿的是微博運動界面的個人出生日期設置view,先看看我的效果圖:

支持設置初始年份,左右滑動選擇出生年份,對應的TextView的值也會改變。這個動畫效果弄了好久,感覺還是比較生硬,與微博那個還是有點區別。大家有改進的方案,歡迎一起交流。
自定義View四部曲,這裡依舊是這個套路,看看怎麼實現的。
1.自定義view的屬性:
在res/values/ 下建立一個attrs.xml , 在裡面定義我們的屬性以及聲明我們的整個樣式。
<?xml version="1.0" encoding="utf-8"?>
<resources>
 //自定義屬性名,定義公共屬性
 <attr name="titleSize" format="dimension"></attr>
 <attr name="titleText" format="string"></attr>
 <attr name="titleColor" format="color"></attr>
 <attr name="outCircleColor" format="color"></attr>
 <attr name="inCircleColor" format="color"></attr>
 <attr name="lineColor" format="color"></attr>

 <declare-styleable name="MyScrollView">
  <attr name="titleSize"></attr>
  <attr name="titleColor"></attr>
  <attr name="lineColor"></attr>
 </declare-styleable>

</resources>
依次定義了字體大小,字體顏色,線的顏色3個屬性,format是值該屬性的取值類型。
然後就是在布局文件中申明我們的自定義view:
 <TextView
  android:id="@+id/year_txt"
  android:layout_width="wrap_content"
  android:layout_height="wrap_content"
  android:layout_margin="30dp"
  android:text="出生年份 (年)"
  android:textSize="20dp" />

 <com.example.tangyangkai.myview.MyScrollView
  android:id="@+id/scroll_view"
  android:layout_width="match_parent"
  android:layout_height="70dp"
  myscroll:lineColor="@color/font_text"
  myscroll:titleColor="@color/strong"
  myscroll:titleSize="30dp">
 </com.example.tangyangkai.myview.MyScrollView>
自定義view的屬性我們可以自己進行設置,記得最後要引入我們的命名空間,
xmlns:app=”http://schemas.Android.com/apk/res-auto”
2.獲取自定義view的屬性:
 public MyScrollView(Context context) {
  this(context, null);
 }

 public MyScrollView(Context context, AttributeSet attrs) {
  this(context, attrs, 0);
 }

 public MyScrollView(final Context context, AttributeSet attrs, int defStyleAttr) {
  super(context, attrs, defStyleAttr);
  //獲取我們自定義的樣式屬性
  TypedArray array = context.getTheme().obtainStyledAttributes(attrs, R.styleable.MyScrollView, defStyleAttr, 0);
  int n = array.getIndexCount();
  for (int i = 0; i < n; i++) {
   int attr = array.getIndex(i);
   switch (attr) {
    case R.styleable.MyScrollView_lineColor:
     // 默認顏色設置為黑色
     lineColor = array.getColor(attr, Color.BLACK);
     break;
    case R.styleable.MyScrollView_titleColor:
     textColor = array.getColor(attr, Color.BLACK);
     break;
    case R.styleable.MyScrollView_titleSize:
     // 默認設置為16sp,TypeValue也可以把sp轉化為px
     textSize = array.getDimensionPixelSize(attr, (int) TypedValue.applyDimension(
       TypedValue.COMPLEX_UNIT_SP, 16, getResources().getDisplayMetrics()));
     break;

   }

  }
  array.recycle();
  init();
 }

 private void init() {
  //初始化
  mPaint = new Paint();
  mPaint.setAntiAlias(true);
  mBound = new Rect();
  mTxtBound = new Rect();
  bigTxtSize = textSize;
  oneSize = textSize - 15;
  thirdSize = textSize - 15;
 }
自定義View一般需要實現一下三個構造方法,這三個構造方法是一層調用一層的,屬於遞進關系。因此,我們只需要在最後一個構造方法中來獲得View的屬性以及進行一些必要的初始化操作。盡量不要在onDraw的過程中去實例化對象,因為這是一個頻繁重復執行的過程,new是需要分配內存空間的,如果在一個頻繁重復的過程中去大量地new對象會造成內存浪費的情況。
3.重寫onMesure方法確定view大小:
上一篇自定義View的文章介紹的很詳細,這裡就不重復了,重點放在onDraw方法裡面:
Android自定義View仿微博運動積分動畫效果
4.重寫onDraw方法進行繪畫:
之前說過對於比較復雜的自定義View,重寫onDraw方法之前,首先在草稿本上將大致的樣子畫出來,坐標,起始點都可以簡單標注一下。這個方法很實用,思路很清晰。
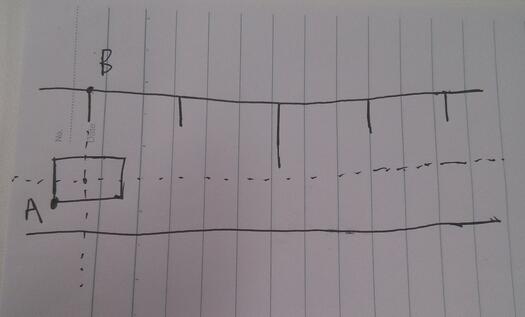
A點的位置就是繪制數字的初始位置,B點的位置就是繪制豎線的起始位置。確定好這兩個初始位置,我們只要寫一個循環,找到規律,依次繪制出後面的線與字即可。因為涉及左右滑動的事件處理,所以需要Android事件分發的知識來進行處理。
 @Override
 public boolean dispatchTouchEvent(MotionEvent ev) {

  int action = ev.getAction();
  int x = (int) ev.getX();
  int y = (int) ev.getY();
  switch (action) {
   case MotionEvent.ACTION_DOWN:
    xDown = x;
    yDown = y;
    break;
   case MotionEvent.ACTION_MOVE:
    xMove = x;
    yMove = y;
    dx = xMove - xDown;
    int dy = yMove - yDown;
    //如果是從左向右滑動
    if (xMove > xDown && Math.abs(dx) > mTouchSlop * 2 && Math.abs(dy) < mTouchSlop) {
     state = 1;
    }
    //如果是從右向左滑動
    if (xMove < xDown && Math.abs(dx) > mTouchSlop * 2 && Math.abs(dy) < mTouchSlop) {
     state = 2;

    }
    break;
   case MotionEvent.ACTION_UP:
    break;
  }
  return super.dispatchTouchEvent(ev);
 }
重寫View的dispatchTouchEvent方法來區別左右滑動,mTouchSlop是Android默認的滑動最小距離,如果水平方向滑動的距離大於豎直方向滑動的距離,就判斷為水平滑動。這裡為了不讓滑動那麼明顯,我讓水平滑動的距離大於默認距離的兩倍才判定左右滑動。state是記錄滑動的狀態。
 @Override
 public boolean onTouchEvent(MotionEvent ev) {

  int action = ev.getAction();
  switch (action) {
   case MotionEvent.ACTION_DOWN:
    break;
   case MotionEvent.ACTION_MOVE:
    if (state == 1 && bigTxtSize - oneSize > -15) {
     bigTxtSize = bigTxtSize - 1;
     oneSize = oneSize + 1;
     postInvalidate();
    }
    if (state == 2 && bigTxtSize - thirdSize > -15) {
     bigTxtSize = bigTxtSize - 1;
     thirdSize = thirdSize + 1;
     postInvalidate();
    }
    break;
   case MotionEvent.ACTION_UP:
    if (state == 1) {
     size = size - 1;
     bigTxtSize = textSize;
     oneSize = textSize - 15;
     postInvalidate();
     listener.OnScroll(size);
     state = 0;
    }
    if (state == 2) {
     size = size + 1;
     bigTxtSize = textSize;
     thirdSize = textSize - 15;
     postInvalidate();
     listener.OnScroll(size);
     state = 0;
    }
    break;
  }
  return true;
 }
重寫View的onTouchEvent方法來處理View的點擊事件。
(1)演示動態圖中,左右滑動的過程中,中間數字會從大變小,左右的數字會從小變大,bigTxtSize代表中間的數字大小,oneSize代表從左到右第二個數字的大小,thirdSize代表從左到右第四個數字的大小。在滑動過程中再使用postInvalidate()方法來一直調用onDraw方法來重新進行繪制,達到數字大小變化的效果。
(2)滑動結束以後進行判斷,如果是從左向右滑動,就會將數字減一;如果是從右向左滑動,就會將數字加一。最後將數字大小,滑動狀態恢復到默認值。
(3)最後一定要返回true,表示消費當前滑動事件,不然滑動沒反應
滑動的操作已經全部處理好,接下來就是繪制:
 @Override
 protected void onDraw(Canvas canvas) {
  txtSize = size - 2;
  bigText = String.valueOf(size);
  smallText = String.valueOf(txtSize);
  mPaint.setColor(lineColor);
  canvas.drawLine(0, 0, getWidth(), 0, mPaint);
  canvas.drawLine(0, getHeight(), getWidth(), getHeight(), mPaint);
  lineX = getWidth() / 10;
  for (int i = 0; i < 5; i++) {
   if (i == 2) {
    mPaint.setTextSize(bigTxtSize);
    if (bigTxtSize == textSize - 15) {
     mPaint.setColor(lineColor);
     canvas.drawLine(lineX, 0, lineX, getHeight() / 5, mPaint);
    } else {
     mPaint.setColor(textColor);
     canvas.drawLine(lineX, 0, lineX, getHeight() / 3, mPaint);
    }
    mPaint.getTextBounds(bigText, 0, bigText.length(), mBound);
    canvas.drawText(bigText, lineX - mBound.width() / 2, getHeight() / 2 + mBound.height() * 3 / 4, mPaint);
   } else if (i == 0 || i == 4) {
    mPaint.setColor(lineColor);
    mPaint.setTextSize(textSize - 15);
    mPaint.getTextBounds(smallText, 0, smallText.length(), mTxtBound);
    canvas.drawLine(lineX, 0, lineX, getHeight() / 5, mPaint);
    canvas.drawText(String.valueOf(txtSize), lineX - mTxtBound.width() / 2, getHeight() / 2 + mTxtBound.height() * 3 / 4, mPaint);
   } else if (i == 1) {
    mPaint.setTextSize(oneSize);
    if (oneSize == textSize) {
     mPaint.setColor(textColor);
     canvas.drawLine(lineX, 0, lineX, getHeight() / 3, mPaint);
    } else {
     mPaint.setColor(lineColor);
     canvas.drawLine(lineX, 0, lineX, getHeight() / 5, mPaint);
    }
    mPaint.getTextBounds(smallText, 0, smallText.length(), mTxtBound);
    canvas.drawText(String.valueOf(txtSize), lineX - mTxtBound.width() / 2, getHeight() / 2 + mTxtBound.height() * 3 / 4, mPaint);
   } else {
    mPaint.setTextSize(thirdSize);
    if (thirdSize == textSize) {
     mPaint.setColor(textColor);
     canvas.drawLine(lineX, 0, lineX, getHeight() / 3, mPaint);

    } else {
     mPaint.setColor(lineColor);
     canvas.drawLine(lineX, 0, lineX, getHeight() / 5, mPaint);
    }
    mPaint.getTextBounds(smallText, 0, smallText.length(), mTxtBound);
    canvas.drawText(String.valueOf(txtSize), lineX - mTxtBound.width() / 2, getHeight() / 2 + mTxtBound.height() * 3 / 4, mPaint);
   }
   txtSize++;
   lineX += getWidth() / 5;
  }

 }
這裡其實就是得到滑動操作的數字尺寸大小,然後進行繪制,最後將數字每次加一,lineX是B點的初始位置,每次加上寬度的五分之一。
5.得到當前的設置值
可以看到View上面的TextView也會跟著下面設置的值改變,所以這裡我們需要單獨處理一下。接口回調,簡單暴力的方式。
在onTouchEvent的case MotionEvent.ACTION_UP中,得到最後設置的值
listener.OnScroll(size);
然後就是對應的Activity了:
public class SecondActivity extends AppCompatActivity implements MyScrollView.OnScrollListener {

 private MyScrollView scrollView;
 private TextView txt;

 @Override
 protected void onCreate(Bundle savedInstanceState) {
  super.onCreate(savedInstanceState);
  setContentView(R.layout.activity_second);
  initview();
 }

 private void initview() {
  scrollView = (MyScrollView) findViewById(R.id.scroll_view);
  scrollView.setSize(1992);
  scrollView.setListener(this);
  txt = (TextView) findViewById(R.id.year_txt);
  txt.setText("出生年份" + scrollView.getSize() + " (年)");
 }

 @Override
 public void OnScroll(int size) {
  txt.setText("出生年份" + size + " (年)");
 }
}
實現接口的方法,進行初始化,設置初始值,然後就是在接口的方法更新數據即可。
自定義view的第一篇:Android自定義View實現BMI指數條
自定義view的第二篇:Android自定義View仿微博運動積分動畫效果
OK,下一篇自定義View再見。
以上就是本文的全部內容,希望對大家的學習有所幫助,也希望大家多多支持本站。
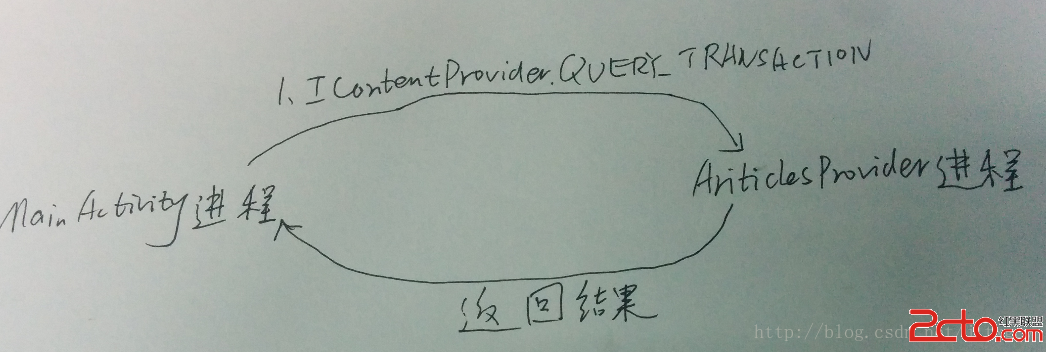 Android Content Provider在應用程序之間共享數據的原理分析
本文參考Android應用程序組件Content Provider在應用程序之間共享數據的原理分析http://blog.csdn.net/luoshengyang/ar
 Android-studio+Genymotion模擬器的聯合使用
(1)關於安裝Android studio的方法: 安裝完,再從上述網址下載個別sdk包(在android-studio的sdk manager裡也可以下載,但是經常被
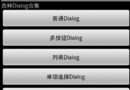 Android開發必知 九種對話框的實現方法
在開發過程中,與用戶交互式免不了會用到對話框以實現更好的用戶體驗,所以掌握幾種對話框的實現方法還是非常有必要的。在看具體實例之前先對AlertDialog做一個簡單介紹。
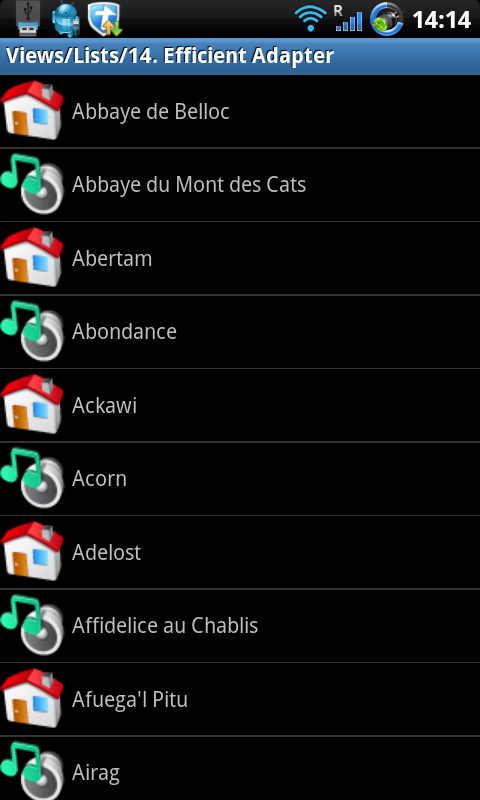 android開發中ListView與Adapter使用要點介紹
1. Adapter.getView() public View getView(int position, View convertView , ViewGroup p
 Android中通過ViewHelper.setTranslationY實現View移動控制(NineOldAndroids開源項目)
我們知道有不少開源工程,能實現很多不錯的效果。前幾天,我看了一個效果,剛