編輯:關於Android編程
JAVA的反射機制,探秘TelephonyManager在Framework裡包含卻在SDK隱藏的幾項功能。先來看看本文程序運行的效果圖:

本文程序演示了以下功能:
1.所有來電自動接聽;
2.所有來電自動掛斷;
3.開啟/關閉Radio;
4.開啟/關閉數據連接(WAP or NET的連接)。
調用TelephonyManager的隱藏API是先參考Framework的/base/telephony/java/com/android/internal/telephony/ITelephony.aidl,然後自己實現一個ITelephony.aidl,最後在TelephonyManager中通過反射機制實例化自定義的ITelephony,實例化之後就可以調用ITelephony裡面的函數了。
本文程序需要在AndroidManifest.xml添加以下兩行代碼,以獲得權限:
XML/HTML代碼:
<uses-permission android:name="android.permission.CALL_PHONE" />
<uses-permission android:name="android.permission.MODIFY_PHONE_STATE" />
main.xml源碼如下:
<?xml version="1.0" encoding="utf-8"?>
<LinearLayout xmlns:android="http://schemas.android.com/apk/res/android"
  android:orientation="vertical" android:layout_width="fill_parent"
  android:layout_height="fill_parent">
  <RadioGroup android:layout_height="wrap_content"
    android:layout_width="fill_parent" android:id="@+id/rGrpSelect">
    <RadioButton android:layout_height="wrap_content"
      android:layout_width="fill_parent" android:id="@+id/rbtnAutoAccept"
      android:text="所有來電自動接聽"></RadioButton>
    <RadioButton android:layout_height="wrap_content"
      android:layout_width="fill_parent" android:id="@+id/rbtnAutoReject"
      android:text="所有來電自動掛斷"></RadioButton>
  </RadioGroup>
  <ToggleButton android:layout_height="wrap_content"
    android:layout_width="fill_parent" android:id="@+id/tbtnRadioSwitch"
    android:textOn="Radio已經啟動" android:textOff="Radio已經關閉"
    android:textSize="24dip" android:text></ToggleButton>
  <ToggleButton android:layout_height="wrap_content"
    android:layout_width="fill_parent" android:id="@+id/tbtnDataConn"
    android:textSize="24dip" android:text android:textOn="允許數據連接"
    android:textOff="禁止數據連接"></ToggleButton>
</LinearLayout>
PhoneUtils.java是手機功能類,從TelephonyManager中實例化ITelephony並返回,源碼如下:
package com.testTelephony;

import java.lang.reflect.Field;
import java.lang.reflect.Method;
import com.android.internal.telephony.ITelephony;
import android.telephony.TelephonyManager;
import android.util.Log;

public class PhoneUtils {
  /**
   * 從TelephonyManager中實例化ITelephony,並返回
   */
  static public ITelephony getITelephony(TelephonyManager telMgr) throws Exception {
    Method getITelephonyMethod = telMgr.getClass().getDeclaredMethod("getITelephony");
    getITelephonyMethod.setAccessible(true);//私有化函數也能使用
    return (ITelephony)getITelephonyMethod.invoke(telMgr);
  }

  static public void printAllInform(Class clsShow) {
    try {
      // 取得所有方法
      Method[] hideMethod = clsShow.getDeclaredMethods();
      int i = 0;
      for (; i < hideMethod.length; i++) {
        Log.e("method name", hideMethod[i].getName());
      }
      // 取得所有常量
      Field[] allFields = clsShow.getFields();
      for (i = 0; i < allFields.length; i++) {
        Log.e("Field name", allFields[i].getName());
      }
    } catch (SecurityException e) {
      // throw new RuntimeException(e.getMessage());
      e.printStackTrace();
    } catch (IllegalArgumentException e) {
      // throw new RuntimeException(e.getMessage());
      e.printStackTrace();
    } catch (Exception e) {
      // TODO Auto-generated catch block
      e.printStackTrace();
    }
  }
}
testTelephony.java是主類,使用PhoneStateListener監聽通話狀態,以及實現上述4種電話控制功能,源碼如下:
package com.testTelephony;

import android.app.Activity;
import android.os.Bundle;
import android.telephony.PhoneStateListener;
import android.telephony.TelephonyManager;
import android.util.Log;
import android.view.View;
import android.widget.RadioGroup;
import android.widget.ToggleButton;

public class testTelephony extends Activity {
  /** Called when the activity is first created. */
  RadioGroup rg;//來電操作單選框
  ToggleButton tbtnRadioSwitch;//Radio開關
  ToggleButton tbtnDataConn;//數據連接的開關
  TelephonyManager telMgr;
  CallStateListener stateListner;
  int checkedId=0;
  @Override
  public void onCreate(Bundle savedInstanceState) {
    super.onCreate(savedInstanceState);
    setContentView(R.layout.main);

    telMgr= (TelephonyManager)getSystemService(TELEPHONY_SERVICE);
    telMgr.listen(new CallStateListener(), CallStateListener.LISTEN_CALL_STATE);

    PhoneUtils.printAllInform(TelephonyManager.class);

    rg = (RadioGroup)findViewById(R.id.rGrpSelect);
    rg.setOnCheckedChangeListener(new CheckEvent());
    tbtnRadioSwitch=(ToggleButton)this.findViewById(R.id.tbtnRadioSwitch);
    tbtnRadioSwitch.setOnClickListener(new ClickEvent());
    try {
      tbtnRadioSwitch.setChecked(PhoneUtils.getITelephony(telMgr).isRadioOn());
    } catch (Exception e) {
      Log.e("error",e.getMessage());
    }
    tbtnDataConn=(ToggleButton)this.findViewById(R.id.tbtnDataConn);
    tbtnDataConn.setOnClickListener(new ClickEvent());
    try {
      tbtnDataConn.setChecked(PhoneUtils.getITelephony(telMgr).isDataConnectivityPossible());
    } catch (Exception e) {
      Log.e("error",e.getMessage());
    }
  }

  /**
   * 來電時的操作
   * @author GV
   *
   */
  public class CheckEvent implements RadioGroup.OnCheckedChangeListener{

    @Override
    public void onCheckedChanged(RadioGroup group, int checkedId) {
      testTelephony.this.checkedId=checkedId;
    }
  }

  /**
   * Radio和數據連接的開關
   * @author GV
   *
   */
  public class ClickEvent implements View.OnClickListener{

    @Override
    public void onClick(View v) {
      if (v == tbtnRadioSwitch) {
        try {
          PhoneUtils.getITelephony(telMgr).setRadio(tbtnRadioSwitch.isChecked());
        } catch (Exception e) {
          Log.e("error", e.getMessage());
        }
      }
      else if(v==tbtnDataConn){
        try {
          if(tbtnDataConn.isChecked())
            PhoneUtils.getITelephony(telMgr).enableDataConnectivity();
          else if(!tbtnDataConn.isChecked())
            PhoneUtils.getITelephony(telMgr).disableDataConnectivity();
        } catch (Exception e) {
          Log.e("error", e.getMessage());
        }
      }
    }
  }

  /**
   * 監視電話狀態
   * @author GV
   *
   */
  public class CallStateListener extends PhoneStateListener {
    @Override
    public void onCallStateChanged(int state, String incomingNumber) {
      if(state==TelephonyManager.CALL_STATE_IDLE)//掛斷
      {
        Log.e("IDLE",incomingNumber);
      }
      else if(state==TelephonyManager.CALL_STATE_OFFHOOK)//接聽
      {
        Log.e("OFFHOOK",incomingNumber);
      }
      else if(state==TelephonyManager.CALL_STATE_RINGING)//來電
      {
        if(testTelephony.this.checkedId==R.id.rbtnAutoAccept)
        {
          try {
            //需要<uses-permission android:name="android.permission.MODIFY_PHONE_STATE" />
            PhoneUtils.getITelephony(telMgr).silenceRinger();//靜鈴
            PhoneUtils.getITelephony(telMgr).answerRingingCall();//自動接聽

          } catch (Exception e) {
            Log.e("error",e.getMessage());
          }
        }
        else if(testTelephony.this.checkedId==R.id.rbtnAutoReject)
        {
          try {
            PhoneUtils.getITelephony(telMgr).endCall();//掛斷
            PhoneUtils.getITelephony(telMgr).cancelMissedCallsNotification();//取消未接顯示
          } catch (Exception e) {
            Log.e("error",e.getMessage());
          }
        }
      }
      super.onCallStateChanged(state, incomingNumber);
    }
  }
}
以上就是Android TelephonyManager的介紹和簡單示例,希望能幫助有需要的同學,謝謝大家對本站的支持!
 Android ListView適配器(Adapter)優化方法詳解
Android ListView的優化,在做Android項目的時候,在用到ListView 界面及數據顯示,這個時候如果資源過大,對項目來說,用戶體驗肯定是不好的,這裡
 Activity之間的動畫切換學習筆記(一)
首先什麼是Transition? 安卓5.0中Activity和Fragment變換是建立在名叫Transitions的安卓新特性之上的。這個誕生於4.4的transit
 Android中自定義View和自定義動畫
Android FrameWork 層給我們提供了很多界面組件,但是在實際的商業開發中這些組件往往並不能完全滿足我們的需求,這時候我們就需要自定義我們自己的視圖和動畫。
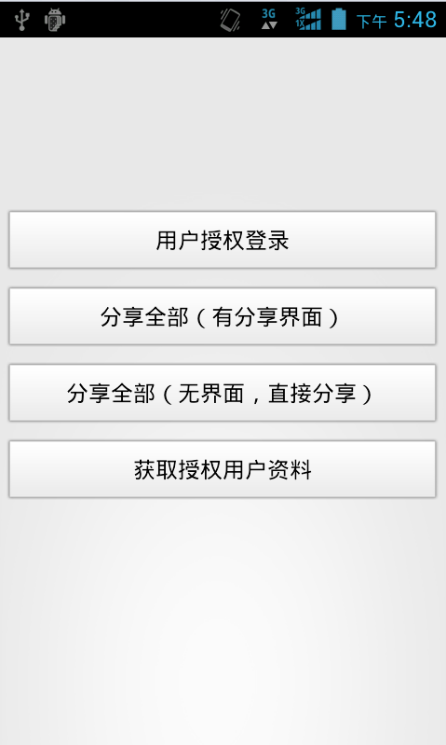 Android實現第三方授權登錄、分享以及獲取用戶資料
由於公司項目的需要,要實現在項目中使用第三方授權登錄以及分享文字和圖片等這樣的效果,幾經波折,查閱了一番資料,做了一個Demo。實現起來的效果還是不錯的,不敢獨享,決定寫