編輯:關於Android編程
一 Paint ,Canvas
public class drawView extends View{
  private Paint paint1;
  public drawView(Context context,AttributeSet set ){
    super(context,set);
  }

  public void onDraw(Canvas canvas){

    super.onDraw(canvas);
        //new 一個畫筆對象
    paint1= new Paint();
    canvas.drawColor(Color.TRANSPARENT);
    //給畫筆設置 屬性
    paint1.setAntiAlias(true);
    paint1.setColor(Color.GRAY);
    paint1.setStyle(Paint.Style.FILL);
    paint1.setStrokeWidth(3);

    //畫一個圓
    //canvas.drawCircle(arg0, arg1, arg2, arg3);
    canvas.drawCircle(10, 10, 5, paint1);
    }
}
二 AsyncImageTask
  /*
   * //默認開啟的線程數為128條如果超過128條會放進隊列進行排隊
    //繼承AsyncTask時指定三個參數第一個為要傳入的參數類型 第二個為進度的參數類型 第三個為返回結果的參數類型
    //當調用execute時首先執行preExecute然後在執行去啟用線程池的execute
    //這時會啟動子線程去執行doinbackground--執行完後AsyncTask內部會有Handler將結果返回到UI線程中
    //也就是onPostExecute的這個方法然後在進行UI界面的更新
   */
   private void asyncImageLoad(ImageView imageView, String path) {
      AsyncImageTask asyncImageTask = new AsyncImageTask(imageView);
      asyncImageTask.execute(path);

    }
   private final class AsyncImageTask extends AsyncTask<String, Integer, Uri>{
    private ImageView imageView;
    public AsyncImageTask(ImageView imageView) {
      this.imageView = imageView;

    }
    protected Uri doInBackground(String... params) {//子線程中執行的
      try {
        Uri uu = ContactService.getImage(params[0], cache);//將URI路徑拋給主線程
        System.out.println(uu+"  zuuuuuuuu");
        return uu;
      } catch (Exception e) {
        e.printStackTrace();
      }
      return null;
    }
    protected void onPostExecute(Uri result) {//運行在主線程,獲取 URI 路徑 ,進行圖片更新
      Log.i("Test", result+"");
      if(result!=null && imageView!= null)
        imageView.setImageURI(result);//setImageURI這個方法會根據路徑加載圖片
    }
   }
三 截取字符串
//截取字符串 從 0 到 第一個 "/" 字符
 String name = result.substring(0,result.indexOf("/"));
//截取字符串 從 第一個 字符 “/” 到 最後一個 “/” 字符
 String name = result.substring(result.indexOf("/")+1, result.lastIndexOf("/")));
四 MD5廣泛用於加密
import java.security.MessageDigest;
import java.security.NoSuchAlgorithmException;
public class MD5 {
  public static String getMD5(String content) {
    try {
      MessageDigest digest = MessageDigest.getInstance("MD5");
      digest.update(content.getBytes());
      return getHashString(digest);

    } catch (NoSuchAlgorithmException e) {
      e.printStackTrace();
    }
    return null;
  }

  private static String getHashString(MessageDigest digest) {
    StringBuilder builder = new StringBuilder();
    for (byte b : digest.digest()) {
      builder.append(Integer.toHexString((b >> 4) & 0xf));
      builder.append(Integer.toHexString(b & 0xf));
    }
    return builder.toString();
  }
}
五 讀取流中的字節:
import java.io.ByteArrayOutputStream;
import java.io.InputStream;
public class StreamTool {
  /**
   * 讀取流中的數據
   * @param inStream
   * @return
   * @throws Exception
   */
  public static byte[] read(InputStream inStream) throws Exception{
    ByteArrayOutputStream outStream = new ByteArrayOutputStream();
    byte[] buffer = new byte[1024];
    int len = 0;
    while( (len = inStream.read(buffer)) != -1){
      outStream.write(buffer, 0, len);
    }
    inStream.close();
    return outStream.toByteArray();
  }
}
六 解析服務器傳過來的 xml 數據流
/*
   * 得到解析 xml 後 的 Contact list 集合
   */
  public static List<Contact> getContacts() throws Exception {

    String path = StringTools.getURL_list_xml;
    URL url = new URL(path);
  //URLConnection與HttPURLConnection都是抽象類,無法直接實例化對象。
  //其對象主要通過URL的openconnection方法獲得。
  //利用HttpURLConnection對象從網絡中獲取網頁數據
    HttpURLConnection con = (HttpURLConnection) url.openConnection();
    con.setReadTimeout(5000);
    con.setRequestMethod("GET");
    if(con.getResponseCode() == 200){ //http協議,裡面有相應狀態碼的解釋,
                   //這裡如樓上所說是判斷是否正常響應請求數據.
      return parseXML(con.getInputStream()); //FFF
      //return StreamTool.read(con.getInputStream());
    }
    return null;
  }
其中 parseXML(con.getInputStream());
  /*
   * 解析XMl
   */
   private static List<Contact> parseXML(InputStream xml) throws Exception {
    List<Contact> contacts = new ArrayList<Contact>();
    Contact contact = null;
    XmlPullParser pullParser = Xml.newPullParser();
    pullParser.setInput(xml,"UTF-8");
    int event = pullParser.getEventType();
    while(event != XmlPullParser.END_DOCUMENT){
      switch (event) {
      case XmlPullParser.START_TAG :
        if("contact".equals(pullParser.getName())){
          contact = new Contact();
          contact.id = new Integer(pullParser.getAttributeValue(0));
        }else if("name".equals(pullParser.getName())){
          contact.name = pullParser.nextText();// .nextText 不是 .getText !!!!
        }else if("image".equals(pullParser.getName())){

          contact.imageUrl = pullParser.getAttributeValue(0);//FFF
        }

        break;
      case XmlPullParser.END_TAG :
        if("contact".equals(pullParser.getName())){
        contacts.add(contact);
        contact = null;
        }
        break;
      }
      event = pullParser.next();
    }
    return contacts;
  }
七 解析 服務器傳過來的 Json 數據:
/*
   * 解析 Json 數據
   */
  private static List<SecondActivity_Goods_Bean> parseJson(InputStream inputStream) throws Exception {

    List<SecondActivity_Goods_Bean> SecondActivity_Goods_Beans = new ArrayList<SecondActivity_Goods_Bean>();
    SecondActivity_Goods_Bean goodBean = null;
    byte[] data = StreamTool.read(inputStream);
    String json = new String(data);
    JSONArray array = new JSONArray(json);
    for(int i=0;i<array.length();i++){
      JSONObject jsonObject = array.getJSONObject(i);
      jsonObject.getString("imageUrl");
      jsonObject.getString("imageContent");
      jsonObject.getString("goodsPrice");
      goodBean = new SecondActivity_Goods_Bean(jsonObject.getString("imageUrl"),
                           jsonObject.getString("imageContent"),
                           jsonObject.getString("goodsPrice"));
      SecondActivity_Goods_Beans.add(goodBean);
    }
    return null;
  }
八 向服務器提交數據:
  private static String sendPostRequest(String path,Map<String, String> parame, String encoding)
  throws Exception {
    //StringBuilder 來組合成這段數據 發給服務器   telephone_number=telephone_number&password=password
    StringBuilder data = new StringBuilder();
    if(parame != null && !parame.isEmpty()){
      for(Map.Entry<String, String> entry:parame.entrySet()){
        data.append(entry.getKey()).append("=");
        data.append(URLEncoder.encode(entry.getValue(), encoding));
        data.append("&");
      }
      data.deleteCharAt(data.length() -1);//最後會多出 “&”
    }
    byte[] entity = data.toString().getBytes();//默認得到UTF-8的字節碼
    HttpURLConnection conn = (HttpURLConnection) new URL(path).openConnection();
    conn.setConnectTimeout(5000);
    conn.setRequestMethod("POST"); //采用 POST 向服務器發送請求
    conn.setRequestProperty("Content-Type", "application/x-www-form-urlencoded");//設置Post請求的 頭字段
    conn.setRequestProperty("Content-Length", String.valueOf(entity.length));//設置Post請求的 頭字段

    OutputStream outStream = conn.getOutputStream();//得到數據輸出流
    outStream.write(entity);//將數據寫給 http輸出流緩沖區

    if(conn.getResponseCode() == 200){ //的android客戶端向服務器請求 請求碼 時 數據輸出流的緩沖區才把數據寫給服務器
      //String s = conn.getResponseMessage();//這個方法得到字符串 “OK”
      /*
       * 得到服務器返回的數據!!! 得到服務器的返回值就可以判斷數據是否上傳成功
       */
      byte[] stringData = StreamTool.read(conn.getInputStream());
      String stringFlag = new String(stringData,"UTF-8");
      return stringFlag; // 數據發送成功 返回 true
    }
    return "Submit_Fail";
  }
九 SharedPreferences
public class SharedPreferences_Service {
  private Context context;
  private SharedPreferences sp;
  public SharedPreferences_Service(Context applicationCon){
    this.context = applicationCon;
  }
  /**
   * 將 文件存儲在 File Explorer的data/data/相應的包名/Rsgistered_form.xml 下導出該文件
   * @param name
   * @param telephone_number
   * @param password
   */
  public void SetParament(String name,String telephone_number,String password){
    sp = context.getSharedPreferences("Rsgistered_form", context.MODE_APPEND);
    Editor et = sp.edit();
    et.putString("name", name);
    et.putString("telephone_number",telephone_number);
    et.putString("password",password);
    et.commit();
  }
  /**
   * 在文件夾 File Explorer的data/data/相應的 Rsgistered_form.xml下取數據
   * @return
   */
  public Map<String, String> GetParament(){
    Map<String, String> parmes = new HashMap<String, String>();
    sp = context.getSharedPreferences("Rsgistered_form", context.MODE_APPEND);
    parmes.put("name", sp.getString("name", ""));//獲得name字段,參數為空就返回空
    parmes.put("telephone_number", sp.getString("telephone_number", ""));
    parmes.put("password", sp.getString("password", ""));
    return parmes;
  }
}
十 <!-- 設置圓角半徑 --><!-- 漸變 -->
<?xml version="1.0" encoding="utf-8"?>
<shape xmlns:android="http://schemas.android.com/apk/res/android"
  android:shape="rectangle" >
  <!-- 圓角 -->
<corners
    android:radius="9dp"
    android:topLeftRadius="2dp"
    android:topRightRadius="2dp"
    android:bottomLeftRadius="2dp"
    android:bottomRightRadius="2dp"/>
<!-- 設置圓角半徑 --><!-- 漸變 -->
<gradient
    android:startColor="@android:color/white"
    android:centerColor="@android:color/black"
    android:endColor="@android:color/black"
    android:useLevel="true"
    android:angle="45"
    android:type="radial"
    android:centerX="0"
    android:centerY="0"
    android:gradientRadius="90"/>
<!-- 間隔 -->
<padding
    android:left="2dp"
    android:top="2dp"
    android:right="2dp"
    android:bottom="2dp"/>
<!-- 各方向的間隔 --><!-- 大小 -->
<size
    android:width="50dp"
    android:height="50dp"/>
<!-- 寬度和高度 --><!-- 填充 -->
<solid
    android:color="@android:color/white"/>
<!-- 填充的顏色 --><!-- 描邊 -->
<stroke
    android:width="2dp"
    android:color="@android:color/black"
    android:dashWidth="1dp"
    android:dashGap="2dp"/>

</shape>
也可以在 drawable 文件夾下 在定義個 xxx.xml 使用 selector
<?xml version="1.0" encoding="utf-8"?>
<selector xmlns:android="http://schemas.android.com/apk/res/android">
 <item android:drawable="@drawable/button_pressed_bg" android:state_pressed="true"></item>
 <item android:drawable="@drawable/shape_image"></item>
</selector>
定義一個有四個角弧度的 長方形背景
<?xml version="1.0" encoding="utf-8"?>
<shape xmlns:android="http://schemas.android.com/apk/res/android"
  android:shape="rectangle" >
  <!-- 指定4個角的弧度 -->
  <corners android:topLeftRadius="2px"
    android:topRightRadius="2px"
    android:bottomLeftRadius="2px"
    android:bottomRightRadius="2px"/>
  <!-- 指定背景顏色 -->
  <solid android:color="#FFFFFF"/>
  <!-- 指定框條的顏色的寬度 -->
  <stroke android:width="0.5dp" android:color="#7A7A7A"/>

</shape>
十一 anim文件
// anim 文件夾下 的 out.xml 動畫文件
<?xml version="1.0" encoding="utf-8"?>
<set xmlns:android="http://schemas.android.com/apk/res/android"
  android:shareInterpolator="false">
  <!-- 100%p 的 p 是指從父類view 的 指定位置 0 到 起始位 100%-->
  <!-- 位移 -->
   <translate
    android:fromXDelta="0%p"
    android:toXDelta="100%p"
    android:duration="1000"
    />
   <!-- 透明度 -->
   <alpha
    android:fromAlpha="1.0"
    android:toAlpha="0.5"
    android:duration="500"
    />
</set>
十二 ,將 Raw 加載數據庫 導入 手機文件夾下
private SQLiteDatabase openDatabase(String dbfile) {

    try {
      if (!(new File(dbfile).exists())) {
        //判斷數據庫文件是否存在,若不存在則執行導入,否則直接打開數據庫
        InputStream is = this.context.getResources().openRawResource(R.raw.china_city); //欲導入的數據庫
        FileOutputStream fos = new FileOutputStream(dbfile);
        byte[] buffer = new byte[BUFFER_SIZE];
        int count = 0;
        while ((count = is.read(buffer)) > 0) {
          fos.write(buffer, 0, count);
        }
        fos.close();
        is.close();
      }
      return SQLiteDatabase.openOrCreateDatabase(dbfile, null);
    } catch (FileNotFoundException e) {
      PLog.e("File not found");
      e.printStackTrace();
    } catch (IOException e) {
      PLog.e("IO exception");
      e.printStackTrace();
    }

    return null;
  }
十三 , 雙擊退出應用
public class DoubleClickExit {
  /**
   * 雙擊退出檢測, 阈值 2000ms
   */
  public static long lastClick = 0L;
  private static final int THRESHOLD = 2000;// 2000ms
  public static boolean check() {
    long now = System.currentTimeMillis();
    boolean b = now - lastClick < THRESHOLD;
    lastClick = now;
    return b;
  }
}
  @Override
  public void onBackPressed() {
    if (!DoubleClickExit.check()) {
        ToastUtil.showShort(getString(R.string.double_exit));
      } else {
        finish();
      }
  }
十四 EditText 一些設置:
//設置點擊後 軟鍵盤的 顯示類型 ,numberDecimal帶小數點的數字
android:inputType="numberDecimal"
// 設置alertDialog中的 editView 自動彈出軟鍵盤
 editView.setOnFocusChangeListener(new View.OnFocusChangeListener() {
      @Override
      public void onFocusChange(View v, boolean hasFocus) {
        if (hasFocus) {
          // 設置 彈出軟鍵盤
          alertDialog.getWindow().setSoftInputMode(WindowManager.LayoutParams.SOFT_INPUT_STATE_ALWAYS_VISIBLE);
        }
      }
    });
十五 Calendar
mCalendar= Calendar.getInstance();//獲取當前日期
    int_YEAR = mCalendar.get(Calendar.YEAR);
    int_MONTH = mCalendar.get(Calendar.MONTH);
    int_DAT = mCalendar.get(Calendar.DAY_OF_MONTH);
    int_lastday=mCalendar.getActualMaximum(Calendar.DAY_OF_MONTH);
    int_week = mCalendar.get(Calendar.DAY_OF_WEEK);
十六 DialogFragment ,DialogFragment官方推薦使用的,好處就不多說
public class YourDialogFragment extends DialogFragment {


  public interface DialogFragmentDataImp{//定義一個與Activity通信的接口,使用該DialogFragment的Activity須實現該接口
    void showMessage(String message);
  }

  public static YourDialogFragment newInstance(String message){
    //創建一個帶有參數的Fragment實例
    YourDialogFragment fragment = new YourDialogFragment ();
    Bundle bundle = new Bundle();
    bundle.putString("message", message);
    fragment.setArguments(bundle);//把參數傳遞給該DialogFragment
    return fragment;
  }
  @Override
  public Dialog onCreateDialog(Bundle savedInstanceState) {
    View customView = LayoutInflater.from(getActivity()).inflate(
        R.layout.fragment_edit_bill_dialog, null);
    //ButterKnife.bind(this,customView);
    mContext = getActivity();

    initView();

    return new AlertDialog.Builder(getActivity()).setView(customView)
        .create();
  }
使用(在 activity 或 fragment 調用):
 YourDialogFragment dialog = new YourDialogFragment();
    dialog.show(getFragmentManager(), "loginDialog");
 Android中HttpURLConnection使用詳解
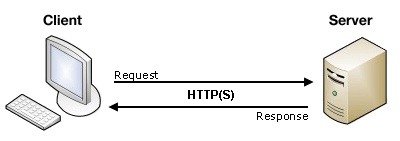
認識Http協議 Android中發送http網絡請求是很常見的,要有GET請求和POST請求。一個完整的http請求需要經歷兩個過程:客戶端發送請求到服務器,然後服務
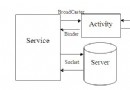 Android實現Activity、Service與Broadcaster三大組件之間互相調用的方法詳解
本文實例講述了Android實現Activity、Service與Broadcaster三大組件之間互相調用的方法。分享給大家供大家參考,具體如下:我們研究兩個問題,1、
 android提供外部資源的規則和注意事項
您應該始終外部化應用資源,例如圖像和代碼中的字符串,這樣有利於您單獨維護這些資源。 此外,您還應該為特定設備配置提供備用資源,方法是將它們分組到專門命名的資源目錄中。 在
 Android上使用ZXing識別條形碼與二維碼的方法
目前有越來越多的手機具備自動對焦的拍攝功能,這也意味著這些手機可以具備條碼掃描的功能。手機具備條碼掃描的功能,可以優化購物流程,快速存儲電子名片(二維碼)等。本文所述實例