編輯:關於Android編程
在項目開發中,我們經常需要進行動態添加組件,其中可添加的部分有兩項:布局和組件
其中,添加的布局主要有RelativeLayout型(相對布局)的和LinearLayout(線性布局)
添加的組件主要有文本顯示框,編輯框,按鈕等組件。
下面,就讓我們來進行實現:
首先我們創建一個新的項目,刪除MainActivity.class中沒有的代碼,僅留下protected void onCreate(Bundle savedInstanceState)函數往布局文件中添加一個新的組件:
1. addView方法簡介
在Android中,addView(ViewGroup view, index)在指定的index處添加一個view。可以利用排版View的 addView 函數,將動態產生的View 物件加入到排版View 中。
2、示例:
(1)首先我們往布局文件中添加一個組件,比如一個文本,兩個按鈕,此時我們需要在布局文件中添加一個布局項<LinearLayout>,定義其id為linearlay_1,用於在添加組件時識別,布局文件代碼如下所示:
 <TextView
  android:layout_width="wrap_content"
  android:layout_height="wrap_content"
  android:text="動態添加組件示例"
  android:id="@+id/textview"/>
 <LinearLayout
  android:layout_below="@+id/textview"
  android:id="@+id/linearlay_1"
  android:layout_height="wrap_content"
  android:layout_width="wrap_content"
  android:orientation="vertical"
  >

</LinearLayout>
然後我們在Activity類裡邊進行添加組件,代碼如下所示:
   /**
  * 代碼中,布局的位置,是垂直順序排列的因為界面代碼Linerlayout的orientation設置的是
  * vertical的,但是為了美觀,需要設置添加的View的位置和樣式。在添加View的時候分
  * 為兩類來介紹,一種是布局(例如:Linearlayout和RelativeLayout等,對於RelativeLayout屬於相對布局)

  *注意,對於LinearLayout布局來說,設置橫向還是縱向是必須的!否則就看不到效果了。

  */

public class MainActivity extends Activity {

 @Override
 protected void onCreate(Bundle savedInstanceState) {
 super.onCreate(savedInstanceState);
 setContentView(R.layout.activity_main);

 //綁定activity_main布局文件中的布局項,其中R.id.lenearlay_1為布局文件中設置的id
 LinearLayout linear=(LinearLayout) findViewById(R.id.linearlay_1);
 //添加文本,this代表當前項目
 TextView tv=new TextView(this);
 tv.setText("示例文本框");
 tv.setId(1);//設置ID,可有可無,也可以在R文件中添加字符串,然後在這裡使用引用的方式使用
 linear.addView(tv);

  // 將Button 加入到LinearLayout 中
  Button b1 = new Button(this);
  b1.setText("取消");
  linear. addView ( b1 );

  // 將Button 2 加入到LinearLayout 中
  Button b2 = new Button(this);
  b2.setText("確定");
  linear. addView ( b2 );

  // 從LinearLayout 中移除Button 1
  // linear. removeView ( b1 );


 }

}
效果如下圖所示:

圖 1 動態添加組件-LinearLayout
(2) 動態添加布局:
* 下面的例子將介紹如何動態添加布局,基本內容和上面的代碼一致,主要注重如何控制添加的布局的位置
* 在控制布局的位置的時候使用LayoutParam類來實現。
* 注意:控制位置和樣式的時候,布局和控件使用的方法是一樣的。
*/這次只是在MainActivity中進行操作,不涉及布局文件(.xml),其代碼如下所示:
 public class MainActivity extends Activity {

 protected void onCreate(Bundle savedInstanceState) {
 super.onCreate(savedInstanceState);
 setContentView(R.layout.activity_main);
  //////////////////////////////////////
  //創建一個相對布局relative
 RelativeLayout relative = new RelativeLayout(this);
 relative.setBackgroundColor(Color.YELLOW);
 // 將Button1 加入到RelativeLayout 中
  Button btn_r1 = new Button(this);
  btn_r1.setText("取消");//設置顯示的字符
  btn_r1.setId(24);
  relative.addView(btn_r1);

  // 將Button2 加入到RelativeLayout 中
  Button btn_r2 = new Button(this);
  btn_r2.setText("確定");//設置顯示的字符
  btn_r2.setId(25);
  relative.addView(btn_r2);
  // 設置RelativeLayout布局的寬高
   RelativeLayout.LayoutParams lp=new RelativeLayout.LayoutParams(LayoutParams.WRAP_CONTENT,LayoutParams.WRAP_CONTENT);
   lp.addRule(RelativeLayout.ALIGN_PARENT_LEFT, RelativeLayout.TRUE);
   lp.addRule(RelativeLayout.ALIGN_PARENT_TOP, RelativeLayout.TRUE);
   btn_r1.setLayoutParams(lp); ////設置按鈕的布局屬性
   lp=new RelativeLayout.LayoutParams(LayoutParams.WRAP_CONTENT,LayoutParams.WRAP_CONTENT);
   lp.addRule(RelativeLayout.RIGHT_OF, btn_r1.getId());
   btn_r2.setLayoutParams(lp); ////設置按鈕的布局屬性
   setContentView(relative);
 }

}
效果如下所示:
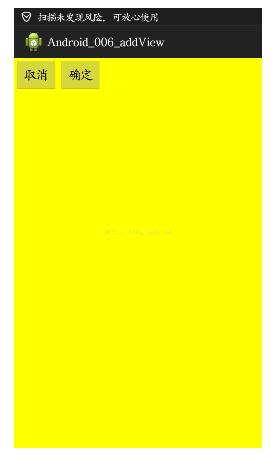
圖 2 動態添加布局-RelativeLayout
學會了上面的介紹,你就可以很輕松的布局界面,無論是按鈕還是其他組件,對於布局,你也可以很方便的進行布局使用,以上就是在安卓中如何動態添加組件的方法。
以上就是本文的全部內容,希望對大家的學習有所幫助,也希望大家多多支持本站。
 字體管家怎麼用?輕松教你美化手機字體
字體管家是手機安卓手機上面的一個更改手機字體的軟體,應該算是手機美化類別的。字體管家在手機在線字體的收集方面還算是比較全面的,雖不能算是百變字體,但分類足以
 Android 中的消息傳遞,詳解廣播機制
--------------------------------------廣播機制簡介-----------------------------------------
 android高分段進階攻略(5)android指南針
前段時間,有一位網友發私信給我(@伍歌),問我做過磁場傳感器可以做過指南針嗎?其實我第一節裡面已經說過了,磁場傳感器可以做,只是算法比較麻煩,最簡單的指南針使用方向傳感器
 Android開發----------- 手電筒改進版本
在之前的基礎上 在 res 文件夾下面: 添加一個 drawable/local_me.xml localme_cml 主程序: p