編輯:關於Android編程
昨日實現了360手機衛士的來電顯示歸屬地的功能,具體的功能就是當來電的時候,顯示當前號碼的歸屬地,學習之後發現操作
非常的簡單,具體實現代碼如下:
AddressService.java
 package com.qingguow.mobilesafe.service;

import com.qingguow.mobilesafe.utils.NumberQueryAddressUtil;

import android.app.Service;
import android.content.Intent;
import android.os.IBinder;
import android.telephony.PhoneStateListener;
import android.telephony.TelephonyManager;
import android.widget.Toast;

/**
 * 來電顯示
 *
 * @author taoshihan
 *
 */
public class AddressService extends Service {
  private TelephonyManager tm;
  private MyPhoneStateListener phoneStateListener;

  @Override
  public IBinder onBind(Intent arg0) {
    // TODO Auto-generated method stub
    return null;
  }
  /**
   * 服務創建
   */
  @Override
  public void onCreate() {
    super.onCreate();
    tm = (TelephonyManager) getSystemService(TELEPHONY_SERVICE);
    phoneStateListener = new MyPhoneStateListener();
    tm.listen(phoneStateListener, PhoneStateListener.LISTEN_CALL_STATE);
  }

  private class MyPhoneStateListener extends PhoneStateListener {
    @Override
    public void onCallStateChanged(int state, String incomingNumber) {
      super.onCallStateChanged(state, incomingNumber);
      switch (state) {
      case TelephonyManager.CALL_STATE_RINGING:
        String info = NumberQueryAddressUtil
            .queryAddress(incomingNumber);
        Toast.makeText(getApplicationContext(), info, 1).show();
        break;
      default:
        break;
      }
    }
  }
  /**
   * 服務銷毀
   */
  @Override
  public void onDestroy() {
    // TODO Auto-generated method stub
    super.onDestroy();
    //取消監聽
    tm.listen(phoneStateListener, PhoneStateListener.LISTEN_NONE);
    phoneStateListener=null;
  }
}
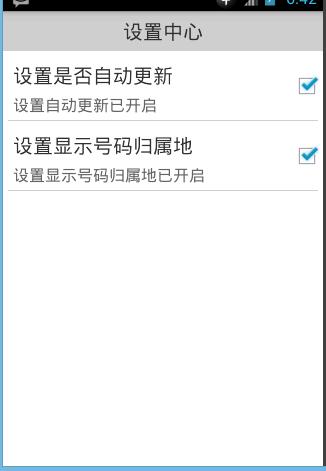
設置中心,配置是否開啟來電歸屬地顯示
直接使用我們之前定義好的組合控件
<com.qingguow.mobilesafe.ui.SettingItemView
    tsh:title="設置顯示號碼歸屬地"
    tsh:desc_on="設置顯示號碼歸屬地已開啟"
    tsh:desc_off="設置顯示號碼歸屬地已關閉"
    android:layout_width="wrap_content"
    android:layout_height="wrap_content"
    android:id="@+id/siv_show_address">
  </com.qingguow.mobilesafe.ui.SettingItemView>
獲取到SettingItemView對象,我們自定義的控件,設置狀態
調用SettingItemView對象的setOnClickListener()方法,設置點擊事件,重寫onClick方法
調用SettingItemView對象的isChecked()方法,得到當前是否選中
判斷狀態,調用SettingItemView對象的setChecked()方法,設置狀態,參數:布爾值
調用startService()方法,開啟監聽手機狀態的服務,參數:Intent對象,
調用stopService()方法,關閉服務
判斷當前服務是否開啟,設置控件的默認選中狀態
新建一個工具類ServicesUtils.java
定義一個靜態方法isServiceRunning(),傳入參數:Context上下文,String服務名
調用Context對象的getSystemService()方法,獲取ActivityManager對象,參數:Context.ACTIVITY_SERVICE
調用ActivityManager對象的getRunningServices()方法,得到運行的服務List集合,參數:int最大值
for循環List集合,每條是個RunningServiceInfo對象
調用RunningServiceInfo.servie.getClassName(),獲取到String服務類名,判斷一下如果相等返回true
SettingActivity.java
package com.qingguow.mobilesafe;

import android.app.Activity;
import android.content.Intent;
import android.content.SharedPreferences;
import android.content.SharedPreferences.Editor;
import android.os.Bundle;
import android.view.View;
import android.view.View.OnClickListener;

import com.qingguow.mobilesafe.service.AddressService;
import com.qingguow.mobilesafe.ui.SettingItemView;
import com.qingguow.mobilesafe.utils.ServiceUtils;

public class SettingActivity extends Activity {
  private SettingItemView siv_item;
  private SharedPreferences sp;
  // 設置是否開啟號碼歸屬地
  private SettingItemView showAddressBtn;

  @Override
  protected void onCreate(Bundle savedInstanceState) {
    super.onCreate(savedInstanceState);
    setContentView(R.layout.activity_setting);

    // 設置號碼歸屬地
    showAddressBtn = (SettingItemView) findViewById(R.id.siv_show_address);
    if (ServiceUtils.isRunningService(this,
        "com.qingguow.mobilesafe.service.AddressService")) {
      showAddressBtn.setChecked(true);
    } else {
      showAddressBtn.setChecked(false);
    }
    showAddressBtn.setOnClickListener(new OnClickListener() {
      @Override
      public void onClick(View arg0) {
        if (showAddressBtn.isChecked()) {
          showAddressBtn.setChecked(false);
          stopService(new Intent(getApplicationContext(),
              AddressService.class));
        } else {
          showAddressBtn.setChecked(true);
          startService(new Intent(getApplicationContext(),
              AddressService.class));
        }
      }
    });

    siv_item = (SettingItemView) findViewById(R.id.siv_item);
    sp = getSharedPreferences("config", MODE_PRIVATE);
    // 根據保存的數據設置狀態
    boolean update = sp.getBoolean("update", false);
    if (update) {
      siv_item.setChecked(true);
    } else {
      siv_item.setChecked(false);
    }

    // 自動更新的點擊事件
    siv_item.setOnClickListener(new OnClickListener() {
      @Override
      public void onClick(View arg0) {
        Editor editor = sp.edit();
        if (siv_item.isChecked()) {
          // 設置不選中
          siv_item.setChecked(false);
          editor.putBoolean("update", false);
        } else {
          // 設置選中
          siv_item.setChecked(true);
          editor.putBoolean("update", true);
        }
        editor.commit();
      }
    });
  }
}
ServicesUtils.java
package com.qingguow.mobilesafe.utils;

import java.util.List;

import android.app.ActivityManager;
import android.app.ActivityManager.RunningServiceInfo;
import android.content.Context;
/**
 * 服務工具類
 * @author taoshihan
 *
 */
public class ServiceUtils {
  /**
   * 判斷某服務是否開啟
   * @param context
   * @param serviceName
   * @return
   */
  public static boolean isRunningService(Context context,String serviceName){
    ActivityManager am=(ActivityManager) context.getSystemService(Context.ACTIVITY_SERVICE);
    List<RunningServiceInfo> infos=am.getRunningServices(100);
    for(RunningServiceInfo info:infos){
      String name=info.service.getClassName();
      if(name.equals(serviceName)){
        return true;
      }
    }
    return false;
  }
}
設置效果如下:
以上就是本文的全部內容,希望對大家的學習有所幫助,也希望大家多多支持本站。
 Android動態部署六:如何從插件apk中啟動BroadcastReceiver和ContentProvider
實現Android動態部署的過程中最重要的是從插件apk中啟動四大組件,經過前面幾篇文章的分析,現在只剩下BroadcastReceiver和ContentProvide
 Android初級教程:Android中解析方式之pull解析
在安卓中有很多種解析方式。按照大方向有xml解析和json解析。而,細致的分,xml和json解析各有自己的很多解析方式。今天這一篇主要介紹xml解析中的pull解析。對
 Android音頻開發(7):使用 OpenSL ES API(下)
本文是我的《Android音頻開發》系列的第七篇文章,上一篇文章總整體上介紹了 Android OpenSL ES API 的基本概況,告訴了大家這個框架有什麼特性,可以
 神奇的 Swift 錯誤處理
Swift 中的錯誤處理從 O-C 沿襲而來,但 Swift 1.0 之後逐漸發生了巨大改變。重要的改變發生在 Swift 2,它率先使用了“處理非異常的狀態