編輯:關於Android編程
上文介紹了單行文本水平觸摸滑動效果,通過EditText實現TextView單行長文本水平滑動效果。
本文繼續介紹了多行文本折疊展開,自定義布局View實現多行文本折疊和展開
1.概述
經常在APP中能看到有引用文章或大段博文的內容,他們的展示樣式也有點兒意思,默認是折疊的,當你點擊文章之後它會自動展開。再次點擊他又會縮回去。
網上有找到部分效果,感覺不是很滿意。最後自己嘗試用 自定義布局layout 寫了個demo。比較簡陋,不過可以用了。有這方面需求的朋友可以稍加改造下。如有更好的創意,也不妨分享一下。
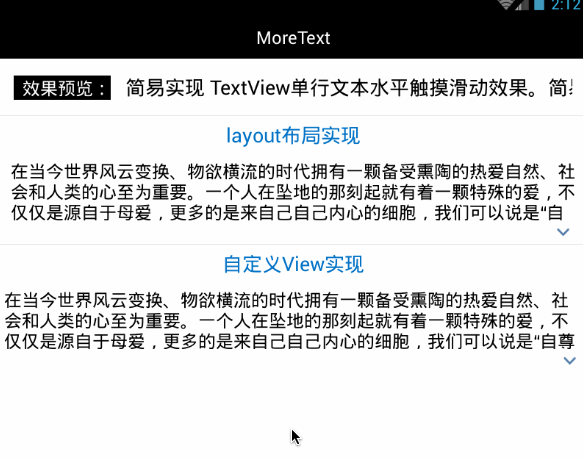
效果圖:
2.具體實現
但從實現效果方面來看,只用簡單定義必要view即可,後變為了方便擴展使用和挪用,又對整個布局進行封裝,方便直接使用。
2.1 通過多個布局組合實現
第一想法當然是用多個View組合來實現。那麼久定義一個LinearLayout布局分別嵌套TextView和ImageView來做。
大概步驟:
- 定義布局,垂直的線性LinearLayout布局、TextView和ImageView。 在layout中定義基本組件。
- 設置TextView的高度為指定行數*行高。 不使用maxLine的原因是maxLine會控制顯示文本的行數,不方便後邊使用動畫展開全部內容。因此這裡TextView的高度也因該為wrap_content。
- 給整個布局添加點擊事件,綁定動畫。 點擊時,若TextView未展開則展開至其實際高度,imageView 旋轉;否則回縮至 指定行數*行高 , imageView 旋轉縮回。
開始編寫代碼:
1.在xml中定義布局:
 <LinearLayout
 android:id="@+id/description_layout"
 android:layout_width="match_parent"
 android:layout_height="wrap_content"
 android:orientation="vertical"
 android:paddingLeft="12dip"
 android:paddingRight="12dip"
 android:paddingTop="5dip" >

 <TextView
 android:id="@+id/description_view"
 android:layout_width="match_parent"
 android:layout_height="wrap_content"
 android:textColor="@android:color/black"
 android:textSize="18dip" >
 </TextView>

 <ImageView
 android:id="@+id/expand_view"
 android:layout_width="wrap_content"
 android:layout_height="wrap_content"
 android:layout_gravity="right"
 android:paddingBottom="5dip"
 android:paddingLeft="5dip"
 android:paddingRight="5dip"
 android:paddingTop="5dip"
 android:src="@drawable/text_ic_expand"
 android:visibility="gone" />
 </LinearLayout>
2.首先在activity中定義並初始化這些view:
public class MainActivity extends Activity {
 TextView descriptionView;
 View layoutView ,expandView; //LinearLayout布局和ImageView
 int maxDescripLine = 3; //TextView默認最大展示行數

 //在OnCreate中初始化
 {
 layoutView = findViewById(R.id.description_layout);
 descriptionView = (TextView)findViewById(R.id.description_view);
 expandView = findViewById(R.id.expand_view);
 }
}
3.然後設置textview顯示文本,再根據默認展示行數設置其高度,並根據其是否已完全顯示(當前展示行數是否大於等於實際行數)來判斷需不需要點擊更多按鈕。
 //設置文本
 descriptionView.setText(getText(R.string.content));

 //descriptionView設置默認顯示高度
 descriptionView.setHeight(descriptionView.getLineHeight() * maxDescripLine);
 //根據高度來判斷是否需要再點擊展開
 descriptionView.post(new Runnable() {

 @Override
 public void run() {
 expandView.setVisibility(descriptionView.getLineCount() > maxDescripLine ? View.VISIBLE : View.GONE);
 }
 });
因為textView設置的是wrap_content,所以會顯示實際高度和行數,這裡根據maxDescripLine來設置其高度。
看了最後一行代碼可能有人會問?ImageView (點擊展開更多)是否應該顯示 的判斷邏輯為什麼要放在post方法裡邊呢? 這是由於在OnCreate方法中定義設置的textView不會馬上渲染並顯示,所以textview的getLineCount()獲取到的值一般都為零,因此使用post會在其繪制完成後來對ImageView進行顯示控制。
ps: 感覺我描述不清的朋友可以看下stackoverflow 上的講解 how to use getlinecount() in textview android.
4.給layoutView設置點擊事件。
給ImageView定義一個RotateAnimation的旋轉動畫,在旋轉過程中根據旋轉百分比進度控制textView高度,進而達到我們想要的效果。
 layoutView.setOnClickListener(new View.OnClickListener() {
 boolean isExpand;//是否已展開的狀態

 @Override
 public void onClick(View v) {
 isExpand = !isExpand;
 descriptionView.clearAnimation();//清楚動畫效果
 final int deltaValue;//默認高度,即前邊由maxLine確定的高度
 final int startValue = descriptionView.getHeight();//起始高度
 int durationMillis = 350;//動畫持續時間
 if (isExpand) {
  /**
  * 折疊動畫
  * 從實際高度縮回起始高度
  */
  deltaValue = descriptionView.getLineHeight() * descriptionView.getLineCount() - startValue;
  RotateAnimation animation = new RotateAnimation(0, 180, Animation.RELATIVE_TO_SELF, 0.5f, Animation.RELATIVE_TO_SELF, 0.5f);
  animation.setDuration(durationMillis);
  animation.setFillAfter(true);
  expandView.startAnimation(animation);
 } else {
  /**
  * 展開動畫
  * 從起始高度增長至實際高度
  */
  deltaValue = descriptionView.getLineHeight() * maxDescripLine - startValue;
  RotateAnimation animation = new RotateAnimation(180, 0, Animation.RELATIVE_TO_SELF, 0.5f, Animation.RELATIVE_TO_SELF, 0.5f);
  animation.setDuration(durationMillis);
  animation.setFillAfter(true);
  expandView.startAnimation(animation);
 }
 Animation animation = new Animation() {
  protected void applyTransformation(float interpolatedTime, Transformation t) { //根據ImageView旋轉動畫的百分比來顯示textview高度,達到動畫效果
  descriptionView.setHeight((int) (startValue + deltaValue * interpolatedTime));
  }
 };
 animation.setDuration(durationMillis);
 descriptionView.startAnimation(animation);
 }
 });
至此,通過布局已經實現了我們想要的效果。具體代碼參見代碼示例 的第一部分。
當然,我們可以這樣使用,但是每次都這麼重寫未免顯得有些麻煩。因此有必要把他寫成一個單獨控件,方便我們以後的開袋即食。廢話不多說,上菜。
2.2 通過自定義View組合封裝
這個view的布局結構並不打算使用xml來定義layout,直接定義一個繼承LinearLayout的MoreTextView類.這個類裡邊添加TextView和ImageView。
1.使用styleable自定義View屬性
為了後邊能夠方便的在xml布局中使用MoreTextView這個自定義View,類似通過
android:text = “XXX”
android:textSize = “XXX”
這樣快捷的綁定文本內容和設置字體大小等屬性,我們可以通過 declare-styleable在values文件下的xml中自定義我們想要的屬性,並在View中獲取和使用。詳細使用declare-styleable的內容會在後邊補充,這裡簡要說下。
比如,MoreTextView應該有的基本屬性,像 文本字體大小(textSize)、顏色(textColor)和文本內容(text),還有默認顯示行數(maxLine)等幾種屬性。我們要想像TextView一樣直接在xml中設置綁定,可以這樣做。
首先在values目錄下新建個attrs.xml(名字隨意),並定義MoreTextView這些屬性。
<?xml version="1.0" encoding="utf-8"?>
<resources>
 <declare-styleable name="MoreTextStyle">
 <attr name="textSize" format="dimension"/>
 <attr name="textColor" format="color"/>
 <attr name="maxLine" format="integer" />
 <attr name="text" format="string" />
 </declare-styleable>
</resources>
2.自定義MoreTextView並獲取這些屬性的值
上邊定義了這些屬性,就等於允許我們在xml中使用
more:text = “XXX”
more:textSize = “XXX”
more : textColor = “XXX”
more : maxLine = “XXX”
(注: more這個關鍵字可以隨意)
這樣直接設置屬性值。那麼具體怎麼取值,我們稍後來講。
(1)定義MoreTextView的屬性:
public class MoreTextView extends LinearLayout{
 protected TextView contentView; //文本正文
 protected ImageView expandView; //展開按鈕

 //對應styleable中的屬性
 protected int textColor;
 protected float textSize;
 protected int maxLine;
 protected String text;

 //默認屬性值
 public int defaultTextColor = Color.BLACK;
 public int defaultTextSize = 12;
 public int defaultLine = 3;

 //....實現部分略
}
(2)MoreTextView的構造方法:
 public MoreTextView(Context context, AttributeSet attrs) {
 super(context, attrs);
 initalize();
 initWithAttrs(context, attrs);
 bindListener();
 }
這三個方法簡單說明下:
initalize()初始化並添加View。初始化TextView和ImageView,並添加到MoretextView中去。
initWithAttrs(context, attrs)取值並設置。利用attrs從xml布局中取我們配置好的text/textSize/textColor/maxLine等屬性的屬性值,並設置到View上去。
bindListener()綁定點擊事件並設置動畫。 給當前MoreTextView設置點擊事件,實現點擊折疊和展開。
各個方法的具體實現:
//初始化並添加View
protected void initalize() {
 setOrientation(VERTICAL); //設置垂直布局
 setGravity(Gravity.RIGHT); //右對齊
 //初始化textView並添加
 contentView = new TextView(getContext());
 addView(contentView, LinearLayout.LayoutParams.MATCH_PARENT, LinearLayout.LayoutParams.WRAP_CONTENT);
 //初始化ImageView並添加
 expandView = new ImageView(getContext());
 int padding = dip2px(getContext(), 5);
 expandView.setPadding(padding, padding, padding, padding);
 expandView.setImageResource(R.drawable.text_ic_expand);
 LinearLayout.LayoutParams llp = new LinearLayout.LayoutParams(LinearLayout.LayoutParams.WRAP_CONTENT, LinearLayout.LayoutParams.WRAP_CONTENT);
 addView(expandView, llp);
取值並設置這部分有必要將一下。我們利用TypedArray從定義的styleable中取出屬性值,賦給我們定義好的類的屬性變量。記得取完之後調用recycle()回收釋放。
 protected void initWithAttrs(Context context, AttributeSet attrs) {
 TypedArray a = context.obtainStyledAttributes(attrs,
 R.styleable.MoreTextStyle);
 int textColor = a.getColor(R.styleable.MoreTextStyle_textColor,
 defaultTextColor); //取顏色值,默認defaultTextColor
 textSize = a.getDimensionPixelSize(R.styleable.MoreTextStyle_textSize, defaultTextSize);//取顏字體大小,默認defaultTextSize
 maxLine = a.getInt(R.styleable.MoreTextStyle_maxLine, defaultLine);//取顏顯示行數,默認defaultLine
 text = a.getString(R.styleable.MoreTextStyle_text);//取文本內容

 //綁定到textView bindTextView(textColor,textSize,maxLine,text);

 a.recycle();//回收釋放
 }

 //綁定到textView
 protected void bindTextView(int color,float size,final int line,String text){
 contentView.setTextColor(color);
 contentView.setTextSize(TypedValue.COMPLEX_UNIT_PX,size);
 contentView.setText(text);
 contentView.setHeight(contentView.getLineHeight() * line);
 post(new Runnable() {//前面已講,不再贅述

 @Override
 public void run() {
 expandView.setVisibility(contentView.getLineCount() > line ? View.VISIBLE : View.GONE);

 }
 });
 }
最後設置點擊事件。
 //點擊展開與折疊,不再贅述
 protected void bindListener(){
 setOnClickListener(new View.OnClickListener() {
 boolean isExpand;

 @Override
 public void onClick(View v) {
 isExpand = !isExpand;
 contentView.clearAnimation();
 final int deltaValue;
 final int startValue = contentView.getHeight();
 int durationMillis = 350;
 if (isExpand) {
  deltaValue = contentView.getLineHeight() * contentView.getLineCount() - startValue;
  RotateAnimation animation = new RotateAnimation(0, 180, Animation.RELATIVE_TO_SELF, 0.5f, Animation.RELATIVE_TO_SELF, 0.5f);
  animation.setDuration(durationMillis);
  animation.setFillAfter(true);
  expandView.startAnimation(animation);
 } else {
  deltaValue = contentView.getLineHeight() * maxLine - startValue;
  RotateAnimation animation = new RotateAnimation(180, 0, Animation.RELATIVE_TO_SELF, 0.5f, Animation.RELATIVE_TO_SELF, 0.5f);
  animation.setDuration(durationMillis);
  animation.setFillAfter(true);
  expandView.startAnimation(animation);
 }
 Animation animation = new Animation() {
  protected void applyTransformation(float interpolatedTime, Transformation t) {
  contentView.setHeight((int) (startValue + deltaValue * interpolatedTime));
  }

 };
 animation.setDuration(durationMillis);
 contentView.startAnimation(animation);
 }
 });
 }
另外,定義幾個方法方便外部調用(獲取文本TextView,直接設置文本內容),同時還定義了一個dip轉像素的靜態方法。
 public TextView getTextView(){
 return contentView;
 }

 public void setText(CharSequence charSequence){
 contentView.setText(charSequence);
 }

 public static int dip2px(Context context, float dipValue){
 final float scale = context.getResources().getDisplayMetrics().density;
 return (int)(dipValue * scale + 0.5f);
 }
其實到這裡,我們的自定義多文本折疊展開MoreTextView已經完成了。如何使用呢?
在layout/xx.xml中使用
要想方便的使用我們剛剛的自定義屬性來定義值,記得在xml namespace中定義應用:
自動引用命名空間res-auto
xmlns:more=”http://schemas.android.com/apk/res-auto”
或者 直接定義包名
xmlns:more=”http://schemas.android.com/apk/res/com.qiao.moretext”
命名空間後邊跟的 more即下邊你要使用自定義屬性的開頭部分。
比如我們的activity_main.xml
<LinearLayout xmlns:android="http://schemas.android.com/apk/res/android"
xmlns:more="http://schemas.android.com/apk/res/com.qiao.moretext"
 android:id="@+id/root"
 android:layout_width="match_parent"
 android:layout_height="match_parent"
 android:background="@android:color/white"
 android:orientation="vertical" >

 <com.qiao.moretext.MoreTextView
 android:layout_width="match_parent"
 android:layout_height="wrap_content"
 android:layout_margin="5dip"
 more:textColor="@android:color/black"
 more:textSize="18dip"
 more:maxLine="3"
 more:text="@string/content"/>

</LinearLayout>
在java中直接定義使用
由於上邊定義MoreTextView只定義了一種構造方法 MoreTextView(Context context, AttributeSet attrs) ,所以使用時,也只能:
 MoreTextView content = new MoreTextView(MainActivity.this, null);
 content.setText(getText(R.string.content));
 //然後addview到你要添加的地方

  當然,聰明如你,可肯定知道怎麼定義另外的構造方法來簡單實用啦。
  –>
  MoreTextView(Context context){
    //使用默認值直接初始化
    bindTextView();
  }
3.綜述
綜上呢,我們已經完成了所要實現的功能,作為UI呢,他可能會有些簡陋,但作為一個demo起到示范作用已經夠了。後邊我們可能會考慮把它作為微博的一個listitem做成列表一樣,並加入點贊等功能。有興趣不妨做一下咯。。
源碼示例下載地址:http://xiazai.jb51.net/201610/yuanma/Androidtouchmove(jb51.net).rar
以上就是本文的全部內容,希望對大家的學習有所幫助,也希望大家多多支持本站。
 [android] 天氣app布局練習
[android] 天氣app布局練習主要練習一下RelativeLayout和LinearLayout
 Android自定義賬戶類型和同步適配器模式 Custom Account Type & SyncAdapter
自定義賬戶類型 Custom Account Type當有多個APP共用一個賬號系統的時候,在用戶的Android設備上創建一個自定義賬戶用以處理登錄認證會方便很多,比如
 Fresco簡單的使用—SimpleDraweeView
百學須先立志—學前須知:在我們平時加載圖片(不管是下載還是加載本地圖片…..)的時候,我們經常會遇到這樣一個需求,那就是當圖片正在加載時應該呈現
 Android編譯系統
本文的目的是用比較容易理解的方式,介紹一下整個Android項目的編譯。至少知道大概的編譯流程是怎麼樣的,項目裡面的Android.mk文件包含些什麼內容。makefil