編輯:關於Android編程
本文實例講述了Android編程輸入事件流程。分享給大家供大家參考,具體如下:
EventHub對輸入設備進行了封裝。輸入設備驅動程序對用戶空間應用程序提供一些設備文件,這些設備文件放在/dev/input裡面。
EventHub掃描/dev/input下所有設備文件,並打開它們。
bool EventHub::openPlatformInput(void)
{
...
  mFDCount = 1;
  mFDs = (pollfd *)calloc(1, sizeof(mFDs[0]));
  mDevices = (device_t **)calloc(1, sizeof(mDevices[0]));
  mFDs[0].events = POLLIN;
  mDevices[0] = NULL;
  res = scan_dir(device_path);
...
  return true;
}
EventHub對外提供了一個函數用於從輸入設備文件中讀取數據。
bool EventHub::getEvent(int32_t* outDeviceId, int32_t* outType,
    int32_t* outScancode, int32_t* outKeycode, uint32_t *outFlags,
    int32_t* outValue, nsecs_t* outWhen)
    {
     ...
      while(1) {
    // First, report any devices that had last been added/removed.
    if (mClosingDevices != NULL) {
      device_t* device = mClosingDevices;
      LOGV("Reporting device closed: id=0x%x, name=%s\n",
         device->id, device->path.string());
      mClosingDevices = device->next;
      *outDeviceId = device->id;
      if (*outDeviceId == mFirstKeyboardId) *outDeviceId = 0;
      *outType = DEVICE_REMOVED;
      delete device;
      return true;
    }
    if (mOpeningDevices != NULL) {
      device_t* device = mOpeningDevices;
      LOGV("Reporting device opened: id=0x%x, name=%s\n",
         device->id, device->path.string());
      mOpeningDevices = device->next;
      *outDeviceId = device->id;
      if (*outDeviceId == mFirstKeyboardId) *outDeviceId = 0;
      *outType = DEVICE_ADDED;
      return true;
    }
    release_wake_lock(WAKE_LOCK_ID);
    pollres = poll(mFDs, mFDCount, -1);
    acquire_wake_lock(PARTIAL_WAKE_LOCK, WAKE_LOCK_ID);
    if (pollres <= 0) {
      if (errno != EINTR) {
        LOGW("select failed (errno=%d)\n", errno);
        usleep(100000);
      }
      continue;
    }
    for(i = 1; i < mFDCount; i++) {
      if(mFDs[i].revents) {
        LOGV("revents for %d = 0x%08x", i, mFDs[i].revents);
        if(mFDs[i].revents & POLLIN) {
          res = read(mFDs[i].fd, &iev, sizeof(iev));
          if (res == sizeof(iev)) {
            LOGV("%s got: t0=%d, t1=%d, type=%d, code=%d, v=%d",
               mDevices[i]->path.string(),
               (int) iev.time.tv_sec, (int) iev.time.tv_usec,
               iev.type, iev.code, iev.value);
            *outDeviceId = mDevices[i]->id;
            if (*outDeviceId == mFirstKeyboardId) *outDeviceId = 0;
            *outType = iev.type;
            *outScancode = iev.code;
            if (iev.type == EV_KEY) {
              err = mDevices[i]->layoutMap->map(iev.code, outKeycode, outFlags);
              LOGV("iev.code=%d outKeycode=%d outFlags=0x%08x err=%d\n",
                iev.code, *outKeycode, *outFlags, err);
              if (err != 0) {
                *outKeycode = 0;
                *outFlags = 0;
              }
            } else {
              *outKeycode = iev.code;
            }
            *outValue = iev.value;
            *outWhen = s2ns(iev.time.tv_sec) + us2ns(iev.time.tv_usec);
            return true;
          } else {
            if (res<0) {
              LOGW("could not get event (errno=%d)", errno);
            } else {
              LOGE("could not get event (wrong size: %d)", res);
            }
            continue;
          }
        }
      }
    }
 ...
}
對於按鍵事件,調用mDevices[i]->layoutMap->map進行映射。映射實際是由 KeyLayoutMap::map完成的,KeyLayoutMap類裡讀取配置文件qwerty.kl,由配置文件qwerty.kl決定鍵值的映射關系。你可以通過修改./development/emulator/keymaps/qwerty.kl來改變鍵值的映射關系。
JNI函數
在frameworks/base/services/jni/com_android_server_KeyInputQueue.cpp文件中,向JAVA提供了函數android_server_KeyInputQueue_readEvent,用於讀取輸入設備事件。
static jboolean
android_server_KeyInputQueue_readEvent(JNIEnv* env, jobject clazz, jobject event)
{
  gLock.lock();
  sp hub = gHub;
  if (hub == NULL) {
    hub = new EventHub;
    gHub = hub;
  }
  gLock.unlock();
  int32_t deviceId;
  int32_t type;
  int32_t scancode, keycode;
  uint32_t flags;
  int32_t value;
  nsecs_t when;
  bool res = hub->getEvent(&deviceId, &type, &scancode, &keycode, &flags, &value, &when);
  env->SetIntField(event, gInputOffsets.mDeviceId, (jint)deviceId);
  env->SetIntField(event, gInputOffsets.mType, (jint)type);
  env->SetIntField(event, gInputOffsets.mScancode, (jint)scancode);
  env->SetIntField(event, gInputOffsets.mKeycode, (jint)keycode);
  env->SetIntField(event, gInputOffsets.mFlags, (jint)flags);
  env->SetIntField(event, gInputOffsets.mValue, value);
  env->SetLongField(event, gInputOffsets.mWhen, (jlong)(nanoseconds_to_milliseconds(when)));
  return res;
}
readEvent調用hub->getEvent讀了取事件,然後轉換成JAVA的結構。
事件中轉線程
在frameworks/base/services/java/com/android/server/KeyInputQueue.java裡創建了一個線程,它循環的讀取事件,然後把事件放入事件隊列裡。
Thread mThread = new Thread("InputDeviceReader") {
  public void run() {
      android.os.Process.setThreadPriority(
          android.os.Process.THREAD_PRIORITY_URGENT_DISPLAY);
        try {
        RawInputEvent ev = new RawInputEvent();
        while (true) {
          InputDevice di;
        readEvent(ev);
        send = preprocessEvent(di, ev);
          addLocked(di, curTime, ev.flags, ..., me);
        }
    }
  };
}
輸入事件分發線程
在frameworks/base/services/java/com/android/server/WindowManagerService.java裡創建了一個輸入事件分發線程,它負責把事件分發到相應的窗口上去。
mQueue.getEvent
dispatchKey/dispatchPointer/dispatchTrackball
更多關於Android相關內容感興趣的讀者可查看本站專題:《Android開發入門與進階教程》、《Android調試技巧與常見問題解決方法匯總》、《Android多媒體操作技巧匯總(音頻,視頻,錄音等)》、《Android基本組件用法總結》、《Android視圖View技巧總結》、《Android布局layout技巧總結》及《Android控件用法總結》
希望本文所述對大家Android程序設計有所幫助。
 Android筆記十一.ListView+Adapter
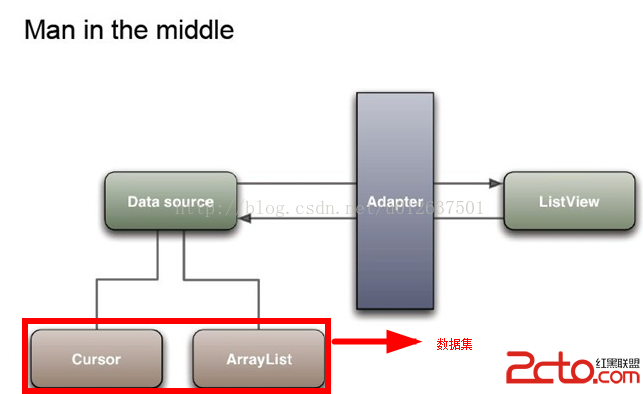
深入理解Adapter 一、ListView ListView是Android開發過程中較為常見的組件之一,它將數據以列表的形式展現出來。一般而言,一個ListView由
 Android studio 插件安裝 plugin
Android studio 插件安裝 plugin android studio 上有很多第三方插件可以極大提高開發效率 安裝插件的入口有兩個地方:
 [Android]內存洩露排查手記
內存洩露排查手記 Time:2013.09.02 Author:sodino 問題現象: 這裡內存洩露是指已實例化的對象長期被hold住且無法釋放或不能
 Android 使用開源庫加載網絡圖片
Android 使用開源庫加載網絡圖片,使用開源庫加載圖片。單擊listview彈出popupwindow彈出框詳情查看:Android 單擊listview彈出popu