編輯:關於Android編程
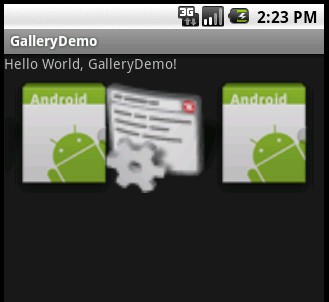
本文實例講述了Android編程仿Iphone拖動相片特效Gallery的簡單應用。分享給大家供大家參考,具體如下:
Step 1:准備圖片素材.
將icon2,icon3,icon4,icon5,icon6五張圖片導入res/drawable裡加上icon.png本身一共有6張圖片.
Step 2:新建Android工程,命名為GalleryDemo.
Step 3:設計UI,修改main.xml代碼如下:
<?xml version="1.0" encoding="utf-8"?>
<LinearLayout
 xmlns:android="http://schemas.android.com/apk/res/android"
 android:background="@drawable/white"
 android:orientation="vertical"
 android:layout_width="fill_parent"
 android:layout_height="fill_parent"
 >
 <TextView
 android:id="@+id/myTextView01"
 android:layout_width="fill_parent"
 android:layout_height="wrap_content"
 android:text="@string/hello"
 android:gravity="center_vertical|center_horizontal"
 />
 <Gallery
 android:id="@+id/myGallery1"
 android:layout_width="fill_parent"
 android:layout_height="wrap_content"
 android:gravity="bottom"
 />
</LinearLayout>
Step 4:設計主程序類GalleryDemo.Java代碼如下:
package com.android.test;
import com.android.test.R.drawable;
import android.app.Activity;
import android.content.Context;
import android.os.Bundle;
import android.view.View;
import android.view.ViewGroup;
import android.widget.BaseAdapter;
import android.widget.Gallery;
import android.widget.ImageView;
public class GalleryDemo extends Activity {
 /** Called when the activity is first created. */
 @Override
 public void onCreate(Bundle savedInstanceState) {
 super.onCreate(savedInstanceState);
 setContentView(R.layout.main);
 ((Gallery) findViewById(R.id.myGallery1)).setAdapter(new ImageAdapter(
  this));
 }
 public class ImageAdapter extends BaseAdapter {
 /* 類成員 myContext為Context父類 */
 private Context myContext;
 /* 使用res/drawable圖片作為圖片來源 */
 private int[] myImageIds = { drawable.icon, drawable.icon2,
  drawable.icon3, drawable.icon4, drawable.icon5, drawable.icon6};
 /* 構造器只有一個參數,即要存儲的Context */
 public ImageAdapter(Context c) {
  this.myContext = c;
 }
 /* 返回所有已定義的圖片總數量 */
 public int getCount() {
  return this.myImageIds.length;
 }
 /* 利用getItem方法,取得目前容器中圖像的數組ID */
 public Object getItem(int position) {
  return position;
 }
 public long getItemId(int position) {
  return position;
 }
 /* 取得目前欲顯示的圖像View,傳入數組ID值使之讀取與成像 */
 public View getView(int position, View convertView, ViewGroup parent) {
  /* 創建一個ImageView對象 */
  ImageView i = new ImageView(this.myContext);
  i.setImageResource(this.myImageIds[position]);
  i.setScaleType(ImageView.ScaleType.FIT_XY);
  /* 設置這個ImageView對象的寬高,單位為dip */
  i.setLayoutParams(new Gallery.LayoutParams(120, 120));
  return i;
 }
 /* 依據距離中央的位移量 利用getScale返回views的大小(0.0f to 1.0f) */
 public float getScale(boolean focused, int offset) {
  /* Formula: 1 / (2 ^ offset) */
  return Math.max(0, 1.0f / (float) Math.pow(2, Math.abs(offset)));
 }
 }
}
Step 5:run it,效果如下圖:
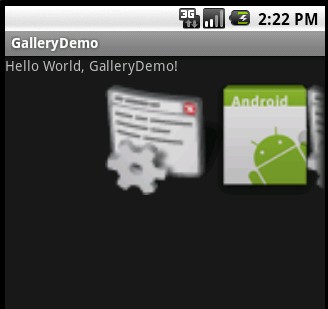
注明:該代碼基本參照Android SDK開發范例代碼大全
更多關於Android相關內容感興趣的讀者可查看本站專題:《Android圖形與圖像處理技巧總結》、《Android開發入門與進階教程》、《Android調試技巧與常見問題解決方法匯總》、《Android多媒體操作技巧匯總(音頻,視頻,錄音等)》、《Android基本組件用法總結》、《Android視圖View技巧總結》、《Android布局layout技巧總結》及《Android控件用法總結》
希望本文所述對大家Android程序設計有所幫助。
 Android實現ListView異步加載圖片的方法
本文實例講述了Android實現ListView異步加載圖片的方法。分享給大家供大家參考。具體如下:ListView異步加載圖片是非常實用的方法,凡是是要通過網絡獲取圖片
 Android版短信 篩選/批量刪除 程序(支持Android 2.3~4.4)
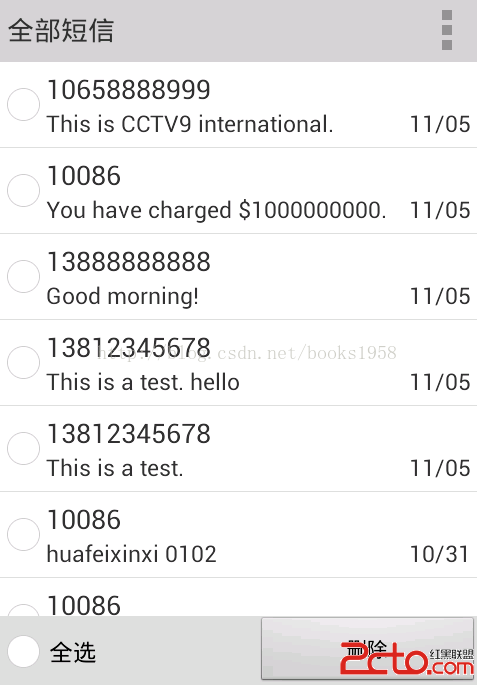
這是一個短信篩選/批量刪除的工具類程序。 首先上圖: 1.展示全部系統短信。 2.新建篩選器(支持按號碼篩選和按內容篩選) 3.篩選,批量刪除。 主要代碼:
 Android 仿Win8的metro的UI界面(上)
昨晚沒事手機下載了一些APP,發現現在仿win8的主界面越來越多,在大家見慣了類GridView或者類Tab後,給人一種耳目一新的感覺。今天在eoe上偶然發
 Android 四大組件之Service 的生命周期和使用
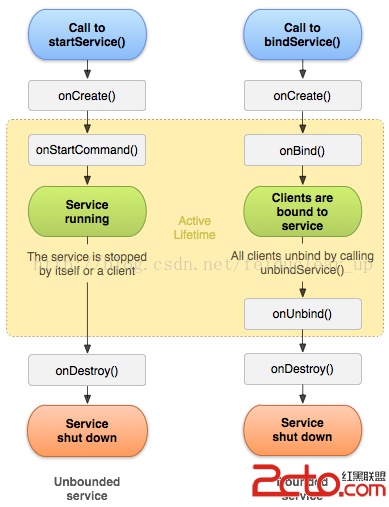
Service簡介:Service 是Android的四大組件之一,一般用於沒有UI界面,長期執行的後台任務,即使程序退出時,後台任務還在執行。比如:音樂播放。Servi