編輯:關於Android編程
先看看效果圖:
中間的圓形頭像和光環波形講解請看:http://www.jb51.net/article/96508.htm
周圍的氣泡布局,因為布局RatioLayout是繼承自ViewGroup,所以布局layout就可以根據自己的需求來布局其子view,view.layout(int l,int t,int r,int b);用於布局子view在父ViewGroup中的位置(相對於父容器),所以在RatioLayout中計算所有子view的left,top,right,bottom。那麼頭像的周圍的氣泡view是如何計算它的left,top,right,bottom的呢,這些氣泡view是坐落在頭像外圍的圓環上,只要知道這個圓環的半徑,然後再根據氣泡的個數,計算每個氣泡之間的角度,半徑加角度就可以計算每個氣泡坐落的位置。
/**
 * 計算氣泡的布局位置
 * @param textViews
 */
 private void calculateRatioFrame(List<BubbleView> textViews){
 if(textViews.size() == 0) return;
 mRatioFrameList.clear();

 double angle = 0;//記錄每個氣泡的角度,正上方的為0°
 double grad = Math.PI * 2 / textViews.size();//梯度,每個TextView之間的角度 (Math.PI 是數學中的90°)
 double rightAngle = Math.PI / 2;//一圈為360°,一共四個方向,每個方向90°,我們按照小於等於90°來計算,然後再放到相應的方向上

 //cx,cy是容器的中心點,也是圓形頭像的中心點,計算氣泡的位置就是已cx,cy為基准來計算的
 int cx = mWidth / 2;//容器中心x坐標
 int cy = mHeight / 2;//容器中心y坐標

 int radius = mMinSize / 2 / 2 / 2 + mMinSize / 2 / 2 ;//動態氣泡的組成圓的半徑

 int left = 0;
 int top = 0;
 int right = 0;
 int bottom = 0;
 int a = 0,b = 0;//a是基於cx的偏移量,b是基於cy的偏移量,
 //int r = mMinSize / 6 / 2;//氣泡半徑
 for (int i = 0; i < textViews.size(); i++) {
 int r = textViews.get(i).getMeasuredWidth() / 2;//計算得來//固定死的mMinSize / 6 / 2;//氣泡半徑
 if(angle >= 0 && angle < rightAngle){ //0 - 90度是計算偏移量
 //保持角度在 0 - 90
 a = (int)(radius * Math.sin(Math.abs(angle % rightAngle)));
 b = (int)(radius * Math.cos(Math.abs(angle % rightAngle)));

 left = cx + a - r;//cx + a為氣泡的中心點,要想得到left,還需減去半徑r
 top = cy - b - r;
 right = left + 2 * r;
 bottom = top + 2 * r;


 }else if(angle >= rightAngle && angle < rightAngle * 2){ // 90 - 180
 a = (int)(radius * Math.sin(Math.abs(angle % rightAngle)));
 b = (int)(radius * Math.cos(Math.abs(angle % rightAngle)));
 left = cx + b - r;
 top = cy + a - r;
 right = left + 2 * r;
 bottom = top + 2 * r;


 }else if(angle >= rightAngle * 2 && angle < rightAngle * 3){ // 180 - 270
 a = (int)(radius * Math.sin(Math.abs(angle % rightAngle)));
 b = (int)(radius * Math.cos(Math.abs(angle % rightAngle)));
 left = cx - a - r;
 top = cy + b - r;
 right = left + 2 * r;
 bottom = top + 2 * r;

 }else if(angle >= rightAngle * 3 && angle < rightAngle * 4){ //270 - 360
 a = (int)(radius * Math.sin(Math.abs(angle % rightAngle)));
 b = (int)(radius * Math.cos(Math.abs(angle % rightAngle)));
 left = cx - b - r;
 top = cy - a - r;
 right = left + 2 * r;
 bottom = top + 2 * r;

 }

 //將計算好的left, top, right,bottom,angle保存起來
 mRatioFrameList.add(new RatioFrame(left, top, right,bottom,angle));
 //角度再加一個梯度值
 angle += grad;

 }
 }
計算好氣泡的布局left, top, right,bottom,下面就開始布局這起氣泡,布局中的代碼就簡單的多了
@Override
 protected void onLayout(boolean changed, int l, int t, int r, int b) {
 if(mImageView == null) return;

 int width = mImageView.getMeasuredWidth();//計算圓形頭像的寬
 int height = mImageView.getMeasuredHeight();//計算圓形頭像的高
 //計算圓形頭像的left, top, right,bottom
 int left = mWidth / 2 - width / 2;
 int top = mHeight / 2 - height / 2;
 int right = mWidth / 2 + width / 2;
 int bottom = mHeight / 2 + height / 2;
 //開始布局
 mImageView.layout(left,top,right,bottom);
 //布局愛心動畫
 for (int i = 0; i < mLoveXinList.size(); i++) {
 ImageView imageView = mLoveXinList.get(i);
 left = mWidth / 2 + width / 4 - imageView.getMeasuredWidth() / 2;
 bottom = mHeight / 2 + height / 3;
 top = bottom - imageView.getMeasuredHeight();
 right = left + imageView.getMeasuredWidth();

 imageView.layout(left,top,right,bottom);
 }

 //布局所有氣泡
 for (int i = 0; i < mTextViews.size(); i++) {

 TextView textView = mTextViews.get(i);

 //RatioFrame ratioFrame = mRatioFrameList.get(i);//無動畫時使用
 //有動畫的時候,執行期間left, top, right,bottom都在變
 if(mCurrentRatioFrameList != null){
 //ValueAnimator執行動畫是所產生的所有氣泡left, top, right,bottom
 RatioFrame ratioFrame = mCurrentRatioFrameList.get(i);
 textView.layout(ratioFrame.mLeft,ratioFrame.mTop,ratioFrame.mRight,ratioFrame.mBottom);
 }

 }

 }
好了,靜態的氣泡排版到這裡就好了,下面的問題是,展開時如何使氣泡從中心點,以弧形的路徑展開,並且氣泡的大小也是由小到大變化。這裡就用到的動畫類ValueAnimator和ScaleAnimation,詳解請參考:http://www.jb51.net/article/96509.htm
向外展開的效果我們可以使用view.layout()不斷的重新布局氣泡view,讓其產生一個平移的效果,下面的一個問題就是如何計算平移軌道上面的left, top, right,bottom,然後重新請求布局就可以了,那麼下面就解決如何計算這個軌跡,分析
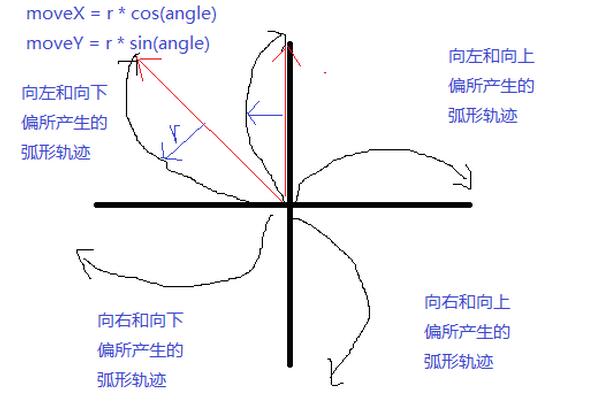
弧形軌跡計算,其實就是在直線軌跡的基礎上加上偏移量(moveX和moveY),就形成了弧形軌跡,直線軌跡很好計算,關鍵的就是這個偏移量,因為在首位的偏移量小,而在中間的偏移量大,且在不同的方向上,moveX和moveY的值的正負也不一樣。偏移的距離因為是由小到大再由大到小,所以我們用二次函數( -2 * Math.pow(fraction,2) + 2 * fraction)來計算距離,用此二次函數得到的值乘以一個設定的最大值,這個最大值的就會是由小到大再由大到小的變化,然後再用不同的角度來計算它的正負
if(endRatioFrame.mAngle >0 && endRatioFrame.mAngle <= rightAngle){//(0 < angle <= 90)上移,左移
 moveX = (int)(temp * Math.abs(Math.cos(endRatioFrame.mAngle)));//上移就應該在原本的軌跡上減去moveX
 moveY = (int)(temp * Math.abs(Math.sin(endRatioFrame.mAngle)));
 }else if(endRatioFrame.mAngle > rightAngle && endRatioFrame.mAngle <= rightAngle * 2){//(90 < angle <= 180)右移,上移
 moveX = (int)(-temp * Math.abs(Math.cos(endRatioFrame.mAngle)));
 moveY = (int)(temp * Math.abs(Math.sin(endRatioFrame.mAngle)));
 }else if(endRatioFrame.mAngle > rightAngle * 2 && endRatioFrame.mAngle <= rightAngle * 3){//(180 < angle <= 2700)下移,右移
 moveX = (int)(-temp * Math.abs(Math.cos(endRatioFrame.mAngle)));
 moveY = (int)(-temp * Math.abs(Math.sin(endRatioFrame.mAngle)));
 }else if(endRatioFrame.mAngle > rightAngle * 3 && endRatioFrame.mAngle <= rightAngle * 4 || endRatioFrame.mAngle == 0){//(270 < angle <= 360 或者 angle == 0) 左移,下移
 moveX = (int)(temp * Math.abs(Math.cos(endRatioFrame.mAngle)));
 moveY = (int)(-temp * Math.abs(Math.sin(endRatioFrame.mAngle)));
 }
根據三角函數的變化值,上面的代碼可以簡化為
moveX = (int)(temp * Math.cos(endRatioFrame.mAngle));
moveY = (int)(temp * Math.sin(endRatioFrame.mAngle));
通過上面的計算公式邏輯,就可以得到氣泡展開時的類型估算器的實現類,退出氣泡就將邏輯反一下就可以了
package com.cj.dynamicavatarview.ratio;

import android.animation.TypeEvaluator;
import android.content.Context;
import android.util.TypedValue;

import java.util.ArrayList;
import java.util.List;

/**
 * Created by chenj on 2016/10/19.
 */
public class EnterRatioFrameEvaluator implements TypeEvaluator {

 public static final int OFFSET_DISTANCE = 80;

 private Context mContext;

 private int mOffsetDistance;

 public EnterRatioFrameEvaluator(Context context){
 this.mContext = context;
 mOffsetDistance = (int)TypedValue.applyDimension(TypedValue.COMPLEX_UNIT_DIP,OFFSET_DISTANCE,mContext.getResources().getDisplayMetrics());
 }


 @Override
 public Object evaluate(float fraction, Object startValue, Object endValue) {
 List<RatioFrame> startRatioFrameList = (List<RatioFrame>) startValue;//開始值
 List<RatioFrame> endRatioFrameList = (List<RatioFrame>) endValue;//結束值
 List<RatioFrame> ratioFrameList = new ArrayList<>();//產生的新值

 for (int i = 0; i < endRatioFrameList.size(); i++) {
 RatioFrame endRatioFrame = endRatioFrameList.get(i);
 RatioFrame startRatioFrame = startRatioFrameList.get(i);
 //計算left,top,right,bottom

 double t = ( -2 * Math.pow(fraction,2) + 2 * fraction);//傾斜變化率

 int temp = (int)((mOffsetDistance) * t);
 double rightAngle = Math.PI / 2;

 int moveX = 0,moveY = 0;
 //讓氣泡上、下、左、右平移,形成弧度的平移路線
 moveX = (int)(temp * Math.cos(endRatioFrame.mAngle));
 moveY = (int)(temp * Math.sin(endRatioFrame.mAngle));
 //重新得到left ,top,right,bottom
 int left = (int)(startRatioFrame.mLeft + ((endRatioFrame.mLeft - startRatioFrame.mLeft) * fraction) - moveX);
 int top = (int)(startRatioFrame.mTop + ((endRatioFrame.mTop - startRatioFrame.mTop) * fraction) - moveY) ;
 int right = (int)(startRatioFrame.mRight + ((endRatioFrame.mRight - startRatioFrame.mRight) * fraction) - moveX);
 int bottom = (int)(startRatioFrame.mBottom + ((endRatioFrame.mBottom - startRatioFrame.mBottom) * fraction) - moveY) ;
 ratioFrameList.add(new RatioFrame(left,top,right,bottom));
 }
 return ratioFrameList;
 }
}
下面就可以用ValueAnimator來實現弧形平移軌跡了
ValueAnimator mAnimatorEnetr = ValueAnimator.ofObject(new EnterRatioFrameEvaluator(getContext()), getRatioFrameCenterList(mRatioFrameCenter,mRatioFrameList),mRatioFrameList);
 mAnimatorEnetr.addUpdateListener(new ValueAnimator.AnimatorUpdateListener() {
 @Override
 public void onAnimationUpdate(ValueAnimator animation) {
 //獲取新的布局值
 mCurrentRatioFrameList = (List<RatioFrame>) animation.getAnimatedValue();
 //請求重新布局
 requestLayout();
 }
 });
 mAnimatorEnetr.setDuration(OPEN_BUBBLE_TIME);

 mAnimatorEnetr.start();
好了,從中心點向外展開的弧形動畫到這就實現了,然後再加上縮放的動畫就可以了,縮放的動畫使用View動畫就可以實現。
/**
 * 氣泡由小到大縮放
 * @param textViews
 */
 private void scaleSmallToLarge(List<BubbleView> textViews){
 // 以view中心為縮放點,由初始狀態縮小到看不間
 ScaleAnimation animation = new ScaleAnimation(
 0.0f, 1.0f,//一點點變小知道看不見為止
 0.0f, 1.0f,
 Animation.RELATIVE_TO_SELF, 0.5f, Animation.RELATIVE_TO_SELF, 0.5f//中間縮放
 );
 animation.setDuration(OPEN_BUBBLE_TIME);//要和平移的時間一致
 for (int i = 0; i < textViews.size(); i++) {
 //再執行動畫
 textViews.get(i).startAnimation(animation);
 }

 }
下面解決的就是展開後,氣泡開始浮動,點擊氣泡後停止浮動,滑動手指的之後氣泡跟著手指移動,松開手指後氣泡返回到原來的位置,返回時的動畫效果和氣泡展開的動畫效果非常的類似,氣泡跟著手指移動也很好實現,只需要將氣泡view設置onTouch事件,再onTouch中計算滑動的距離,然後重新view.layout()就可以了,所以這裡我們解決浮動問題就可以了。浮動是不規則的,並且浮動的距離和速度也是不一樣的,我用View動畫實現的效果不是很好,然後就改用了屬性動畫來實現。只需要將view平移x軸和y軸,讓其平移的距離和時間都不同,看上去就像無規則的移動,讓其反復的做這樣的平移就可以實現浮動的效果。
/**
 * 給指定的View設置浮動效果
 * @param view
 * @return
 */
 private AnimatorSet setAnimFloat(View view ){
 List<Animator> animators = new ArrayList<>();
 //getRandomDp()得到一個隨機的值
 ObjectAnimator translationXAnim = ObjectAnimator.ofFloat(view, "translationX", 0f,getRandomDp(),getRandomDp() , 0);
 translationXAnim.setDuration(getRandomTime());
 translationXAnim.setRepeatCount(ValueAnimator.INFINITE);//無限循環
 translationXAnim.setRepeatMode(ValueAnimator.INFINITE);//
 translationXAnim.setInterpolator(new LinearInterpolator());
 translationXAnim.start();
 animators.add(translationXAnim);
 //
 ObjectAnimator translationYAnim = ObjectAnimator.ofFloat(view, "translationY", 0f,getRandomDp(),getRandomDp() , 0);
 translationYAnim.setDuration(getRandomTime());
 translationYAnim.setRepeatCount(ValueAnimator.INFINITE);
 translationYAnim.setRepeatMode(ValueAnimator.INFINITE);
 translationXAnim.setInterpolator(new LinearInterpolator());
 translationYAnim.start();
 animators.add(translationYAnim);

 AnimatorSet animatorSet = new AnimatorSet();
 animatorSet.playTogether(animators);
 //animatorSet.setStartDelay(delay);
 animatorSet.start();
 return animatorSet;
 }
按住停止浮動,松開的時候先歸位,然後再次的浮動,如果animator.end()方法,歸位後開始浮動的時候會出現閃動的現象,因為屬性動畫,雖然可以改變view的位置,但是不會改變view的left,top,right,bottom,所以重新開始浮動的時候會出現閃爍的現象,因為x = mLeft + translationX,當重新開始的時候,屬性動畫是重新創建的,translationX是從0開始的,因此會出現閃爍的現象。
final AnimatorSet animatorSet = mAnimatorSetList.get(position);
 for (Animator animator : animatorSet.getChildAnimations()) {
 //執行到動畫最後,恢復到初始位置,不然重新開始浮動的時候,會有一個閃爍的bug
 if(animator.isRunning()) {
 animator.end();//執行到動畫最後
 animator.cancel();//取消動畫
 }
 }
到這裡流程已經差不多了,但是當氣泡移動到圓形頭像的裡面的時候松開,氣泡應當有一個縮放的效果後歸位,然後應有一個接口回調,告訴調用者,我到中間了松開了,你可以做一些相應的處理。現在我們看一下如何計算氣泡已經移動到頭像裡了,其實通過圓形頭像中心點和氣泡的中心點構成一個直接三角形,然後通過勾股定理,計算直角邊的長度和圓形頭像的半徑做比較,如果小於圓形頭像的半徑,就說明已經到頭像裡面了。
/**
 * 判斷氣泡中心點是否在圖片內部
 * @param view
 * @param current 當前移動到的位置
 * @param endRatioFrame 如果在中間,該值用於復位到原本位置
 * @return
 */
 private boolean isInPictureCenter(int position,View view,RatioFrame current,RatioFrame endRatioFrame){
 RatioPoint centerPoint = new RatioPoint(mWidth/2,mHeight/2);
 RatioPoint currentPoint = new RatioPoint(current.mLeft + ((current.mRight - current.mLeft) / 2),current.mTop + ((current.mBottom - current.mTop) / 2));
 int x = Math.abs(centerPoint.x - currentPoint.x);
 int y = Math.abs(centerPoint.y - currentPoint.y);
 //通過勾股定理計算兩點之間的距離
 int edge = (int)Math.sqrt(Math.pow(x,2) + Math.pow(y,2));
 int pictureRadius = mImageView.getPictureRadius();
 //然後和內部圖片的半斤比較,小於pictureRadius,就說明在內部
 if(pictureRadius > edge){//進入到內部

 if(mInnerCenterListener != null){
 mInnerCenterListener.innerCenter(position,((TextView)view).getText().toString());
 }

 //說明到中心了,執行氣泡縮放
 reveseScaleView(position ,view,current,endRatioFrame);
 return true;
 }
 return false;
 }
氣泡執行縮放
/**
 * 縮放圖片(補間動畫)
 * @param view
 * @param current 縮放後用於平移的起點
 * @param endRatioFrame 縮放後用於平移的終點
 */
 public void reveseScaleView(final int position , final View view, final RatioFrame current, final Object endRatioFrame) {
 // 以view中心為縮放點,由初始狀態縮小到看不間
 ScaleAnimation animation = new ScaleAnimation(
 1.0f, 0.0f,//一點點變小知道看不見為止
 1.0f, 0.0f,
 Animation.RELATIVE_TO_SELF, 0.5f, Animation.RELATIVE_TO_SELF, 0.5f//中間縮放
 );
 animation.setDuration(BUBBLE_ENTER_CENTER_SCALE_TIME);
 animation.setRepeatMode(Animation.REVERSE);
 animation.setRepeatCount(1);
 animation.setAnimationListener(new Animation.AnimationListener() {
 @Override
 public void onAnimationStart(Animation animation) {
 }

 @Override
 public void onAnimationEnd(Animation animation) {
 //執行完縮放後,讓氣泡歸位,歸位結束後,執行接口回調
 homingBubbleView(true,position,view, current, endRatioFrame);
 }

 @Override
 public void onAnimationRepeat(Animation animation) {
 }
 });
 view.startAnimation(animation);
 }
氣泡進入中心的接口回調定義
public interface InnerCenterListener{
 //進入中心,松開歸位後調用
 void innerCenterHominged(int position, String text);
 //進入中心,松開時調用
 void innerCenter(int position, String text);
 }
下面就剩執行加1操作和播放愛心的動畫,這兩個動畫就是執行兩個View動畫,這裡就不貼出來了,到這裡高仿QQ個性名片就講解結束了,如果講的不好或有問題歡迎留言
源碼下載:GitHub
下載2
以上就是本文的全部內容,希望對大家的學習有所幫助,也希望大家多多支持本站。
 Android學習筆記之Button的點擊事件切換點擊圖片
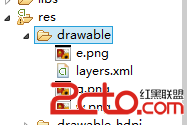
android:background=@drawable/button_selector (2)在res文件夾下創建drawable文件夾,創建一個s
 android:Notification實現狀態欄的通知
在使用手機時,當有未接來電或者新短消息時,手機會給出響應的提示信息,這些提示信息通常會顯示到手機屏幕的狀態欄上。Android也提供了用於處理這些信息的類,它們是Noti
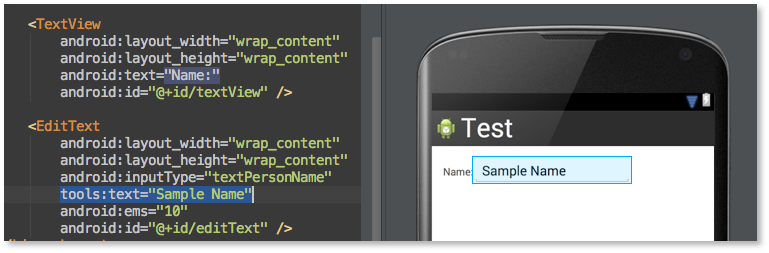 Android Studio使用小技巧:布局預覽時填充數據
我們都知道Android Studio用起來很棒,其中布局預覽更棒。我們在調UI的時候基本是需要實時預覽來看效果的,在Android Studio中只需要切換到Desig
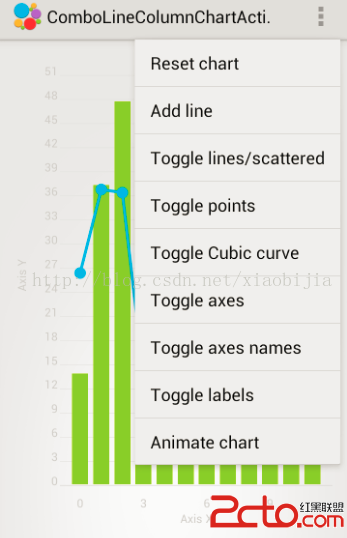 android系統自帶actionbar總結
android不同的版本引入的actionbar有差異,現總結如下一、在support.v7包中引入布局使用onCreateOptionsMenu方法中的參數:infla