編輯:關於Android編程
話不多說,我們先來看看效果:

Hi前輩搜索預覽
這一張是《Hi前輩》的搜索預覽圖,你可以在這裡下載這個APP查看更多效果:
http://www.wandoujia.com/apps/com.superlity.hiqianbei
LSearchView
這是一個MD風格的搜索框,集成了ripple動畫以及search時的loading,使用很簡單,如果你也需要這樣的搜索控件不妨來試試:https://github.com/onlynight/LSearchView
RippleEverywhere
女友的照片:

女友的照片:
這是一個水波紋動畫支持庫,由於使用暫時只支持Android4.0以上版本。https://github.com/onlynight/RippleEverywhere
實現原理
使用屬性動畫完成該動畫的實現,由於android2.3以下已經不是主流機型,故只兼容4.0以上系統。
關於屬性動畫,如果還有童鞋不了解可以去看看hongyang大神的這篇文章:
http://www.jb51.net/article/82668.htm
在我看來屬性動畫實際上就類似於定時器,所謂定時器就是獨立在主線程之外的另外一個用於計時的線程,每當到達你設定時間的時候這個線程就會通知你;屬性動畫也不光是另外一個線程,他能夠操作主線程UI元素屬性就說明了它內部已經做了線程同步。
基本原理
我們先來看下關鍵代碼:
@Override
protected void onDraw(Canvas canvas) {
if (running) {
// get canvas current state
final int state = canvas.save();
// add circle to path to crate ripple animation
// attention: you must reset the path first,
// otherwise the animation will run wrong way.
ripplePath.reset();
ripplePath.addCircle(centerX, centerY, radius, Path.Direction.CW);
canvas.clipPath(ripplePath);
// the {@link View#onDraw} method must be called before
// {@link Canvas#restoreToCount}, or the change will not appear.
super.onDraw(canvas);
canvas.restoreToCount(state);
return;
}
// in a normal condition, you should call the
// super.onDraw the draw the normal situation.
super.onDraw(canvas);
}
Canvas#save()和Canvas#restoreToCount()
這個兩個方法用於繪制狀態的保存與恢復。繪制之前先保存上一次的狀態;繪制完成後恢復前一次的狀態;以此類推直到running成為false,中間的這個過程就是動畫的過程。
Path#addCircle()和Canvas#clipPath()
addCircle用於在path上繪制一個圈;clipPath繪制剪切後的path(只繪制path內的區域,其他區域不繪制)。
radiusAnimator = ObjectAnimator.ofFloat(this, "animValue", 0, 1);
/**
* This method will be called by {@link this#radiusAnimator}
* reflection calls.
*
* @param value animation current value
*/
public void setAnimValue(float value) {
this.radius = value * maxRadius;
System.out.println("radius = " + this.radius);
invalidate();
}
這一段是動畫的動效關鍵,首先要有一個隨著時間推移而變化的值,當每次這個值變化的時候我們需要跟新界面讓view重新繪制調用onDraw方法,我們不能手動調用onDraw方法,系統給我們提供的invalidate會強制view重繪進而調用onDraw方法。
以上就是這個動畫的全部關鍵原理了,下面我們來一份完整的源碼:
import android.animation.Animator;
import android.animation.ObjectAnimator;
import android.annotation.TargetApi;
import android.content.Context;
import android.graphics.Canvas;
import android.graphics.Path;
import android.util.AttributeSet;
import android.view.View;
import android.view.animation.AccelerateDecelerateInterpolator;
import android.widget.ImageView;
/**
* Created by lion on 2016/11/11.
* <p>
* RippleImageView use the {@link Path#addCircle} function
* to draw the view when {@link RippleImageView#onDraw} called.
* <p>
* When you call {@link View#invalidate()} function,then the
* {@link View#onDraw(Canvas)} will be called. In that way you
* can use {@link Path#addCircle} to draw every frame, you will
* see the ripple animation.
*/
public class RippleImageView extends ImageView {
// view center x
private int centerX = 0;
// view center y
private int centerY = 0;
// ripple animation current radius
private float radius = 0;
// the max radius that ripple animation need
private float maxRadius = 0;
// record the ripple animation is running
private boolean running = false;
private ObjectAnimator radiusAnimator;
private Path ripplePath;
public RippleImageView(Context context) {
super(context);
init();
}
public RippleImageView(Context context, AttributeSet attrs) {
super(context, attrs);
init();
}
public RippleImageView(Context context, AttributeSet attrs, int defStyleAttr) {
super(context, attrs, defStyleAttr);
init();
}
@TargetApi(21)
public RippleImageView(Context context, AttributeSet attrs, int defStyleAttr, int defStyleRes) {
super(context, attrs, defStyleAttr, defStyleRes);
init();
}
private void init() {
ripplePath = new Path();
// initial the animator, when animValue change,
// radiusAnimator will call {@link this#setAnimValue} method.
radiusAnimator = ObjectAnimator.ofFloat(this, "animValue", 0, 1);
radiusAnimator.setDuration(1000);
radiusAnimator.setInterpolator(new AccelerateDecelerateInterpolator());
radiusAnimator.addListener(new Animator.AnimatorListener() {
@Override
public void onAnimationStart(Animator animator) {
running = true;
}
@Override
public void onAnimationEnd(Animator animator) {
running = false;
}
@Override
public void onAnimationCancel(Animator animator) {
}
@Override
public void onAnimationRepeat(Animator animator) {
}
});
}
@Override
protected void onLayout(boolean changed, int left, int top, int right, int bottom) {
super.onLayout(changed, left, top, right, bottom);
centerX = (right - left) / 2;
centerY = (bottom - top) / 2;
maxRadius = maxRadius(left, top, right, bottom);
}
/**
* Calculate the max ripple animation radius.
*
* @param left view left
* @param top view top
* @param right view right
* @param bottom view bottom
* @return
*/
private float maxRadius(int left, int top, int right, int bottom) {
return (float) Math.sqrt(Math.pow(right - left, 2) + Math.pow(bottom - top, 2) / 2);
}
/**
* This method will be called by {@link this#radiusAnimator}
* reflection calls.
*
* @param value animation current value
*/
public void setAnimValue(float value) {
this.radius = value * maxRadius;
System.out.println("radius = " + this.radius);
invalidate();
}
@Override
protected void onDraw(Canvas canvas) {
if (running) {
// get canvas current state
final int state = canvas.save();
// add circle to path to crate ripple animation
// attention: you must reset the path first,
// otherwise the animation will run wrong way.
ripplePath.reset();
ripplePath.addCircle(centerX, centerY, radius, Path.Direction.CW);
canvas.clipPath(ripplePath);
// the {@link View#onDraw} method must be called before
// {@link Canvas#restoreToCount}, or the change will not appear.
super.onDraw(canvas);
canvas.restoreToCount(state);
return;
}
// in a normal condition, you should call the
// super.onDraw the draw the normal situation.
super.onDraw(canvas);
}
/**
* call the {@link Animator#start()} function to start the animation.
*/
public void startAnimation() {
if (radiusAnimator.isRunning()) {
radiusAnimator.cancel();
}
radiusAnimator.start();
}
}
以上所述是小編給大家介紹的Android自定義水波紋動畫Layout實例代碼,希望對大家有所幫助,如果大家有任何疑問請給我留言,小編會及時回復大家的。在此也非常感謝大家對本站網站的支持!
 windows下eclipse搭建android_ndk開發環境
安裝cygwin:由於NDK編譯代碼時必須要用到make和gcc,所以你必須先搭建一個linux環境, cygwin是一個在windows平台上運行的unix模擬環境,它
 Android Classloader熱修復技術之百家齊放
大概在2015年10月底,QQ空間發了一篇叫《安卓App熱補丁動態修復技術介紹》的文章,文章中提到為了能讓Class進行熱修復,其中一個條件就是防止類被打上CLASS_I
 Android導出jar包後的資源使用問題
我們經常遇到一個需求,就是給別人使用我們工程的時候,為了能夠屏蔽代碼,把代碼封裝成jar包提供給第三方使用,但是這樣我們的資源文件怎麼給對方用呢? 網上有很多方法,有用C
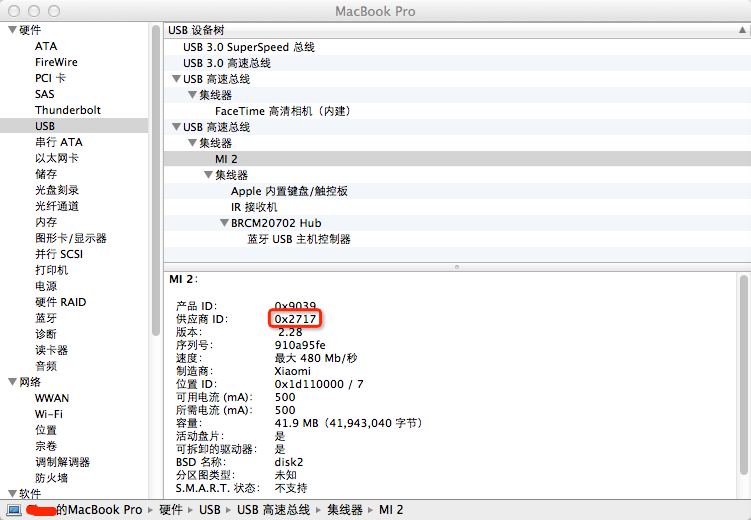 Android 手機無法連接mac解決辦法
Android 手機無法連接mac解決辦法一般的android連接mac 很方便不用安裝驅動就可以啦,可是不知道為什麼二般情況下有的android手機(小米2,華為等)就