編輯:關於Android編程
實現原理
首先就是自定義個WaveView 繼承View,然後再WaveView 內部實現代碼邏輯:
① 水波就波嘛? sin函數? 貝塞爾曲線? 都行,這裡就用二階貝塞 爾曲線去畫吧
② 波要動嘛,怎麼動呢?線程? 好吧 這裡用了個Handler。
③繪制波首先要找點,那麼在onMeasure()裡找出需要的點咯,這裡就暫時展示一個波段吧,一個波長移動左邊不就沒了?OK 那就兩個波吧,吼吼,兩個波(猥瑣男潛質表露無遺啊)。接下來就是Handler 結合 onDraw()繪制。OK,那就先看我Word繪制的粗癟的波動圖,請看VCR,oh,no... gif
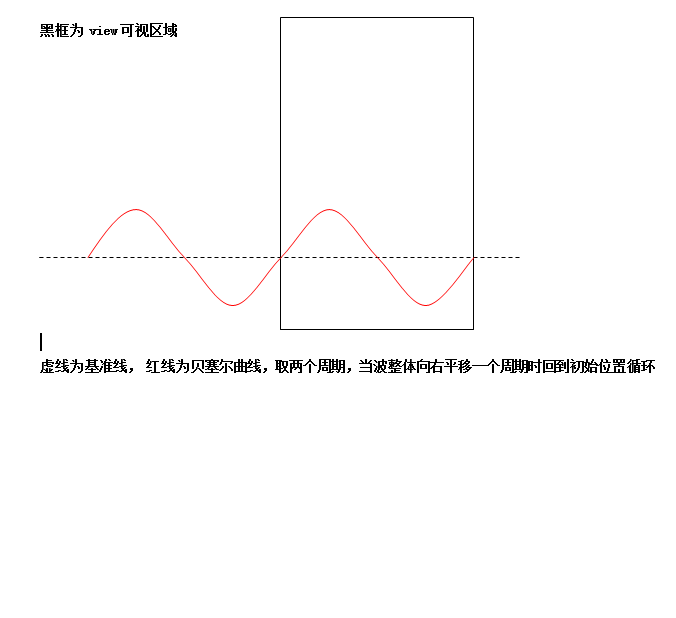
意思就是波平移一個波長之後回到初始位置繼續平移循環。
好吧,有人說了,這麼簡單的邏輯你要啰嗦那麼多???
好吧,我承認,我有唐僧的潛質。。。
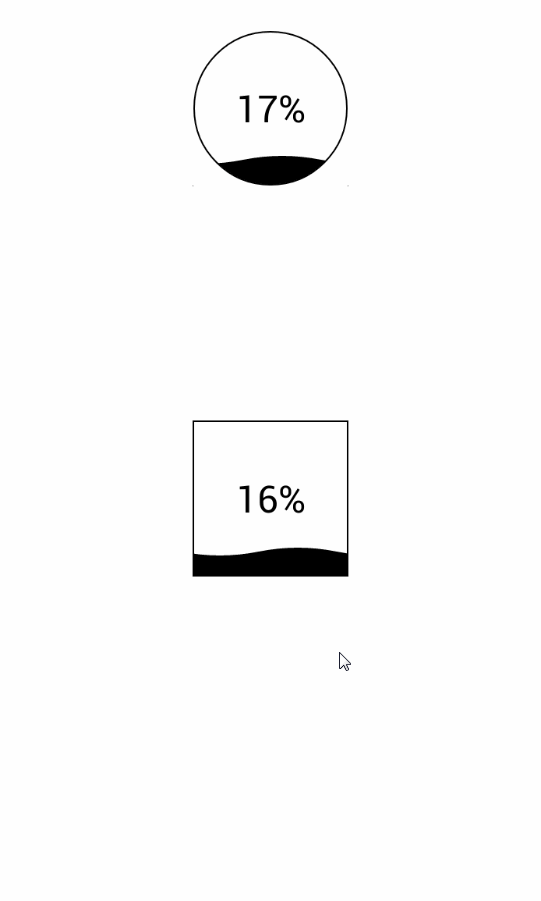
閒話就不說了,先上
效果圖
示例代碼如下
調用的Activity
 * Created by LiuDong on 2016/12/22.
 * Email:[email protected]
 */

public class WaveActivity extends Activity {
 LD_WaveView waveView;//方形
 LD_WaveView waveCircleView;//圓形
 private int progrees=0;//進度
 private Handler mHandler=new Handler(){
  @Override
  public void handleMessage(Message msg) {
   if (progrees==100) progrees=0;
   Log.i("progress",progrees+"");
   waveView.setmProgress(progrees++);
   waveCircleView.setmProgress(progrees++);
   mHandler.sendEmptyMessageDelayed(0,100);
  }
 };
 @Override
 protected void onCreate(Bundle savedInstanceState) {
  super.onCreate(savedInstanceState);
  setContentView(R.layout.activity_wave);
  waveView= (LD_WaveView) findViewById(R.id.waveView);
  waveCircleView= (LD_WaveView) findViewById(R.id.waveViewCircle);
  mHandler.sendEmptyMessageDelayed(0,10);
 }
}
xml布局
<?xml version="1.0" encoding="utf-8"?>
<RelativeLayout xmlns:android="http://schemas.android.com/apk/res/android"
 xmlns:app="http://schemas.android.com/apk/res-auto"
 android:orientation="vertical" android:layout_width="match_parent"
 android:background="@color/ld_White"
 android:layout_height="match_parent">
 <com.dadong.ld_tools.widget.LD_WaveView
  android:id="@+id/waveViewCircle"
  android:layout_marginTop="20dp"
  android:layout_width="100dp"
  android:layout_centerHorizontal="true"
  android:layout_height="100dp"
  app:wave_color="@color/ld_Black"
  app:wave_circle="true"
  />
 <com.dadong.ld_tools.widget.LD_WaveView
  android:id="@+id/waveView"
  android:layout_width="100dp"
  android:layout_height="100dp"
  app:wave_color="@color/ld_Black"
  app:wave_circle="false"
  android:layout_centerInParent="true" />
</RelativeLayout>
自定義WaveView
/**
 * Created by LiuDong on 2016/12/23.
 * Email:[email protected]
 */

public class LD_WaveView extends View {

 private int mProgress;//進度
 private int mTimeStep = 10;//時間間隔
 private int mSpeed = 5;//波單次移動的距離
 private int mViewHeight;//視圖寬高
 private int mViewWidth;//視圖寬度
 private int mLevelLine;// 基准線


 private int mWaveLength;//波長 暫定view寬度為一個波長
 private int mStrokeWidth;//園的線寬
 private RectF rectF;//圓環區域
 private int mWaveHeight;//波峰高度
 private int mLeftWaveMoveLength;//波平移的距離,用來控制波的起點位置
 private int mWaveColor;//波的顏色
 private Paint mPaint;//畫筆
 private Paint mCirclePaint;//圓環畫筆
 private Paint mBorderPaint;//邊界畫筆
 private int mBorderWidth=4;//邊界寬度
 private Paint mTextPaint;//文字畫筆
 private Path mPath;//繪畫線
 private List<Point> mPoints;//點的集合
 private boolean isMeasure = false;//是否已測量過
 private boolean isCircle=false;//是否圓形默認false,可屬性代碼設置
 //處理消息
 private Handler handler = new Handler() {
  @Override
  public void handleMessage(Message msg) {

   initWaveMove();
  }
 };

 /**
  * 初始化波的移動
  */
 private void initWaveMove(){
  mLeftWaveMoveLength+=mSpeed;//波向右移動距離增加mSpeed;
  if (mLeftWaveMoveLength>=mWaveLength){//當增加到一個波長時回復到0
   mLeftWaveMoveLength=0;
  }
  invalidate();

 }
 public LD_WaveView(Context context) {
  this(context, null);
 }

 public LD_WaveView(Context context, AttributeSet attrs) {
  this(context, attrs, 0);
 }

 public LD_WaveView(Context context, AttributeSet attrs, int defStyleAttr) {
  super(context, attrs, defStyleAttr);

  getAttr(context, attrs, defStyleAttr);
  init();

 }

 /**
  * 初始化畫筆
  */
 private void init() {
  mPoints = new ArrayList<Point>();
  //波浪軌跡畫筆
  mPaint = new Paint();
  mPaint.setAntiAlias(true);
  mPaint.setColor(mWaveColor);
  mPaint.setStyle(Paint.Style.FILL_AND_STROKE);


  mPath = new Path();


  //文字畫筆
  mTextPaint=new Paint();
  mTextPaint.setColor(Color.RED);
  mTextPaint.setTextAlign(Paint.Align.CENTER);
  mTextPaint.setTextSize(48);


  //圓環畫筆
  mCirclePaint=new Paint();
  mCirclePaint.setAntiAlias(true);
  mCirclePaint.setColor(Color.WHITE);
  mCirclePaint.setStyle(Paint.Style.STROKE);
  //邊界線畫筆
  mBorderPaint=new Paint();
  mBorderPaint.setAntiAlias(true);
  mBorderPaint.setColor(mWaveColor);
  mBorderPaint.setStrokeWidth(mBorderWidth);
  mBorderPaint.setStyle(Paint.Style.STROKE);


 }

 /**
  * 獲取自定義的屬性值
  *
  * @param attrs
  */
 private void getAttr(Context context, AttributeSet attrs, int defStyle) {

  TypedArray a = context.obtainStyledAttributes(attrs, R.styleable.LD_WaveView, defStyle, 0);

  mWaveColor = a.getColor(R.styleable.LD_WaveView_wave_color, Color.RED);
  isCircle=a.getBoolean(R.styleable.LD_WaveView_wave_circle,false);
  a.recycle();

 }


 /**
  *
  * @param widthMeasureSpec
  * @param heightMeasureSpec
  */
 @Override
 protected void onMeasure(int widthMeasureSpec, int heightMeasureSpec) {

  super.onMeasure(widthMeasureSpec, heightMeasureSpec);
  if (!isMeasure&&Math.abs(getMeasuredHeight()-getMeasuredWidth())<50) {//只計算一次就夠了 ,relativelayout的時候要繪制兩次 加個寬高判斷
   mViewHeight = getMeasuredHeight();
   mViewWidth = getMeasuredWidth();
   mLevelLine = mViewHeight; //初始化波的准位線  起始位視圖最底部
   {
    mLevelLine = mViewHeight * (100-mProgress) / 100;
    if (mLevelLine < 0) mLevelLine = 0;
   }
   //計算波峰值
   mWaveHeight = mViewHeight / 20;//波峰暫定為view高度的1/20,如果需要設置 可設置set方法賦值;
   mWaveLength = getMeasuredWidth();

   //計算所有的點 這裡取寬度為整個波長 往左再延伸一個波長 兩個波長則需要9個點
   for (int i = 0; i < 9; i++) {
    int y = 0;
    switch (i % 4) {
     case 0:
      y = mViewHeight;
      break;
     case 1:
      y =mViewHeight+ mWaveHeight;
      break;
     case 2:
      y = mViewHeight;
      break;
     case 3:
      y = mViewHeight-mWaveHeight;
      break;
    }
    Point point = new Point(-mWaveLength + i * mWaveLength / 4, y);
    mPoints.add(point);
   }
   /**
    * 計算圓環寬度
    */
   int mIncircleRadius=mViewHeight<mViewWidth?mViewHeight/2:mViewWidth/2;//內切圓半徑

   int mcircumcircleRadius= (int) (Math.sqrt((float)(Math.pow(mViewHeight/2,2)+Math.pow(mViewWidth/2,2)))+0.5);//外接圓半徑
   int radius=mcircumcircleRadius/2+mIncircleRadius/2;

   rectF=new RectF(mViewWidth/2-radius,mViewHeight/2-radius,mViewWidth/2+radius,mViewHeight/2+radius);
   mStrokeWidth=mcircumcircleRadius-mIncircleRadius;
   mCirclePaint.setStrokeWidth(mStrokeWidth);//線是有寬度的 采用了這種方式畫圓環
   isMeasure = true;
  }
 }

 @Override
 protected void onDraw(Canvas canvas) {
  super.onDraw(canvas);
  /**
   * 繪制線條
   */
  mPath.reset();
  int i = 0;
  mPath.moveTo(mPoints.get(0).getX()+mLeftWaveMoveLength, mPoints.get(0).getY()-mViewHeight*mProgress/100);
  for (; i < mPoints.size() - 2; i += 2) {
   mPath.quadTo(mPoints.get(i + 1).getX()+mLeftWaveMoveLength, mPoints.get(i + 1).getY()-mViewHeight*mProgress/100, mPoints.get(i + 2).getX()+mLeftWaveMoveLength, mPoints.get(i + 2).getY()-mViewHeight*mProgress/100);
  }
  mPath.lineTo(mPoints.get(i).getX()+mLeftWaveMoveLength, mViewHeight);
  mPath.lineTo(mPoints.get(0).getX()+mLeftWaveMoveLength, mViewHeight);
  mPath.close();
  /**
   * 繪制軌跡
   */
  canvas.drawPath(mPath,mPaint);
  Rect rect = new Rect();

  String progress=String.format("%d%%",mProgress);
  mTextPaint.getTextBounds(progress,0,progress.length(), rect);
  int textHeight = rect.height();
  if (mProgress>=50)//如果進度達到50 顏色變為白色,沒辦法啊,進度在中間 不變顏色看不到
   mTextPaint.setColor(Color.WHITE);
  else
  mTextPaint.setColor(mWaveColor);
  canvas.drawText(progress,0,progress.length(),mViewWidth/2,mViewHeight/2+textHeight/2,mTextPaint);

  if (isCircle) {
   /**
    * 繪制圓環
    */

   canvas.drawArc(rectF, 0, 360, true, mCirclePaint);
   Paint circlePaint = new Paint();
   circlePaint.setStrokeWidth(5);
   circlePaint.setColor(Color.WHITE);
   circlePaint.setAntiAlias(true);
   circlePaint.setStyle(Paint.Style.STROKE);
   canvas.drawCircle(mViewWidth / 2, mViewHeight / 2, mViewHeight / 2, circlePaint);
   /**
    * 繪制邊界
    */

   mBorderPaint.setStrokeWidth(mBorderWidth/2);
  canvas.drawCircle(mViewWidth/2,mViewHeight/2,mViewHeight/2-mBorderWidth/2,mBorderPaint);
  }else {
   /**
    * 繪制矩形邊框
    */
   canvas.drawRect(0,0,mViewWidth,mViewHeight,mBorderPaint);
  }
  //
  handler.sendEmptyMessageDelayed(0,mTimeStep);
 }

 /**
  * 設置進度 基准線
  * @param mProgress
  */
 public void setmProgress(int mProgress) {
  this.mProgress = mProgress;
  mLevelLine=(100-mProgress)*mViewHeight/100;
 }

 /**
  * 設置是否為圓形
  * @param circle
  */
 public void setCircle(boolean circle) {
  isCircle = circle;
 }
}
自定義屬性
<?xml version="1.0" encoding="utf-8"?>
<resources>
 <declare-styleable name="LD_WaveView">
  <attr name="wave_color" format="color"></attr>
  <attr name="wave_circle" format="boolean"></attr>
 </declare-styleable>
</resources>
總結
好了,以上就是這篇文章的全部內容了,代碼裡備注應該還算比較清楚了,希望能對一些人有一些幫助,瑕疵不足之處歡迎指正,或者有好的建議。也可以留言交流。
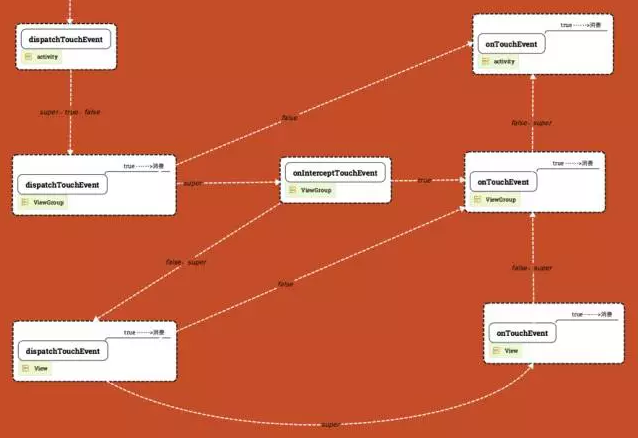 Android 中的事件分發和流程
在Android開發中,事件分發機制是一塊Android比較重要的知識體系,了解並熟悉整套的分發機制有助於更好的分析各種點擊滑動失效問題,更好去擴展控件的事件功能和開發自
 手機qq怎麼安裝 手機qq安卓教程 手機qq安裝目錄哪裡找
手機qq怎麼安裝?,安裝目錄哪裡找,下面小編就簡單介紹下。 手機qq安裝教程 方式一:手機下載(Android Market 電子市場)安裝 啟動程序列表的
 Android開發之使用sqlite3工具操作數據庫的兩種方式
使用 sqlite3 工具操作數據庫的兩種方式 請尊重他人的勞動成果,轉載請注明出處:Android開發之使用sqlite3工具操作數據庫的兩種方式 http://bl
 Android Studio中配置OpenCV庫開發環境的教程
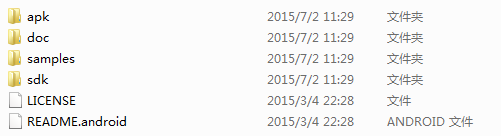
1、下載進入官網(http://opencv.org/)下載OpenCV4Android並解壓。目錄結構如下圖所示。其中,sdk目錄即是我們開發opencv所需要的類庫;