編輯:關於Android編程
在Android中實現菜單功能有多種方法。
Options Menu:用戶按下menu Button時顯示的菜單。
Context Menu:用戶長時間按下屏幕,所顯示出來的菜單也稱為上下文菜單。
Submenu:子菜單。
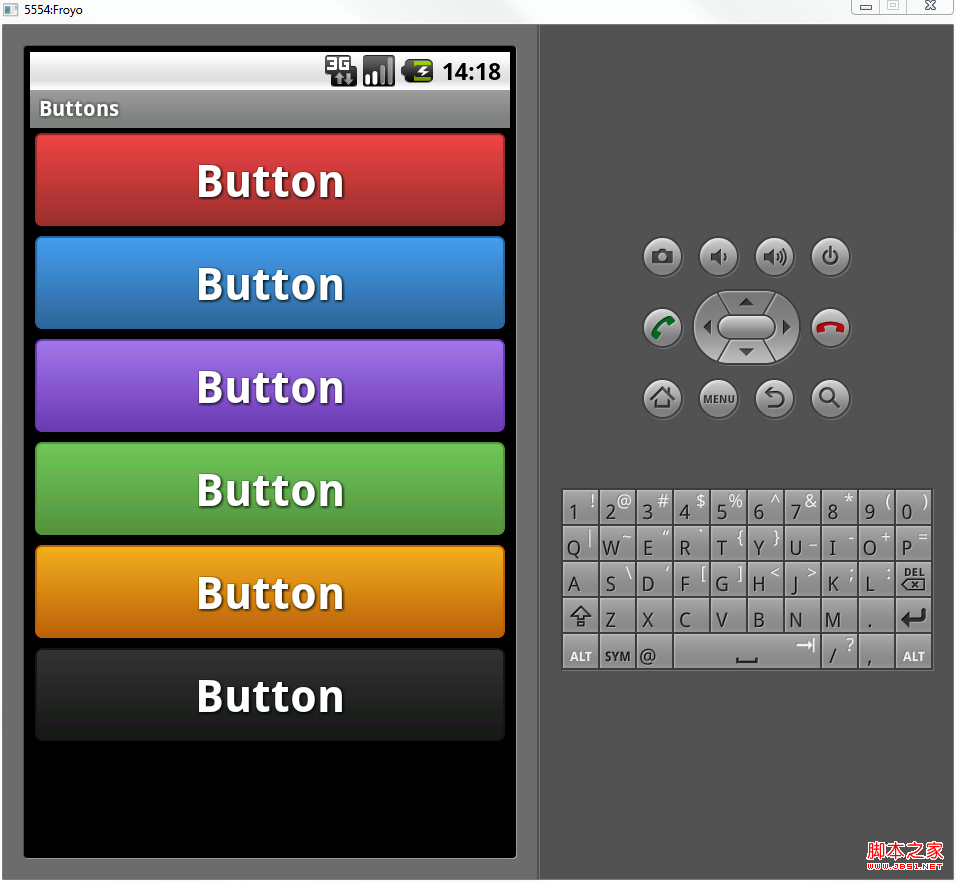
但是有時候這些內置的菜單並不能滿足我們功能,這就需要自己自定義一種菜單。接下來我說的這種就是通過TabHost與RadioGroup結合完成的菜單。這也是很常用的一種底部菜單做法。先上圖:
Xml代碼
<?xml version="1.0" encoding="UTF-8"?>
<TabHost android:id="@android:id/tabhost" android:layout_width="fill_parent" android:layout_height="fill_parent"
 xmlns:android="http://schemas.android.com/apk/res/android">
  <LinearLayout
    android:orientation="vertical"
    android:layout_width="fill_parent"
    android:layout_height="fill_parent">
    <FrameLayout
      android:id="@android:id/tabcontent"
      android:layout_width="fill_parent"
      android:layout_height="0.0dip"
      android:layout_weight="1.0" />
    <TabWidget
      android:id="@android:id/tabs"
      android:visibility="gone"
      android:layout_width="fill_parent"
      android:layout_height="wrap_content"
      android:layout_weight="0.0" />
    <RadioGroup
      android:gravity="center_vertical"
      android:layout_gravity="bottom"
      android:orientation="horizontal"
      android:id="@+id/main_radio"
      android:background="@drawable/maintab_toolbar_bg"
      android:layout_width="fill_parent"
      android:layout_height="wrap_content">
      <RadioButton
        android:id="@+id/radio_button0"
        android:tag="radio_button0"
        android:layout_marginTop="2.0dip"
        android:text="@string/alarm"
        android:drawableTop="@drawable/icon_1"
         />
      <RadioButton
        android:id="@+id/radio_button1"
        android:tag="radio_button1"
        android:layout_marginTop="2.0dip"
        android:text="@string/message"
        android:drawableTop="@drawable/icon_2"
         />
      <RadioButton
        android:id="@+id/radio_button2"
        android:tag="radio_button2"
        android:layout_marginTop="2.0dip"
        android:text="@string/photo"
        android:drawableTop="@drawable/icon_3"
         />
      <RadioButton
        android:id="@+id/radio_button3"
        android:tag="radio_button3"
        android:layout_marginTop="2.0dip"
        android:text="@string/music"
        android:drawableTop="@drawable/icon_4"
         />
      <RadioButton
        android:id="@+id/radio_button4"
        android:tag="radio_button4"
        android:layout_marginTop="2.0dip"
        android:text="@string/setting"
        android:drawableTop="@drawable/icon_5"
         />
    </RadioGroup>
  </LinearLayout>
</TabHost>
需要注意的是,如果用TabHost這個控件,其中有幾個ID是必須這麼寫的,android:id=”@android:id/tabhost ;android:id=”@android:id/tabcontent” ;android:id=”@android:id/tabs” ;之所以要這麼寫是因為在TabHost這個類中。需要實例化上述這個ID的控件。看源碼:
在TabActivity中有麼個方法:
@Override
  public void onContentChanged() {
    super.onContentChanged();
    mTabHost = (TabHost) findViewById(com.android.internal.R.id.tabhost);

    if (mTabHost == null) {
      throw new RuntimeException(
          "Your content must have a TabHost whose id attribute is " +
          "'android.R.id.tabhost'");
    }
    mTabHost.setup(getLocalActivityManager());
  }

  private void ensureTabHost() {
    if (mTabHost == null) {
      this.setContentView(com.android.internal.R.layout.tab_content);
    }
  }
當內容發生改變時它會調用這個方法,來更新列表或者其他視圖,而這個方法中需要實例化TabHost,所以必須通過ID為tabhost實例化。
再看看TabHost這個類中
public void setup() {
   mTabWidget = (TabWidget) findViewById(com.android.internal.R.id.tabs);
   if (mTabWidget == null) {
     throw new RuntimeException(
         "Your TabHost must have a TabWidget whose id attribute is 'android.R.id.tabs'");
   }

   // KeyListener to attach to all tabs. Detects non-navigation keys
   // and relays them to the tab content.
   mTabKeyListener = new OnKeyListener() {
     public boolean onKey(View v, int keyCode, KeyEvent event) {
       switch (keyCode) {
         case KeyEvent.KEYCODE_DPAD_CENTER:
         case KeyEvent.KEYCODE_DPAD_LEFT:
         case KeyEvent.KEYCODE_DPAD_RIGHT:
         case KeyEvent.KEYCODE_DPAD_UP:
         case KeyEvent.KEYCODE_DPAD_DOWN:
         case KeyEvent.KEYCODE_ENTER:
           return false;

       }
       mTabContent.requestFocus(View.FOCUS_FORWARD);
       return mTabContent.dispatchKeyEvent(event);
     }

   };

   mTabWidget.setTabSelectionListener(new TabWidget.OnTabSelectionChanged() {
     public void onTabSelectionChanged(int tabIndex, boolean clicked) {
       setCurrentTab(tabIndex);
       if (clicked) {
         mTabContent.requestFocus(View.FOCUS_FORWARD);
       }
     }
   });

   mTabContent = (FrameLayout) findViewById(com.android.internal.R.id.tabcontent);
   if (mTabContent == null) {
     throw new RuntimeException(
         "Your TabHost must have a FrameLayout whose id attribute is "
             + "'android.R.id.tabcontent'");
   }
 }
這個方法,是在增加選項卡之前由系統調用。在這個方法中需要通過tabs 這個ID實例化一個TabWidget,通過tabcontent這個ID實例化一個FrameLayout,用來放置選項卡內容。所以這兩個ID也是固定的。
在上述布局文件中隱藏了系統默認的Widget,取而代之的是帶有圖片的Button。
看一下主要代碼:
package com.iteye.androidtoast;

import android.app.TabActivity;
import android.content.Intent;
import android.os.Bundle;
import android.widget.RadioGroup;
import android.widget.RadioGroup.OnCheckedChangeListener;
import android.widget.TabHost;

public class MainActivity extends TabActivity implements OnCheckedChangeListener{
  /** Called when the activity is first created. */
  private TabHost mHost;
  private RadioGroup radioderGroup;
  @Override
  public void onCreate(Bundle savedInstanceState) {
    super.onCreate(savedInstanceState);
    setContentView(R.layout.maintabs);
    //實例化TabHost
    mHost=this.getTabHost();

    //添加選項卡
    mHost.addTab(mHost.newTabSpec("ONE").setIndicator("ONE")
          .setContent(new Intent(this,OneActivity.class)));
    mHost.addTab(mHost.newTabSpec("TWO").setIndicator("TWO")
        .setContent(new Intent(this,TwoActivity.class)));
    mHost.addTab(mHost.newTabSpec("THREE").setIndicator("THREE")
        .setContent(new Intent(this,ThreeActivity.class)));
    mHost.addTab(mHost.newTabSpec("FOUR").setIndicator("FOUR")
        .setContent(new Intent(this,FourActivity.class)));
    mHost.addTab(mHost.newTabSpec("FIVE").setIndicator("FIVE")
        .setContent(new Intent(this,FiveActivity.class)));

    radioderGroup = (RadioGroup) findViewById(R.id.main_radio);
    radioderGroup.setOnCheckedChangeListener(this);
  }
  @Override
  public void onCheckedChanged(RadioGroup group, int checkedId) {
    switch(checkedId){
    case R.id.radio_button0:
      mHost.setCurrentTabByTag("ONE");
      break;
    case R.id.radio_button1:
      mHost.setCurrentTabByTag("TWO");
      break;
    case R.id.radio_button2:
      mHost.setCurrentTabByTag("THREE");
      break;
    case R.id.radio_button3:
      mHost.setCurrentTabByTag("FOUR");
      break;
    case R.id.radio_button4:
      mHost.setCurrentTabByTag("FIVE");
      break;
    }
  }
}
以上就是本文的全部內容,希望對大家的學習有所幫助,也希望大家多多支持本站。
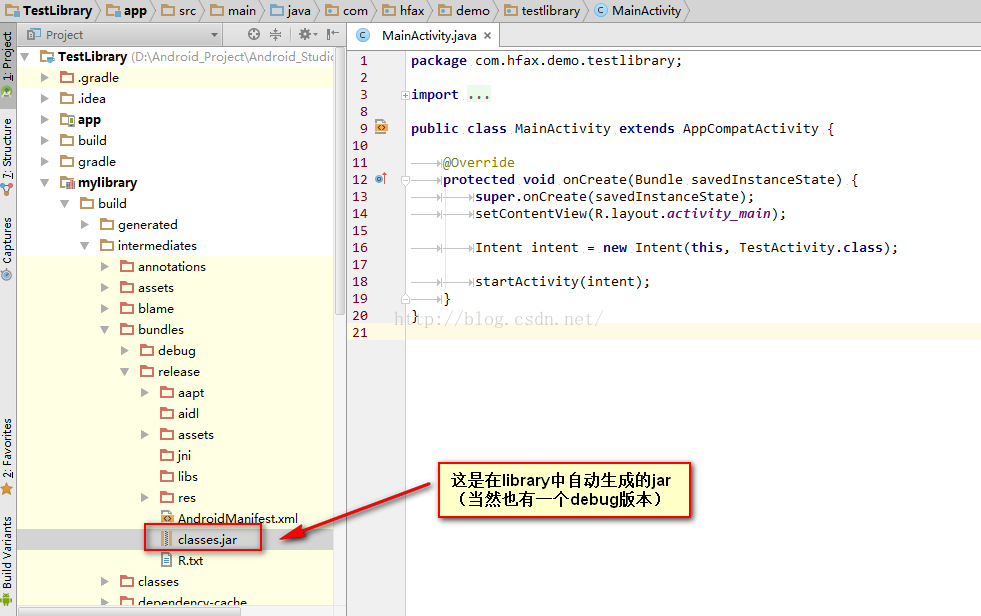 Android Studio生成自定義jar包
眾所周知android studio會在library所依賴的app運行或者build之後自動生成jar,路徑為build/intermediates/bundles/d
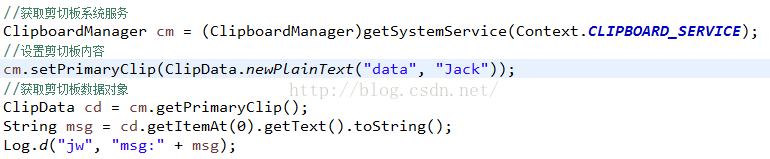 Android系統篇之----免root實現Hook系統服務攔截方法
技術概念來源:[ 360開源插件框架,項目地址:https://github.com/DroidPluginTeam/DroidPlugin]一、Binder機制回顧在之
 安卓動態調試七種武器之長生劍 - Smali Instrumentation
0x00 序隨著移動安全越來越火,各種調試工具也都層出不窮,但因為環境和需求的不同,並沒有工具是萬能的。另外工具是死的,人是活的,如果能搞懂工具的原理再結合上自身的經驗,
 ActionBar 樣式詳解 -- 樣式 主題 簡介
1. 樣式資源解析(1) 樣式簡介樣式解析: 樣式是設置給 View 組件的多個屬性的集合;--樣式的好處: 給一個 TextView 設置 文字大小, 顏色, 對齊方式